It seems like just yesterday it was July and we were at Microsoft Inspire talking to partners about Microsoft Secure Score. Like years past they had a ton of ideas to share but one request was nearly universal between them. That request was the ability for security administrators to more easily assign secure score related Improvement Actions to co-workers for investigation, implementation, and remediation.
This is a scenario that partners and customers alike have asked about for some time, and so we’re excited to announce the general availability of Microsoft Secure Score integration with ServiceNow, Microsoft Teams and Microsoft Planner. With it, security administrators can create ticket, tasks, and send messages directly from the Microsoft Secure Score experience.
Introducing the new Share experience
With Microsoft Secure Score it’s all improving your security posture by implementing recommendations and best practices that we call Improvement Actions (e.g.: Do not allow the use of email forwarding rules to external domains). The more Improvement Actions an organization implements the better their score and the more resistant they’ll be to attacks.
In the previous version of the Microsoft Secure Score experience, as administrators identified interesting Improvement Actions they would need to switch to another application if they wanted to create a ticket and assign it for follow-up. Now with ServiceNow, Microsoft Planner and Microsoft Teams integration into Microsoft Secure Score this experience has been streamlined and automated.
“From the very beginning, ServiceNow’s Now Platform was built to help digitize workflows and make work, work better for people,” said Matt Schvimmer, Vice President and General Manager of IT Service Management (ITSM) at ServiceNow. “The integration of ServiceNow’s ITSM capabilities with Microsoft Secure Score helps customers address one of the biggest challenges they face, which is maintaining and maximizing their security posture.”
To take advantage of the new functionality you will use the new Share button which has been added to the upper right hand side of the Improvement Action’s details page.
When the administrator selects the Share button, they will be given several options which include Copy Link, Email, Microsoft Team, Microsoft Planner and Service Now.
The Service Now option is the first example of the Microsoft 365 security center integrating with a 3rd party product and it makes creating tickets in ServiceNow super easy. Most of the fields will automatically be completed for you and you can edit fields, like priority and due date, before submitting the ticket.
Of course, once a Microsoft Secure Score related Service Now ticket has been created security administrators will want to be able to track their status directly from Microsoft 365 security center. To address this, need we’ve added a Card that will enable you view a Microsoft Secure Score scoped listed of ServiceNow tickets.
Creating tasks in Microsoft Planner and sending messages to a team in Microsoft Teams is just as easy. To create a task in Microsoft Planner just select the Microsoft Planner option from the Share menu, update any fields as necessary, and then select the Create Planner Task button to create it.
To post a message to a Team in Microsoft Team’s use the same type of process after selecting the Microsoft Team option from the Share menu.
In addition to the options just mentioned we also added a Copy Link option that administrators can use to copy a link to an Improvement Action’s details page directly into the clipboard. From here it can be pasted in documents and other resources.
Finally, there is the Email option which enables administrators to automate the process of adding a link to a specific Improvement Action to a draft email.
How to Integrate Microsoft Planner and Microsoft Teams with Microsoft Secure Score
One of the beauties of using cloud-based Microsoft products is a lot of auto-magic can happen in the background to get them integrated talking to each other. In the case of Microsoft Planner and Microsoft Teams there is nothing for you to setup.
How to Integrate ServiceNow with Microsoft Secure Score
For ServiceNow there is a series of steps that must be completed before Microsoft 365 Security Center and ServiceNow can communicate with one another.
The first thing you need to do is install the Security and Compliance Connector for Microsoft 365 from the ServiceNow Store. You can find it by searching for “365”. From here choose the Install button to enable the connector within your ServiceNow instance.
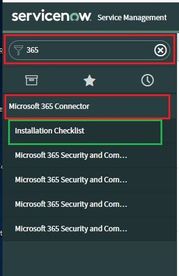
Once installed, the connector must be configured so that it can communicate with Microsoft 365 services. To locate the configuration experience for the connector type “365” in ServiceNow’s Filter navigator which can be found on the left-hand side of its navigation experience. From here select Microsoft 365 Connector and then the Installation Checklist option in the navigation.
Once the Installation Checklist option has been selected you will be asked to complete a series of steps. The first step is to Create an OAuth Endpoint. To complete this step, you will need to copy the redirect URL’s from the ServiceNow user experience into your clipboard. See the image below for an example of the text you’ll need to copy into your clipboard. Next select the Create OAuth Endpoint button.
Next you will complete the OAuth Endpoint form to define the connection information to your Microsoft 365 services. The Name, Client ID, Client Secret fields will automatically be completed for you. To simplify things for the future change the Name field to “Microsoft 365 Connector”. Next paste in the redirect URLs you copied into the clipboard in the previous step into the Redirect URL field.
Next choose the Submit button complete the OAuth Endpoint form and Step 1 of the process. Once it’s been successfully submitted the Microsoft 365 Installation checklist will indicate its complete as shown in the image below.
For Step 2 you will create a user account in Service Now called an ‘Integration user’. This is the account that Microsoft 365 Security center will use to connect to your ServiceNow instance. Please note this account is created with the minimum set of privileges necessary for Microsoft 365 security center to create and manage the tickets it adds to ServiceNow. Input a username and appropriate password in the Username and Password fields. This will be used shortly in one of the subsequent steps.
Next choose the Create user button complete Step 2. Once the account has been successfully created the Microsoft 365 Installation checklist will indicate so as shown in the image below.
For Step 3 you will need to authorized Microsoft 365 Security center to connect to ServiceNow using the Microsoft 365 Security and Compliance Connector.
To do this type “OAuth” in Service Now’s filter navigator on the left-hand navigation. Next click the Application Registry option from menu. From here select the name of OAuth Endpoint that you created in Step 1 to open its details page. Unless you failed to change its name as instructed in one of the previous steps the name should be “Microsoft 365 Connector”.
From the details page take note of the Client-ID and Client-Secret text as you will need this information in subsequent steps to configure Microsoft 365 security center to communitate with ServiceNow.
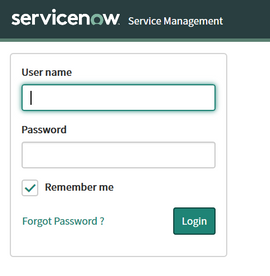
Next log out of ServiceNow and log back in with the Integration User account created during Step 2 to ensure its accessible.
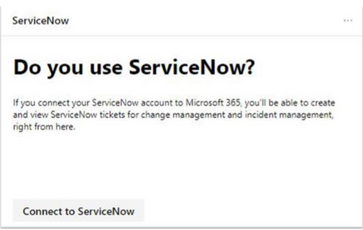
Now that the ServiceNow side of things is configured and it’s time to set things up things on the Microsoft 365 security center side of the house. Logon to the Microsoft 365 security center and scroll down the page until you see the ServiceNow card. Next select the Connect to ServiceNow button.
Once on the Provisioning ServiceNow page you will find that you have already completed Steps 1-3 so you can skip down to Step 4. All you need to do at this point is input the values for Client ID and Client Secret that we asked you to take note of during Step 3. From here enter the URL for your ServiceNow tenant into the Instance Name field. Next select Authorize to allow Microsoft 365 Security center to connect to your ServiceNow instance.
Once authorization is complete you will be prompted to login to ServiceNow. Please user your integrated user login and password here.
Once completed you be brought to a ServiceNow screen where you will click Allow.
Once Allow has been selected you will be brought to a Permissions requested page to accept permissions.
Once you Accept, the permissions request you will be brought back to the Provisioning ServiceNow page where you will have the option of mapping Microsoft 365 Security center ticket states to those from ServiceNow. For instance, for the Select which states represent completed change requests
option select the options that makes the most sense for your organziation. Do the same for the Select which states represent completed incidents option.
Once done select the Save button and you’ll be ready to start creating Microsoft Secure Score related tickets directly in ServiceNow.
Wrapping it up
So, there you have it – a quick introduction of our new Microsoft Secure Score integration with ServiceNow, Microsoft Planner and Microsoft Teams along with the step by step instructions you’ll need to get everything operational within your environment.
We encourage you to start taking advantage of this new functionality at the earliest opportunity and we look forward hearing your feedback. More information on Microsoft Secure Score and ServiceNow integration can be found at Microsoft Docs and Managing tickets through ServiceNow respectively.


