We are thrilled to announce that authors will now have the option to remove the title area, which is no longer mandatory at the top of a page. This title area is being rebranded as a Banner web part with new layouts, allowing you to add one or more banners to any column of a page, including a full-width section.
Now, with this flexibility, you can choose to have no banners, one banner, or multiple banners on a SharePoint page. If you decide to remove the title area, you can choose a Banner to restore the title.
New Banner Layouts:
We’ve added two new layouts for Banner: Author and Fade. It works in each type of section, including Full-width section, One column, Two columns, Three columns, and One-third.
New layouts:
Banner in Full-width Section and Three column section:
Title on the command bar
The first banner at the top of the page (in a full-width section) is considered as the title (H1), which automatically synchronizes to the page Title on the command bar at the top of the screen. Additional banners will function as headings in the page. The page Title on the command bar is visible in edit mode only.
Note: You must enter a page title in the first banner or on the command bar before you can Save and close or Publish the page.
Features and capabilities mentioned in this blog post, are demonstrated in the following video with Tina Chen (Microsoft) and Vesa Juvonen (Microsoft).
WCAG 2.1 Compliance:
How do you meet WCAG 2.1 criteria without a visible H1 title? If you opt not to have a title on the page, a hidden H1 element in HTML will ensure accessibility, with the H1 content derived from the page title on the command bar.
The title area in existing SharePoint page templates has been updated, meaning when you create a new page from a SharePoint page template, you will see a Banner at the top. In some situations, the old title area will not rename automatically, but you can still select new layout options from the toolbox:
When you edit an existing page with a title created before this rollout, you can remove or keep the Title Area.
When you make a copy of an existing page with a title created before this rollout, you can remove or keep the Title Area in the copied page.
When you create a new page using a custom template with a Title Area, you can remove or keep the Title Area in the new page.
General Availability (Worldwide, GCC, GCC High and DoD): We began rolling out in early July 2024 and rollout was completed by the end of August 2024. This message is associated with Microsoft 365 Roadmap ID 386904.
How will this affect your organization?
With this update, SharePoint Page and News authors can set section background color or image, making it an appealing experience.
What do you need to prepare?
This rollout will happen automatically by the specified dates with no admin action required before the rollout. You may want to notify your users about this change and update any relevant documentation as appropriate.
How does it look in emails?
The pre-rollout title areas and Banners will be supported in email. When users send a Page or News as email, the layout will change slightly: the banner image will appear above the banner text.
What is next?
The new Banner is available in Design Ideas Private Preview.
Enhanced page templates experiences with new capabilities like Banner new layouts, Section Background and more.
Thanks for reading. Please enjoy making beautiful pages and let us know any feedback or questions in the comments.
In an earlier blog, we showed you how the Microsoft Customer and Partner Solutions (MCAPS) organization is optimizing internal processes using Copilot for automation and process mining in Microsoft Power Automate. In this blog, we explore how another Microsoft division is using the same tools to get similar results.
Streamlining security access requests
Microsoft Customer Experience & Success (CE&S) is one of the largest customer support teams in the world. With over 17,000 employees worldwide, CE&S is responsible for shaping the strategy, design, and implementation of Microsoft’s end-to-end customer experience.
For one of their projects, CE&S focused on their Just in Time (JIT) security process used to grant access to resources. “Leveraging the process mining capabilities in Power Automate, we wanted to explore ways to improve our responsiveness – without compromising on security,” says Kirk McNesby, Senior Business Process Manager at Microsoft.
In just one week, CE&S successfully deployed process mining and began gathering insights. “With process mining in Power Automate, we were able to easily input data and immediately jump behind the wheel to do meaningful exploration,” says Kirk. “We had no prior knowledge or training. We were ingesting data and learning how to use the tool – all at the same time.”
To begin using process mining, over 14GB of event log data (consisting of SR events and JIT security logs) was loaded into the tool. The team was particularly impressed with the easy-to-use interface. “We liked the out of the box presentations. Variances were presented in a clear, visual format and filtering worked really well with our data,” says Kirk.
The team used the filtering capabilities within process mining to quickly segment access requests by type and looked for patterns that would contribute to optimization. This strategy revealed bottlenecks in a specific access request for users acting as backup support on cases when the main support engineer was unavailable.
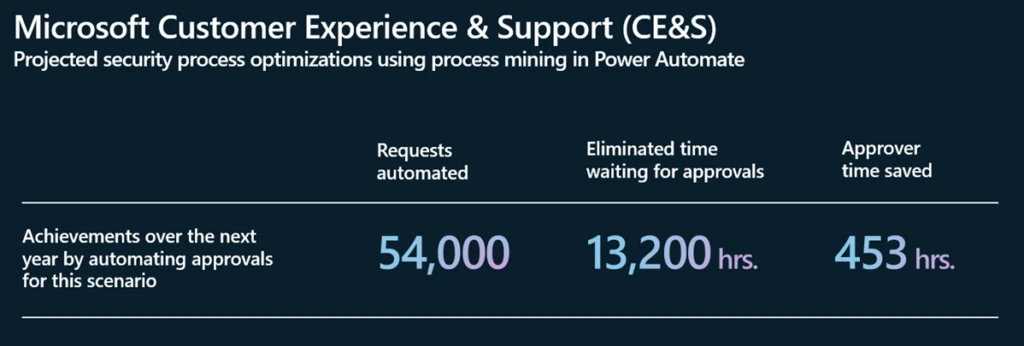
By automating approvals for this scenario, the team estimated that they could automate up to 54,000 approval requests per year, saving users 13,200 hours of wait time. As Kirk adds, “The process mining capabilities in Power Automate were critical to achieving insights this quickly.”
We are excited to introduce new SharePoint design ideas feature with AI powered suggestions for improving the structure of your SharePoint content. With this feature, authors can now use Design Ideas in Microsoft SharePoint to rearrange and reformat their image section, text section, and banner webpart.
Design ideas identify the text and webpart content of the section you are currently authoring, and suggesting new layouts, backgrounds, text formatting, and image webparts to enhance your section. The author then clicks on the suggestions to try and apply different ideas.
When you click into a new section with one blank text webpart, Design ideas will offer you formatting options you can add to get started.
Once your section has additional content, Design ideas will then summarize your text to provide appropriate image webpart and background suggestions, along with basic text formatting.
When you first start an editing session, a red dot will appear in the design ideas content pane pivot to let you know it has ideas available. Click on this pivot to open the design ideas panel.
Upon this first release, Design Ideas will only be available for the following sections containing:
1 Banner webpart
1, 2, and 3 text webparts
1, 2 and 3 text and image webparts
1 blank text webpart
Features and capabilities mentioned in this blog post, are demonstrated in the following video with Sara Cummings (Microsoft) and Vesa Juvonen (Microsoft).
Frequently asked questions
When will this happen?
The feature starts rolling out to customers in August 2024 and will be available gradually worldwide by end of September.
Kick off your journey with SharePoint Embedded. At the SharePoint Embedded for Enterprise Apps events, you’ll explore best practices for your projects, glimpse the future of SharePoint Embedded, and learn to integrate Copilot into document-centric apps. We’re eager for your feedback and experiences; your creations shape ours.
The SharePoint Embedded product team is coming to New York Cityand London in September! Come join us for an all-day event to learn how SharePoint Embedded can deliver Copilot, Collaboration, Compliance, and Core Enterprise Storage for your document centric apps. Specifically, you’ll have the opportunity to do the following:
Learn about SharePoint Embedded, a new way to build file and document centric apps.
Get hands-on coding experience with this new technology and learn how to build your own custom app.
Take a deep dive into critical features, like compliance, collaboration and copilot.
Hear from others who have implemented SharePoint Embedded solutions.
Get insight into the SharePoint Embedded roadmap
New York City, US Date: Thursday, September 12th, 9AM-7PM (times are approximate, including social hour) Where: Microsoft Offices NYC Times Square London, UK Date:Thursday, September 26th, 9AM-7PM (times are approximate, including social hour) Where: Central London, UK (Exact location TBD) RSVP Details (Please note that this event is only open to certain countries and the following will not be accepted: Russia, Belarus)
21+, free event, no registration fees
First come, first served (limited seats)
1 RSVP = 1 person
NDA required (if your company does not have an NDA on record, one will be sent)
NDA must be signed to attend event
Event will be IN PERSON ONLY and will not be recorded
Bring your own device for coding portions (tablets and smartphones will not work)
We are excited to share that we are releasing the new content pane in SharePoint pages and news. This feature serves as a convenient hub for various panes that support authors in crafting their publications. This centralized space now features a user-friendly toolbox that enables authors to easily explore and insert content for creating dynamic and captivating pages. Additionally, the content pane incorporates other useful panes like configuration tools and design ideas.
Within Viva Amplify, the content pane hosts more tools such as the distribution channel selection, writing guidance, and audience selection.
Crafting your pages with the content pane
After entering edit mode, you will notice new icons on the right side of the canvas that serve as the navigation for the content pane. The first icon opens a new toolbox, where you can quickly find web parts, images, and section templates.
Tip: You can click-and-drag web parts and images from the toolbox directly onto the canvas!
You can find more items for any of the toolbox categories by selecting See more/all… on the toolbox.
The second icon in the content pane navigation is a new entry point for the properties pane of web parts and sections.
Tip: You’ll notice an updated design of the “Edit properties” button on webpart toolbars. Clicking this button will also open the properties pane for the selected item.
With the introduction of the content pane, we have also redesigned the section tools. To add a section, select the plus button located on the section borders and select which type of section you want to add. All section tools (move, edit, duplicate, and delete) are now in the section toolbar at the top left of a selected section.