
February 2023 update of Power Automate for desktop
Power Automate for desktop comes with new additions in 2023 February’s release, including the introduction of regions in the designer and the ability to provide valid connections for SharePoint actions upon runtime.
Announcing the release of SharePoint Workflow Manager for SharePoint Server
Last year Microsoft shared plans for several new investments in our SharePoint Server ecosystem. One of those investments is our long-term support for the SharePoint 2013 Workflows platform for SharePoint Server. SharePoint 2013 Workflows are a key scenario for SharePoint Server customers as they power many critical business processes and can operate in purely on-premises deployments.
Today, Microsoft is pleased to announce the release of SharePoint Workflow Manager, a new workflow engine to power the SharePoint 2013 Workflows platform for SharePoint Server and replace Service Bus and Microsoft Workflow Manager. SharePoint Workflow Manager is compatible with SharePoint Server 2013, 2016, 2019, and Subscription Edition. We recommend that all SharePoint Server customers using SharePoint 2013 Workflows upgrade to SharePoint Workflow Manager as soon as they’re able to. Microsoft will focus all future investments and maintenance on SharePoint Workflow Manager rather than Microsoft Workflow Manager, including providing support beyond the year 2026.
Microsoft will continue to provide technical support for existing deployments of Service Bus and Microsoft Workflow Manager until the version of SharePoint Server they’re being used with reaches end of support, or until July 14, 2026, whichever comes first. However, the Service Bus and Microsoft Workflow Manager installers are no longer available from the Microsoft Web Platform Installer (WebPI). Customers who need new SharePoint 2013 workflow engine installations can only install SharePoint Workflow Manager.
This announcement is another example of Microsoft standing behind our SharePoint Server customers as we continue to meet their strategic needs. We look forward to sharing more examples soon with the upcoming release of SharePoint Server Subscription Edition Version 23H1, the next feature update for SharePoint Server Subscription Edition. Stay tuned!

Building beautiful sites with purpose: Part 2
Building beautiful sites with purpose: Part 2
In this Part 2 of our “Building Beautiful sites with purpose” series we are going to focus on the practical build out of the Bonnie’s Community Garden site in both communication site and team site formats. We will cover our remaining 3 sections of focused content:
4. Images and Content
5. Layouts and web parts
6. The Extras
4. Images and content
As you are building out your site one of the ways that you can add visual interest to your site is through your choice of images. You have multiple options when it comes to picking images for your site including stock photography if allowed through your organization.
TIP: All images should have alternate or decorative text applied to them to make your images and sites fully accessible. Do your best to describe the important parts of your images with text.
When you are building your site, you should try to pick images with a similar theme and color scheme to create consistency in the site. This can include using the same colors, images of objects, images of people, there are so many ways to pick images that are consistent. If you look at the samples below you will notice that each pairing of 3 images have similarities between them. This type of consistency makes your site look more cohesive.


General tips for working with images:
- Diversity of people in images – ideally images depicting people are diverse and have a full range of people from different races, geographies, demographics, and genders represented.
- Theme of images – creating consistency in your template by picking a theme, i.e., using abstract images or using images from a retail store; it can help to tie together your scenario to have consistent visual representation.
- Consistent color – choosing images that have consistent colors throughout the site will make it not only more visually appealing but provide another way to unify your scenario.
Things to avoid in images:
- Images with text – translation of content into different languages is important for a fully accessible scenario.
- Culture or regional references – Images that have specific cultural or geography references that your scenario does not account for most often do not translate universally.
One easy way to achieve consistency in your site images is to make use of your Organization Assets for your content owners. The Organization assets library is available for most environments and enables an organization to curate their logo, image, and template assets into a site and libraries to provide them in a uniform way to content creators.
TIP: Create more than one Organization Asset Library to add more than one entry point from the Your organization tab in the image picker.
When you create your Organization Assets Library, you are able to utilize this like most SharePoint document libraries. The structure that you setup of folders and containers for your Organization assets appears as the containers in the Your organization section of the image picker. It is always best to split your content up into different folders to provide more context for the usage of the images for your content creators.


TIP: Give your image files descriptive names to provide more details about content and usage

Learn more about creating and configuring your organization assets libraries here: Create an organization assets library – SharePoint in Microsoft 365 | Microsoft Learn
When it comes to content beyond images, variety is needed as much as possible. This means trying to mix up blocks of text with images, links, lists, and different ways to communicate your message. Most users get tired if you only present them with a long block of text to read. There are so many ways to convey your messages without using text alone.
There are many different web part options to use for including your content in your site, it is important to think about what you are trying to convey and the best method for how to do this.
Some tips for building out content:
- Do correct spelling and grammar.
- Update the site on a regular timeline – stale content isn’t good for anyone.
General guidance about display text for links:
- Never use Click here and avoid mid-sentence links.
- Link text should be short and describe the destination or match the title of the page the user is navigating to. Example: Manage guest users
- Don’t say just Learn more on the page. Say Learn more about [topic]. Example: Learn more about RBAC roles
5. Layout and Web Parts
This is where we start to have fun digging into the layout of our sites. There are a few core differences between a communication and team site that will require us to make different choices to make our sites look beautiful.
First let’s dig into the communication site version of Bonnie’s Community Garden. In this site option, we can utilize the Full-width sections and web parts. This allowed us to go with a more natural feeling flow for our site’s overall layout.
Most of our layout and content choices for our site occur at the Page level. This is where we introduce variety into our content and structure out layout.
Your pages are made up of different sections. These sections allow you to add structure to your site. We have provided a set of section templates that are available for you to use when creating your pages and news content. These section templates give you a quick start to creating content using sections, but you can create your own section designs as well using the different section layouts.

Now let’s look at the comparison of the layout and web parts between the two sites designed for Bonnie’s Community Garden.

First, we will examine the communication site for Bonnie’s Community Garden.
As we move past the tenant and site level decisions, we start to dig into the page content and decisions that made the site shine.
For the homepage of the communication site, we started out with a full-width section that utilized an image web part to display a high impact garden image with our prominent headline for our homepage included on the image. This full-width image provides the visual impact we wanted at the top of the site below our site header, providing the right introduction to our site.
Below this we utilized a single column section with the primary theme color as the section background to provide an easy transition from the full color image to the content on our page. We added a quick links web part to this section and utilized the button layout with icons to provide additional page/content navigation.
As you will see in the diagram of the screenshot, the content is continued down the page using different section layouts and web parts to convey the messaging we wanted for the home page of the site.

As we dig into the team site version of Bonnie’s Community Garden, we see that there are immediately some differences in the design.
For this design, we utilized the vertical column in the primary theme color of purple to provide some visual interest on the site. Team sites do not allow full-width sections and web parts. The vertical column helps to provide visual interest and a pop of color on the site.
With this layout option, we decided to have the vertical content bar move to the bottom of the page when rendered in a small viewpoint. The content that we chose for this vertical column was not as important as the page content.
With this layout, you can see we utilized many of the same web parts and layouts of sections as we did in the communication site, however, we did change up the visual layout with different section background colors and added an additional image for visual interest.
6. The Extras
Now for the fun pieces. As you looked in detail at both of the sites created, you might have noticed that some of these had some extra pieces in them that made the site stand out a bit more and are not available directly out of the box.
With these items they do require a little bit of a designer hand to create and make ready for use in your sites, however the impact of these when used in the right places can be large. For this I am referring to the custom shapes that we added on the communication site and the image filled text on the team site. All 3 of these elements are fairly easy to create using any standard design software and can be used to provide an extra pop of sizzle to your sites.
Let’s talk about the shapes and custom dividers first. In our communication site we are able to utilize these customizations to provide changes to the sections on our pages so that they don’t all appear square all the time. In this site, we utilized two different divider shapes to break up the monotony of the site.
In the first we used a vector image to create a line of flowers growing that would sit on top of our section nicely. And for the second we used a solid color shape to change the bottom of the section to not appear as a square/rectangle.


So, how do you create these and use them? It is fairly simple to create these using the appropriate tool. Whether you are using Figma, Illustrator, Microsoft Designer, or any other tool to create these shapes there are a few important things to note. #1, the background of your shape should be transparent. This is the most important rule of creating custom divider shapes.
Followed closely by #2, the connection between your shape and the section should be thought through and planned. With this connection, you need to make sure that the color bleeds completely off the divider image on the side you want to connect to your section. We utilized 2 different methods for the two divider shapes shown in our sample. For the Flower divider we wanted the flowers to look like they were growing out of the top of the section, so the green color is consistent and attaches the divider to the section. For our colored shape divider, we made sure to utilize the same hexadecimal color as our theme primary color to ensure a seamless flow from one shape to the next.
Adding these onto your page is done by utilizing a full-width section with the image web part immediately above or below your section you want to transform. This allows you to add your custom divider image above or below your section and customize the section to use whatever layout and content you desire.
On our team site, since full-width sections aren’t allowed, we utilized an image with a colored background that used text filled with an image/picture to provide some additional visual impact.

With this image we chose to use a related color to our sites images to allow the picture in the text to “pop” and have the right high contrast from the background. This allowed us to insert multiple colors into the site and provide interest in a different way than the custom divider shapes.
There are so many options for ways that you can customize your sites with images and designs, let your imagination run wild and create something beautiful.
Hopefully this blog series gave you a little inspiration for how you can take the same design and customize a site and make it beautiful. Building, sites, pages, and news is a fun exercise, and we provide so many options for you to customize the way your content is delivered to your users. My best advice is always to have fun and don’t feel constrained. There are ways to do what you want (the SharePoint way) you just have to get creative to find them.
TIP: Stay tuned for more enhancements to our current page authoring experiences that will give you even more inspiration than this blog!
Links to view site details larger:
Communication site details
9 New Independent Publisher Connectors in January 2023
We are excited to announce that we have 9 new Independent Publisher connectors that were published in January 2023. Read about the connectors, learn about the talented publishers, and take a look at the connector files!

Building beautiful sites with purpose: Part 1
For many people getting started with your pages and sites is the hard part. Not knowing exactly what you want to build or how you want your site or page to look. In this blog we will utilize the Bonnie’s Community Garden volunteer site as our basis to take a deep dive into how you can build out a beautiful site using the tools available to you in today’s Modern SharePoint Online sites.
Let’s examine the scenario that we want to use our site to highlight:
“At Relecloud we believe in giving back to our community and this quarter we want to highlight the new Giving opportunity in Bonnie’s Community Garden. We will utilize a new site that will link off our existing Give site to highlight the organization, share details about the opportunities available for our employees and their families to participate in, get engaged and sign up to participate, and even participate in conversations about this garden.”
In this blog we will build out both a Communication site and a Team site to highlight 2 different ways that you can build a beautiful site using modern SharePoint and to learn more tips and tricks for making these sites in your organization.
One of the best ways to get started with any site is to start from a site template. Once you have selected your site type, there are a wide variety of different scenario-based site templates that you can start from. With each site template, you can discover different designs, layouts, themes, contents, and scenarios that will help you get started building your site. When you are picking a template, it is important to note that you can utilize a template that is not your scenario but utilizes a design that you want to replicate or start from. This kind of a head start is a valuable way to begin your site as well. All the contents of a site template are completely editable and available for customization or deletion if desired or not needed.
In building our site, we will go through 6 different areas to evaluate what choices we made and how this impacted our site and what we were able to customize in these areas.
- Site type and template
- Themes and colors
- Site Headers and pages
- Images and content
- Layout and web parts
- The extras
Bonnie’s Community Garden – Communication site
| Bonnie’s Community Garden – Team site
|


1. Site Type and Template
Getting started creating your site begins with several choices. These choices can feel very daunting without understanding the impact of the choices. As you decide between Communication site and Team site the best news is that you can build beautiful sites with either.
Let’s look at the two site types and what the differences are.
Communication sites are the foundation of our company portals. These sites are best used to broadly share information across an organization. Communication sites can become a home site for your organization and are often utilized for Viva Connections.
Team sites are the foundation of our corporate collaboration. These sites are best used to collaborate and share information within groups of people within an organization. These sites are typically connected to a M365 group when utilizing the modern framework of SharePoint. Team sites can also be associated to Microsoft Teams and Yammer communities.
TIP: You cannot change between site types after creation.
A few things to note when making the choice between site types for design purposes:
| Communication site | Team site |
Full width sections Horizontal navigation only | Centered content Navigation orientation choice (vertical or horizontal) |
Site templates are a great resource to get started quickly for creating your sites. When you are first creating your site you often don’t know how you want your site to look, but you might know the scenario that you want your site to fit. Or the opposite might be true, you might know more about how you want your site to look and know less about your content. Both of these are valid options that using a site template can help you get started quickly.


We took design inspiration from the color scheme with the site theme and the layout of the Learning Central site template to inspire our Bonnie’s Community Garden site, despite the content and scenario being completely different. By starting from a site template, we were able to replace the template content with our own content and get a head start on designing our site with inspiration.
2. Themes and Colors
When working on your site, one of the most impactful things you can customize is the color. The site theme has a very visual and distinct impact on your site.
SharePoint provides a set of themes that can be utilized on your sites that are based on Microsoft product color schemes. These themes offer a variety of options that will allow you to change the color of your site based on what your desired look is. You can also create your own custom themes to put your own colors into your SharePoint sites.

Working with themes it is important to keep in mind that accessibility is a necessity when you are designing your theme. You need to make smart choices to make sure that your colors have the correct contrast ratio. The SharePoint themes are evaluated and updated as needed to conform to accessibility standards.
When creating your own theme, there are many approaches you can take. The simplest approach is to customize one of the out of the box themes using Change the Look. This option gives you minimal options to change the main and accent colors using a set of provided color options.
If you are looking to create your own site theme, we always suggest you start by using the Fluent UI theme designer provided by Microsoft which you can find at: Aka.ms/themedesigner . This easy-to-use tool allows you to select your primary theme color, text color, and background color and will automatically generate everything needed for the theme file. The tool allows you to preview your theme on different controls and to confirm that it meets the proper accessibility contrast ratios. Once you have completed creation of your theme, you can utilize the Export theme button to save out your theme file to apply it to your tenant or site.


Using the Export option in the Theme Designer you will either utilize the JSON or PowerShell tabs to export your theme. Site themes have two primary options for application. The first and most common option is to install the theme as a tenant theme using PowerShell. This method allows the site theme to be available to all sites created within your organization under the Company themes heading in Change the Look. This option does require administrator privileges to perform the installation.
TIP: Install your theme using PowerShell and the PowerShell export of your site theme. Additional customization of your theme may be done prior to installation. Make sure you name your site theme appropriately; this name will be displayed in the Change the Look panel.
TIP: Adding an accent color will add an additional color to your theme in the Change the Look panel and in some limited display properties in the site.
For our Bonnie’s Community Garden site, I utilized one of the SharePoint themes (purple) to theme our site.

In many cases you do not find a theme you want to use for your site from your company themes or from the SharePoint site themes installed into your tenant. These sites might call for a one-off site theme for a special purpose or event. There are options for this type of theme, but they should be used sparingly and only in accordance with your organization’s rules and policies.
This second option for installing a site theme is to install one directly on a SharePoint site. This limits the usage of this theme to a single site. It also means that if you use Change the Look, the theme will not be listed as a company theme and if the theme is changed, you will need to reapply it. This theme is stored locally for use on the site it is applied to only, but not stored as a long-term theme. To utilize this method of side loading a site theme onto a single site, you will utilize our REST API method and the JSON code from your theme export.

In the sample site above using a side-loaded theme, you will notice that the theme name does not appear on the change the look panel and the theme is not available. If you change the theme from the panel, you will lose access to the installed theme from this method. This method should be used in a limited manner in your organization.
TIP: Install the theme from Site Contents to apply it to your site and make sure you rename the theme in your code.
Sample of a side loaded site theme. The theme only appears as the current selection in your site, it is not listed as an option to select. If you pick another theme in Change the look, this side loaded theme disappears.
TIP: Keep a copy of your full code to side load a theme in case it gets overwritten by another site owner accidentally, making it easy for you to reapply the theme.
3. Site Header and pages
Now that you picked the colors for your site, you can focus on building the site and the content within it. One of the first areas that you can utilize that will have an impact on your site is the site header. You have 4 different layout options to choose from in your header and each has its separate advantages.

In our Bonnie’s Community Garden sites, we decided to select the extended site header which allows us to select a background image and a larger site logo to customize the top of our site. By utilizing this site header layout, we are also able to introduce an additional color into the mix for our site by creating a custom image for the background of our site header space.
The extended site header layout option gives site owners/designers a unique opportunity to introduce a visual element that is a graphic or colorful way to introduce your site/brand to your users. Our Designing sites with beautiful headers blog gives you more details about what you should do in your site header. This does require a bit more of a design skillset than other site design components to create the custom site header background image.
For the Bonnie’s Garden site, we took advantage of the extended header to introduce a brand pattern in a unique color scheme that will not be utilized by the site theme creating a neutral background for our site logo and a pop of color at the top of the site. We can then use this color in our photographs and images throughout the site to introduce more consistency in our pages.

The extended site header layout option gives site owners/designers a unique opportunity to introduce a visual element that is a graphic or colorful way to introduce your site/brand to your users. Our Designing sites with beautiful headers blog gives you more details about what you should do in your site header.
For the Bonnie’s Garden site, we took advantage of the extended header to introduce a brand pattern in a unique color scheme that will not be utilized by the site theme creating a neutral background for our site logo and a pop of color at the top of the site. We can then use this color in our photographs and images throughout the site to introduce more consistency in our pages.
For our home page, we utilized the home page layout that does not have a page title region and allows our content to go directly to the top of the site under the site header. On additional pages and news, we have the option of using different page title layouts to create a break between the site header and the content on our pages/news posts to provide clear guidance for our users on their location in the site. This guidance is core to the user experience for understanding where a user is within your site.
Much like our site header we have multiple page title layouts to utilize to introduce our content to our users. It is important that the introduction of the page showcases the purpose of the page, and this is why the page title region is included on each page/news post you create.

Each of the different page title region layouts have a different impact on your content and page and allow you to influence the way that your users are introduced to your content. You can think about how you want to showcase your content right from the beginning with an image, title, additional headline (text above title), and details. You can be strategic with your use of the Text above title to group pages together and guide your users through an experience.
Giving back page – Communication siteImage and title layout
| Giving back page- Team siteHome page layout
|


TIP: If you want to use a page without the page title region you can copy your homepage and rename it to create a new page without the page title region.
Stay tuned for Part 2 of this series coming next week on February 14, 2023.
Create a list across Microsoft 365
When the ‘information tracking’ inspiration strikes, create, create, create – no matter where you are!
Since launching Microsoft Lists in May 2020 – revitalizing SharePoint lists value of many years – we’re pleased to have made much progress on numerous fronts: design, performance, capabilities, templates, integration, mobile, and more. And one major area of investment is the notion of creating a list from wherever you work.
“Give a person a list, and they track information for a day. Teach a person to create a list themselves, and they’ll track information for a lifetime.” – Modern Office Axiom
This article focuses on raising awareness of new and old entry points, to create a list when you need it in:
- Microsoft Lists itself
- Microsoft 365 app (Microsoft365.com, formerly Office.com)
- SharePoint app bar
- SharePoint itself (team sites, communication sites, hub sites, home sites)
- Microsoft Teams
- Microsoft Lists app for iOS and Android
- BONUS | A Microsoft 365 connected template
Let’s create a list right here – a ‘blog list’ of all the places within Microsoft 365 where you can create a list, or where one gets created for you. Start by reviewing the new, below demo video to see it all in action. Then, keep scrolling to learn more about each list creation entry point.
Do you feel a strike of listspiration coming? I do. Let’s do this!
One | Create a list using the Microsoft Lists app itself
The Microsoft 365 app launcher is where it’s at – figuratively and technically. Click the app launcher icon (the upper-left square of nine dots, often referred to as the hamburger). Once clicked, you’ll see all your Microsoft 365 apps – ready to launch – including the beautiful, multicolored Lists app (it looks like yellow, orange, red and purple stacked books (or rows :smiling_face_with_smiling_eyes:)). When you view the app launcher for the first time, you’ll see the core Office apps, as well as apps that your organization has added for you on top. If you don’t immediately see Lists, try searching for it right there within the app launcher user interface. Or click All Apps to see all apps ;). Once you see the Lists app, click it, and you’re halfway there. This is true within Microsoft 365 for work and school (AAD), and personal and home plans (MSA – Preview).
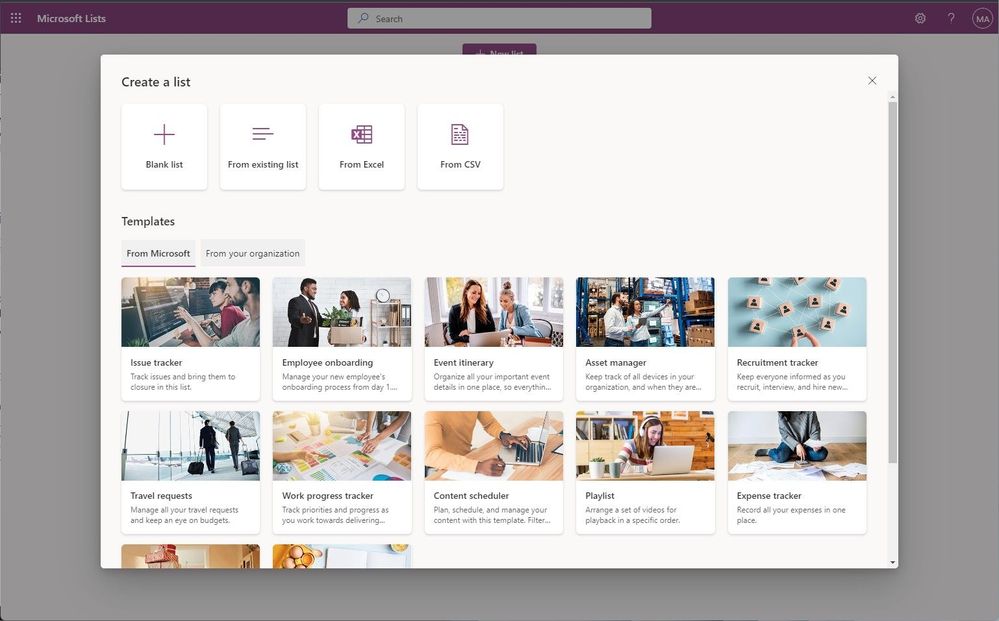
Clicking the Lists app icon brings you to the Lists app in Microsoft 365. And to start creating a new list, click the + New list button at the top. This brings up the common Create a list dialog front and center. It is here where you choose what type of list you want to create: a Blank list (one of my favorite list templates) or use the smarts and formatting of an existing list, import data from Excel or CSV, or use a ready-made or custom organizational template. The beauty is – you choose. Give it a name, choose an icon and color that best represents your list, and then select where to create the list – either in your own personal workspace: “My lists” or within one of your frequently used SharePoint team sites, often connected to a Microsoft Teams team.
That’s it. I’ll spend less time on the create experience for the other methods below – mainly because the create experience is the same. It’s where you start that’s different, with a few “by design” nuances along the way that I’ll highlight.
Learn more about creating a list from the Lists home experience.
Two | Create a list from the Microsoft 365 app (Microsoft365.com, formerly Office.com) – across commercial and consumer
For this one, let’s jump you right into the Create experience within the Microsoft 365 app – type Microsoft365.com/create into your browser; I’ll meet you there. And FYI, this is what is replacing Office.com (which still works) and is also being referred to as Microsoft 365 app going forward.
Once on Microsoft365.com, click the + Create button in the upper left side of the screen (for work and school (first graphic below – AAD) AND home and personal (second graphic below – MSA)). Here you’ll find the Create > List (alongside various other Microsoft 365 app templates) that takes you directly into the Lists app to create a list, right into the common create list experience.


The Microsoft 365 app evolves to show you your most recent, relevant work AND as a launching pad to create whatever you need to create next. Launch away!
Learn more about getting started at Microsoft365.com.
Three | Create a list from the SharePoint app bar
The SharePoint app bar makes important content and resources easier to find no matter where you are in SharePoint. You’ll find it on the left-hand side anywhere in modern sites (team sites, communication sites, hub sites, and home sites. Use it to get to your content, listed as: My sites, My news, My files, and My lists – all personalized and powered by Microsoft Graph. And below all these site and content pivots appears the new + Create experience – to create sites, files, and lists.

When you select List from the SharePoint app bar Create menu (as shown above), you’re taken to the create list experience within the Microsoft Lists user interface. From there, you step through the same list creation experience as highlighted above and choose the preferred SharePoint site you wish to store your new list.
Learn more about the SharePoint app bar.
Four | Create a list in SharePoint itself – within team sites, communication sites, hub sites, and home sites
This is where it all started for lists – listerally – as SharePoint lists (intentionally lower case ‘l’). And as we evolved lists into Microsoft Lists (note the capital “L”), we carried forward the value of SharePoint (including the lists themselves) and added loads of new capabilities in use in Lists today.
So, can you still create a new list in SharePoint? 100% yes! Does it utilize the modern, common list creation experience? Again, 100% yes! The main ‘FYI’ beneficial caveats: 1) We keep you in the SharePoint user interface where you were already working, and 2) We don’t ask you where you wish to store the list – it automatically gets created in the SharePoint site you are creating the new list from. To get started in SharePoint, find the + New drop-down menu and select List; you can also create a new list from the Site contents page – in the same way.

This is all true and possible for SharePoint team sites, communication sites, hub sites, and home sites – any site where you have member or owner access, you can create a list. And though you created the list from SharePoint, it will appear as a Recent lists section in the Microsoft Lists app home page; aka, a list of all your lists – no matter where you created them. :smiling_face_with_smiling_eyes: You can even favorite the list in SharePoint, and it’ll appear within the top favorites section of Microsoft Lists.
Learn more how to create a list in SharePoint. Note: this Support article denotes relevancy to SharePoint Server 2019, 2016 and Subscription Edition – and the user experience is the same when creating a list directly in SharePoint in Microsoft 365.
Five | Create a list in Microsoft Teams
The vision of the Lists app in Teams is to bring all the collaboration and communication modalities to lists and list items, so it is easy to get work done.
To get started, simply go to any channel where you would like to start tracking a list and hit the “+” Add a tab button to explore the tab gallery and select the Lists app. Once the tab is added you can either create a new list or bring in an existing list (from another team or an older SharePoint site, but not a personal list) into the channel as a new tab.

Once you have configured the tab and have a list with list items, you can start a conversation about individual list items, view your list in the Teams mobile app, or access the list from the Lists app in Microsoft 365. And similar to the ‘FYI’ beneficial caveats when creating a list in SharePoint, creating a list in Teams: 1) Keeps you in the Teams user interface, and 2) automatically creates the list in the connected SharePoint team site, appearing as a new tab in your Teams channel; it’s ready, by default, for your team owners and members to access and work together.
Learn more about creating lists in Teams.
Six | Create a list from the Microsoft Lists app for iOS and Android
The Lists mobile apps help you work with your lists on the go – on both iOS and Android. Beyond viewing and editing existing lists and list items, you can create new lists… while sipping coffee – create an Issue tracker list, or when in the passenger’s seat headed to a work event – create a blank list to capture all your new people contacts. No matter the out-and-about scenario, work and information management doesn’t have to stop when you’re on the go.

Creating a list from your mobile device is 100% “thumb ready.” From the home page of the Lists mobile app, click the “+” sign in the middle on the bottom. Choose Blank list or your preferred template. And from here it’s the same as if you’re using Lists app in Microsoft 365: give your list a name, description, icon, color, and then choose where you wish to create the list – in your personal space or in a team workspace. The Microsoft Lists mobile apps are not just companion apps. You’ll be surprised at all you can accomplish with a few finger and thumb taps.
Note: Microsoft Lists for iOS supports work and school accounts and is in preview for signing into the Lists – MSA Preview for home and personal use; coming soon to Android, too.
Get Microsoft Lists for iOS (iPhone and iPad support) and Android (phones and coming support for tablets). Learn more about getting started with the Microsoft Lists mobile apps.
BONUS | Create a list while using a Microsoft 365 connected template
We are combining the best of Microsoft Teams templates with SharePoint site templates – into the same flow of creation. When we create a new team using a default template – for example the “Manage a Project” template, the project management channels and apps, and the connected SharePoint template get applied automatically. And the SharePoint pages, lists, and Power Platform integrations that get created in the new, same SharePoint site. Once it finishes, you’ll see all pinned as tabs in Teams automatically. And best of all these pages and lists are fully editable right in Teams.

Microsoft 365 connected templates save you time and highlight the art of the possible as content and collaboration blend in the flow of your collaborative work management.
Learn more about getting started with Microsoft Teams team templates. You’ll see ~ 6-7 connected templates listed today, with more in planning.
In the end…
Creating a list is fast and simple, and our goal is to give you the list-maker keys when you need it, wherever you work. Varoom! And I’m certain we missed one or two list-making methods – like creative use of the Lists API (go, devs, go!). If so, let us know. And know that no matter what you are looking to do with lists, we’re there to help (training) and listen (feedback).
Have fun create-creating lists-upon-lists-upon-lists.
Cheers, Mark “Lists everywhere” Kashman – Senior product manager at Microsoft

January 2023 update of Power Automate for desktop
Power Automate for desktop comes with new additions in 2023 January’s release, including the availability of more SharePoint connector actions in preview and the introduction of text-based selectors.
Manage your Power Automate Desktop flows using Web APIs
In this post, we will walk through how you can use the Web API capabilities of Power Automate to manage the Power Automate Desktop flows.
Your ultimate email sentiment analysis solution!
Want to level up your customer service game? Discover how to automatically detect negative customer emails and take immediate action with Power Automate and Microsoft Teams integrated with AI Builder’s sentiment analysis. Don’t miss out on this powerful solution for top-notch email management.


