Contents
- What is SSL Offloading
- Configuring SSL Offloading with SharePoint
- Web Applications
- Host Names Site Collections
- SharePoint Apps (App Domain
- Common Issues
- URLs returned to users are incorrect
- List or library Dropdown menu not loading
- After configuring SSL offloading for a web application users receive a 404 or 503
- Additional Information
- Creating IIS bindings for SharePoint Web Applications through PowerShell
What is SSL Offloading?
The idea behind SSL offloading is to reduce the load on web servers as well as the administrative overhead of managing SSL certificates across multiple servers. This is accomplished by using a dedicated network device (often times a network load balancer or a proxy server) to terminate SSL as it routes the requests. This removes the burden of decrypting and encrypting https traffic from the web server as well as providing a single location to host the SSL certificate reducing administrative efforts of maintaining and replacing certificates.
What it looks like:
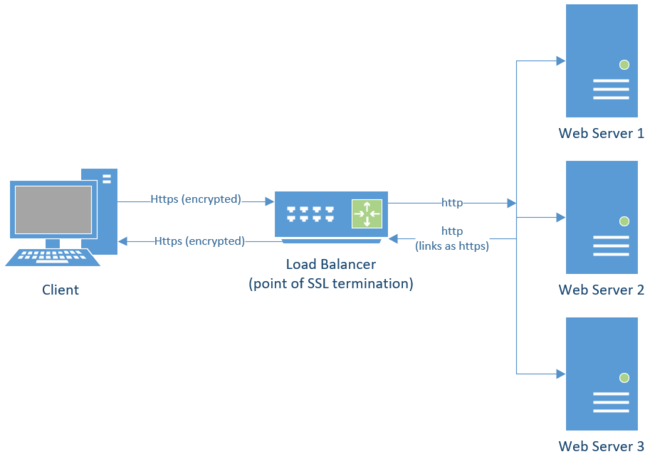
SharePoint SSL Offloading Request
- The user makes an https request for a webpage that is routed to the load balancer
- The load balancer terminates SSL and sends the unencrypted http request to the web server
- The Web server handles the request and returns an unencrypted http response to the load balancer
- The load balancer encrypts the request and forwards it to the client that made the original request as https
Configuring SSL Offloading with SharePoint
Web Applications
To configure a SharePoint web application to take advantage of SSL offloading the Alternate Access Mappings must be configured in a specific way that allows the request to be accepted as http but have links rendered as https. By using internal URLs we can tell SharePoint to recognize an incoming request to http://sharepoint and handle it as though it were https:/sharepoint. Below illustrates how Alternate Access Mappings should be configured to allow for SSL offloading to occur. Note that the internal URL should match the traffic between the load balancer and SharePoint while the public url should reflect what URL users think they are using.
If you are creating a new web application to be used with SSL offloading use the below settings as a guide to create it.
If you are configuring an existing HTTPS Web Application for SSL offloading add an internal URL using the same hostname over http to the zone they wish to use SSL offloading with. The end result should look like the example below. To add these you will want to go to Central Administration > Application Management > Configure Alternate Access Mappings > Add Internal URLs.
|
Zone
|
Internal Url
|
Public Url
|
|
Default
|
https://sharepoint
|
https://sharepoint
|
|
http://sharepoint
|
https://sharepoint
|
Host Names Site Collections
In path based sites we can utilize a combination of internal and public URLs in the web app’s AAMs to achieve the redirection that we need. While we do have multiple zones for HNSCs we do not have the same functionality that internal and public URLs provide. As such the configuration for HNSCs is different as described below.
Web Application Configuration
- The web application should be configured the same way as seen above except the host header should remain empty
- HNSC should be created using an https URL
Example:
New-SPSite 'https://portal.fabrikam.com' -HostHeaderWebApplication 'https://sharepoint.contoso.com' -Name 'Portal' -OwnerAlias 'contosoadministrator' -Language 1033 -Template 'STS#0'
- Bindings for the backing IIS site should include an http binding with a blank host-header if not already present
Proxy or Load Balancer Configuration
Since we cannot use internal URLs like we would for a path based site collections we must configure the proxy server or load balancer that is serving as the point of SSL/TLS termination to add an additional header to the web requests. The header Front-End-Https tells SharePoint whether the links that it renders for this web request should be rendered as http or https.
|
Front-End-Https
|
|
Value
|
Description
|
|
On
|
The request made by the end user was made over https
Example: Front-End-Https: On
|
|
Off
|
The request made by the end user was made over http
|
Public Content: Use host-named site collections with off-box SSL termination
SharePoint Apps (App Domain)
When attempting to configure SSL offloading for app domains you may see the below error:
03/05/2015 09:13:34.20 w3wp.exe (0x0XXX) 0x0XXX SharePoint Foundation General aiz2a High Request for app scheme does not match the webapp’s scheme for this zone. Request Uri: http://app-XXXXXXXXX.apps.contoso.com…. Zone Response Uri: https://sharepoint.contoso.com Site collection path: /
To allow requests between web applications and app domains to be handled under different protocol schemes (http and https) as you would see when configuring SSL offloading for both web apps and app domains run the below PowerShell to enable support for multiple app domains.
$contentService = [Microsoft.SharePoint.Administration.SPWebService]::ContentService
$contentService.SupportMultipleAppDomains = $true
$contentService.Update()
Public Content: Configure an environment for apps for SharePoint (SharePoint 2013)
Common Issues
URLs returned to users are incorrect
When an environment with SSL offloading is not configured correctly it is not uncommon to see the URL in link rendered by SharePoint such as navigation to be incorrect. I.e. all links are rendered in http instead of https or in some scenarios even a different host name. This is most commonly caused by the configuration of alternate access mappings.
Document the following:
- The address and protocol that the users utilize to access the site.
- The address and protocol that the load balancer (or point of SSL termination) forwards the request as. It is possible that the hostname could differ as well as the protocol.
With the answers to the above ensure that the alternate access mappings for the web application are configured as seen below where the numbers coordinate to the responses from the above:
- Public url matches url that users utilize.
- Internal url matches url of incoming requests from the load balancer, if it is not present click Add Internal URLs on the Configure Alternate Access Mappings page in Central Administration.
List or library Dropdown menu not loading
This can be a problem when the site is accessed via Azure Application Proxy. See https://internal.support.services.microsoft.com/en-us/help/4459184
After configuring SSL offloading for a web application users receive a 404 or 503
This most often is due to the bindings in IIS. Locate the IIS site behind this zone of the web application.
To modify the bindings of an IIS website:
- Open Internet Information Services (IIS) Manager from Start > Administrative Tools
- Expand the server name in the Connections pane
- Expand Sites
- Right click on the site that should be serving the requests for the SharePoint Web Application in question
- Ensure that there is both an https as well as an http binding for the hostname that will be accessed as seen in the image below
Additional Information
Creating IIS bindings for SharePoint Web Applications through PowerShell
While you can add bindings to the SPWebApplication.IisSettings.ServerBindings array through PowerShell do note that this does not propagate to the existing IIS sites. This will however create the bindings when the SharePoint Foundation Web Application service is started on a server. As such any new server added to the farm, or any server where the web application service is started/restarted the bindings added through the below method will be reflected.
Add-PSSnapin Microsoft.SharePoint.PowerShell
$wa = Get-SPWebApplication ‘http://sharepoint.contoso.com’
$binding = New-Object Microsoft.SharePoint.Administration.SPServerBinding
$binding.Port = 80
$binding.HostHeader = “”
#Note the “Default” below references the zone of the web application, if you wish to add a binding to a different zone replace that with the appropriate zone (Default/Intranet/Internet/Extranet/Custom).
$iis = $wa.IisSettings[“Default”]
$iis.ServerBindings.Add($binding)
$wa.Update()
#Call the provision method to push this out to all servers, note that this will overwrite any manual modifications to the web.config or other manual changes within IIS for this web app.
$wa.ProvisionGlobally()
Special thanks to the original author: Ian Ragusa (Microsoft PFE)

In this episode, Vesa and Waldek are joined by Sébastien “Seb” Levert, Product Lead and MVP managing product strategy at Valo Intranet in Montreal, Canada. The conversation focused on the convergence of portals and collaboration platforms. Teams is becoming the primary work environment through which LOB apps, communications, BOTs, SharePoint, etc., are being accessed. Valo follows a Teams First development approach. The challenge is creating the tailored/personalized landing page in Teams without the same controls that are available in SharePoint. Other trends discussed – clickable BOT actions, Teams left nav, building personal apps using SPFx, enterprise provisioning and “proper snow.”
This episode was recorded on Monday, February 11, 2020
SharePoint in Microsoft 365 is continuously evolving and improving, especially in areas where Microsoft can refine the first-run experience and guide people to the best use and adoption of the technology that supports their day to day.
Today, we expand the in-product help that appears at the top-right of your SharePoint team sites – to make people’s first SharePoint experiences with sites that much easier and actionable. This is especially true for those who help manage sites and train people at scale within your organization. The question is, how do you get the most out of SharePoint and other integrated apps today? How do you ensure a great first-run experience for your people? What is the next step?
SharePoint Next steps appear when you click on the megaphone icon in the upper-right of the site.
The answer lies in two options: one “self-service” approach and one “at-scale” method:
- Self-service | people click Next steps and choose from the suggested tips to improve teamwork collaboration.
- At-scale | SharePoint admins perform bulk operations across multiple SharePoint sites at once
No matter which option you choose, your site(s) get improved list and library experiences, an updated home page, and mobile readiness. You, too, can the added benefit from other integrated apps such as Planner and Outlook; this process is often referred to as “groupify” as it begins with adding a new Office 365 Groups membership. Updated sites then present helpful, first-run experiences to guide people through the upload of their first set of files, posting news articles for other team members, and adding others as new members.
And with one additional, sequential step you add a Microsoft Teams team as an additional app for your team members to bring communication alongside content; this is sometimes referred to as “teamify” as you are adding a Microsoft Teams team to your team site; yes, a mouth full, but well worth using beyond saying.
Let’s dive into the details of both options …
Self-service “Next steps” tips improve SharePoint site first-run experiences
We’re expanding the in-product help that appears at the top-right of your SharePoint team sites. More and more, SharePoint in Microsoft 365 helps people get the most value from new sites by providing contextual, actionable help. And today, we’re pleased to announce the expansion and location of the Next steps panel.
 Left-to-right: “Next steps” showing from a classic team site and “Next steps” showing from a group-connected team site. Simply click on the megaphone icon to bring up “Next steps” tips from the Office 365 suite header at the top of the SharePoint site.
The SharePoint site “Next steps” panel provides helps for a great first-run experience. All to help you move forward as a team and work out-loud and with confidence and awareness on how everything works in and around your SharePoint site interaction.
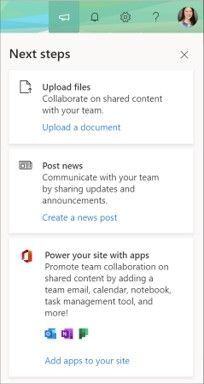
Currently there are four tips (cards) site members and owners may see within the Next steps panel:
- Upload files – Collaborate on shared content with your team; encourages people to Upload a document.
- Post news – Communicate with your team by sharing updates and announcements; helps Create a news post the first few times.
- Invite team members – Engage with your team by adding them to your site’s group; makes it easier to see how to Add members.
- Power your site with apps – Promote team collaboration on shared content by adding a team email, calendar, notebook, task management tool, and more; integrates additional capabilities when you Add apps to your site. #groupify
These tips help your users customize and improve their team sites. Tips are useful for anyone learning more about SharePoint or setting up a new team site for the first time.
Note: the “Power your site with apps” card will appear only on classic SharePoint team site that have not yet connected to a new Office 365 Groups group. Once this update has run, that option will no longer appear for that team site and the additional “Invite team members” may then appear.
For clarity, we also wanted to take a moment to highlight the other four top-right icons you will see above and to the right of your site – next to Next Steps:
- Notifications – people will see various alerts from across Microsoft 365 services based on their notification’s preferences.
- Settings – this gives access to deeper level site settings, like Site contents, Site information, Site usage and more.
- Help – this pulls in contextual “how to” information from support.office.com
- Your Office profile – where you can be you and adjust your account settings and Office profile.
Note: “Connect site to a new Office 365 group” may still appear in upper-right gear icon. This is the same as the new “Power your site with apps” Next steps card.
Learn more how to connect your SharePoint team site to a new Office 365 group.
At-scale, SharePoint admins plan and move multiple sites to modern experiences
Beyond individual site owners being able to connect to new Office 365 Groups from either the new Next steps action described above, it’s important to note that SharePoint admins can do this at scale using bulk operations across numerous sites deemed ready for modernization.
You can perform a bulk operation (known as a group-connection) in which you connect an Office 365 group to a series of sites at one time. This option is preferred for enterprise customers because it enables you to control the configuration (public/private, site classification, alias name) – and save time doing it on behalf of people and sites that qualify and request it.
Below are the two main steps to plan and execute the move to the latest SharePoint and Office 365 Groups experiences at scale:
FIRST | Use the Modernization Scanner tool to better understand classic SharePoint sites and the available capabilities to modernize them. The tool provides factual data about optimizing lists and libraries, connecting to Office 365 Groups, rebuilding classic publishing portals, workflow, blogs and more. Using the dashboards generated by the scanner you’ll be able to better assess the readiness of your sites and plan moving forward and any suggested remediation guidance.
 Select the SharePoint Modernization Scanner option you want in the dropdown and then the checkboxes will show which components will be included in the scan. The “Office 365 Group connection readiness” component is the main component that will be included all scan modes.
Select the SharePoint Modernization Scanner option you want in the dropdown and then the checkboxes will show which components will be included in the scan. The “Office 365 Group connection readiness” component is the main component that will be included all scan modes.
Learn how to get started with the SharePoint modernization scanner. And then download the SharePoint Modernization Scanner and try it today.
SECOND | Programmatically modernize your sites using a CSV files and bulk group-connect PowerShell script. After running the scanner and processing the results, you have identified which sites are ready to group-connect. The next step is to prepare a CSV file to drive the bulk group-connection process.
 Section of the sample PowerShell script to modernize SharePoint pages.
 Section of the sample PowerShell script to create a new Microsoft Teams team and associated it to the SharePoint site.
As you move through the options of what you can do, note you’ll be able to:
- Add a Microsoft Teams team to each SharePoint site
- Modernize all the pages within each site
- Clean up site branding
- Apply a tenant theme to each site
Learn how to connect new Office 365 groups to across multiple sites at once (includes sample PowerShell script); this, too contains a best practices guide to managing SharePoint modernization projects.
Wrapping it up…
We recently spoke to Nicole Woon (Twitter | LinkedIn), a program manager at Microsoft. She helped update the above-mentioned “Next Steps” experience for SharePoint sites. In the podcast episode, I interview Nicole about this new feature update and dig into the design, customer use and future action cards that help customers have a great first-run experience with SharePoint sites:
You, too, can learn from the person behind the modernization tool, Bert Jansen (Twitter | LinkedIn), as he shares how to get started transforming classic SharePoint sites to modern experiences using the admin patterns, practices and tools mentioned above:
We hope you enjoy not only the move to more modern experiences, but improved ways to support your growth and engagement throughout your organization.
What is the next step? Click Next steps and see.
Thanks, Mark Kashman – senior product manager – Microsoft