Announcing the private preview of improved sensitive information types (aka classification depth preview) in M365 Services. This preview will include multiple features over the course of the program while we introduce improvements to the sensitive information types and how they can be used. The initial feature for preview is the introduction of 65 new/improved sensitive types for EU GDPR (57 SITs) and APAC (8 SITs).
The easiest way to test these types will be:
We are currently reviewing release cycles to plan when these will be available to additional clients (such as Microsoft 365 Apps – formerly Office 365 Pro Plus).
An important aspect of this preview is sharing the results of your testing with our preview team.
The private preview will begin rolling out this week. You can sign up to express your interest in joining this preview program by completing the following form.

Every month, tens of millions of people turn to SharePoint lists to track and manage critical business and team data. Lists enable organizations and teams to store and visualize rows of data to share and collaborate on scenarios like inventory management, status reporting, deal milestones and more. They are easy to use, secure, with high capacity up to 30 million items in a single list.
Today, we’re pleased to announce lists from Excel is now rolled out worldwide to customers in Microsoft 365. This is a new way to create a list, saving you time while putting the data in a location that opens new scenarios.
Let’s dive into the details…
Lists from Excel
To create a list from Excel, you can select a table from the Excel files in the SharePoint site, or from your device. You can change the field type of the column if needed, and all your table data will be copied to the new list.
When you create a list from Microsoft Excel, you map table data to a new list – adjusting column types before you click Create.
A quick step-by-step ‘how to’
- From within your SharePoint site, click the upper-right gear icon and select Site contents*
- At the top of the Site contents page, Click New > List
- Click the From Excel tab
- Enter a name for your new list
- Click Upload file to select from your local device or pick from files already in Microsoft 365
- Update the column type headers; for example, change “Number” to Date and time; choice fields work, too, automatically aggregating unique values.
- Click Create to import the Excel table data and create a new SharePoint list
 Adjust the SharePoint column types before you import the Excel table data into Microsoft 365.
Your Excel data is now intact; your SharePoint list ready to extend in numerous ways:
- Further assign and adjust data types to columns in your list
- Enhance visuals by designing list row and column formatting
- Use conditional formatting rules to make the list data intuitive and helpful
- Set reminders on list items
- Build productivity apps with Power Automate (custom flows) and Power Apps (custom forms); your list becomes the foundational data source.
 Further refine your list with conditional formatting on rows and columns.
Note: You can analyze SharePoint list items from a view of the list to Excel – to work with the data in a spreadsheet; simply click Export to Excel. Note: Excel creates an Excel table with a one-way data connection based on a web query file. To bring a fresh copy of the SharePoint list to Excel, select Refresh All on the Data tab from within Excel. Changes made to the Excel table will not be sent to the SharePoint list. Learn more how to export to Excel from SharePoint.
In Summary
It is easier than ever to get started with SharePoint lists – using Excel as shown above or based on existing lists. No matter how you start, it’s then easy to further configure lists by using views, filters, rules and reminders to increase the usefulness of your data – especially as data changes or is missing.
You can further customize lists, too. It is possible to further extend with native integrations leveraging Power Apps and Power Automate. And when your forms and workflows get more complex or pull from multiple sources lean on the Power Platform tools directly available from your list.
Note | We recently announced Microsoft Lists and how it is an evolution of SharePoint lists. For the list from Excel announcement above, we want to emphasize that you will be able to create a list from Microsoft Excel today and in the future when Microsoft Lists begins to roll out and broaden the lists story.
Learn more about how to create a list from Microsoft Excel.
Want to see it in action? Click into the SharePoint list: “Create list from Excel” click-thru demo.
Additional resources:
Thanks, Mark Kashman, senior product manager – Microsoft
*Frequently Asked Question
Q: When will I see the new list creation user interface from a team site home page (New > List) drop-down menu?
A: We are planning to include the New > List entry point from a site home page early Summer 2020. Until then, you can accomplish the above actions from the site’s Site Contents page, accessed from the upper-right gear icon menu.
![General availability of automatic classification with sensitivity labels in Microsoft 365 services]()
Microsoft runs on trust. With digital data growing exponentially, online threats becoming very sophisticated, and remote work necessary, it is more important than ever to safeguard your corporate data.
At Microsoft, our goal is to provide a built-in, intelligent, unified, and extensible solution to protect sensitive data across your enterprise – in Microsoft 365 cloud services, on-premises, third-party SaaS applications, and more. With Microsoft Information Protection, we are building a unified set of capabilities for classification, labeling, and protection across Microsoft 365 apps (Word, PowerPoint, Excel, Outlook) and productivity services like OneDrive, SharePoint, Teams, and Exchange.
Sensitivity labels are central to how your business-critical data can be protected using Microsoft Information Protection. You can create a sensitivity label and associate it with protection like encryption and visual marking. Label-applied protection will persist with the file wherever it goes.
You can start by empowering your users to manually label documents and emails in Office apps across a wide range of platforms (e.g. Windows, Mac, iOS, Android and online). Learn more here on how to enable this manual classification. However, users may forget to label manually or label sensitive data inaccurately. Relying on users alone to manually classify corporate data using labels is not sufficient. The scalable approach is to automatically discover, label, and protect sensitive data. To help you achieve that, we are excited to announce the general availability of automatic classification with sensitivity labels in SharePoint, OneDrive, and Exchange.
You can create an auto-labeling policy with rules tailored for your organization’s sensitive data, targeting specific locations in your enterprise. A policy can either be in simulation or active mode. You can run the policy first in simulation mode and if the results satisfy your organization’s needs then you can proceed and publish the policy.
 Figure 1. Auto label policy across two modes: simulation and active modes
With our 100+ out-of-the-box sensitive information types and ability to create custom ones, you have the flexibility to tailor the auto-labelling policy to specific sensitive information types. You can also scope the policy to a specific SharePoint site or OneDrive account or Exchange mailbox.
Policy Simulator provides insight into policy effectiveness and enables you to simulate in your production environment with real data with no impact on end users until the policy is published.
 Figure 2. Auto labelling policy simulation mode results
Auto classification with sensitivity labels, along with Policy Simulator, is a powerful capability that enable organizations to automatically designate eligible Excel, PowerPoint, Word files, and emails as sensitive in a scalable way.
Your users can search for content within these protected documents, coauthor using Office web apps and be assured that the protection will persist even after the documents are downloaded. This way your security needs are in harmony with your user’s productivity needs.
 Figure 3. Document library experience in SharePoint showing files automatically labelled
Getting Started
As a Microsoft 365 customer, you can turn on this feature in Microsoft 365 compliance center. To learn more about this feature, please read our online documentation. This advanced capability is included with Microsoft 365 SKUs (E5, E5 Compliance and E5 Information Protection & Governance) and Office 365 E5 SKU. You can learn more about our licensing here.
If you are new to Microsoft 365, learn how to try or buy a Microsoft 365 subscription.
As you navigate this challenging time, we have additional resources to help. For more information about securing your organization in this time of crisis, visit our Remote Work site. We’re here to help in any way we can.
Thank you!
Sesha Mani, Principal Group Product Manager, Microsoft
Tony Themelis, Principal PM Manager, Microsoft
Over the last year, SharePoint has embraced the new Microsoft Office icons that were announced in late 2018. A large part of this change is the transition of the SharePoint identity from blue to teal, signaling a shift in the identifying color scheme. In order to best embrace this shift, we are now working to complete an update from blue to teal across the product more broadly. Updating the SharePoint default theme from blue to teal is the final step to adopting the new SharePoint identity.
With this update, you will see classic and modern SharePoint communication sites and team sites (new and existing) update to the teal theme if they have not been customized. A site is considered customized when a custom theme has been selected in the Change the look panel or customizations have been made for classic. This will not impact your sites in any way beyond changing colors from blue to teal as seen in the images below.
How will this impact you?
All new sites from the time of change to teal will be created with teal as the default theme color. This change will happen for any communication site, regardless of modern or classic and for classic team sites. Any modern team site that is group connected will still be created in the existing color selection associated to the M365 group.
This update will not impact custom themes, settings, or the content and structure of sites. This update will only change the theme of new and existing sites that have not been customized.
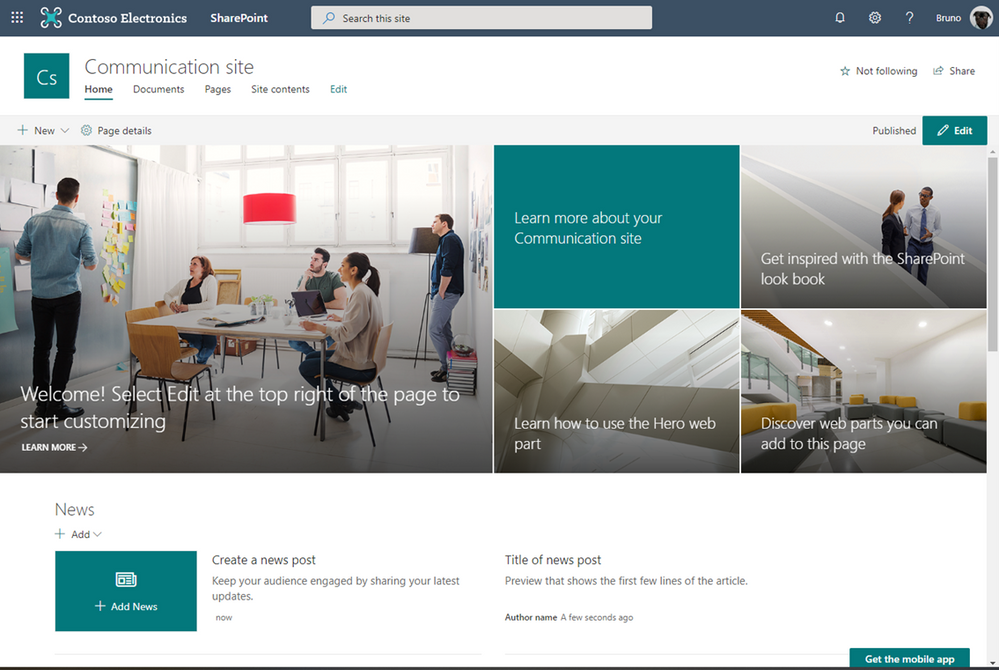
Current blue theme on a communication site:
New Teal theme on a communication site:
SharePoint Communication Site – Teal Theme
Do I need to do anything?
This update is automatic, and no action is required by admins or users.
If you decide to keep the blue theme – or just want to change the theme – site owners can edit the theme in the Change the look panel. This change can be made at any time, and each site will require a manual change.
To automate this process, create a site design that is configured to apply a custom theme. Site designs are a reusable script that will allow site owners and creators to easily apply your organization’s preferred default theme in site settings. Learn more about SharePoint site design scripts.
Below is the sample code of the blue theme if this theme is preferred:
Blue standard theme JSON code:
{
“themePrimary”: “#0078d4”,
“themeLighterAlt”: “#eff6fc”,
“themeLighter”: “#deecf9”,
“themeLight”: “#c7e0f4”,
“themeTertiary”: “#71afe5”,
“themeSecondary”: “#2b88d8”,
“themeDarkAlt”: “#106ebe”,
“themeDark”: “#005a9e”,
“themeDarker”: “#004578”,
“neutralLighterAlt”: “#faf9f8”,
“neutralLighter”: “#f3f2f1”,
“neutralLight”: “#edebe9”,
“neutralQuaternaryAlt”: “#e1dfdd”,
“neutralQuaternary”: “#d0d0d0”,
“neutralTertiaryAlt”: “#c8c6c4”,
“neutralTertiary”: “#a19f9d”,
“neutralSecondary”: “#605e5c”,
“neutralPrimaryAlt”: “#3b3a39”,
“neutralPrimary”: “#323130”,
“neutralDark”: “#201f1e”,
“black”: “#000000”,
“white”: “#ffffff”
}
If you do nothing?
Starting in June, sites that have not been customized will switch from blue to teal and does not require any action from you. New sites you create will default to the teal theme until you change it either through the Change the look panel or by using a custom Site Design.
This change will not impact any custom themes or settings you have currently installed and applied within your tenant. We do not have an opt-out option for administrators.
What site types and states will be impacted:
|
Site Type
|
Customized state
|
Impacted
|
|
Classic Publishing
|
NOT customized with a theme
|
Yes
|
|
Classic Publishing
|
Customized with a theme
|
No
|
|
Classic Team sites
|
NOT customized with a theme
|
Yes
|
|
Classic Team sites
|
Customized with a theme
|
No
|
|
Modern Communication sites
|
NOT customized with a theme
|
Yes
|
|
Modern Communication sites
|
Customized with a theme
|
No
|
|
Group connected Team Sites
|
N/A
|
No
|

Captain’s log, stardate 365.0602.0609.2, our destination – to boldly go where no virtual conference has gone before.
The Galactic Collaboration Summit is about to hit warp speed 10, to help you explore a Milky Way Galaxy full of sessions. Set your phasers on fun, to learn, and engage!
Jeff “Captain” Teper (CVP, Microsoft) will be giving a keynote that’ll be out of this world, plus Microsoft speakers delivering breakout sessions among thought leaders and members of the community from around the world. Review all sessions and start your Galactic exploration today.
What: Galactic Collaboration Summit to learn more | Get your ticket today
When: June 2nd & 9th, 2020 (unique content on both days)
I’m a presenter, not a doctor: 65+ speakers (MVPs, RDs, Microsoft and community members)
Cost: Free and voluntary payment
Primary Twitter hashtag: #GalacticSummit (join in) & follow @CollabSummit
Galactic Collaboration Summit – June 2nd & 9th, 2020 (online training)
Seal up your helmet and ready your best cosmonaut impersonation. The Galactic Collaboration Summit has something for everyone in all reaches of the Microsoft 365 galaxy: far, far away. You’ll find no star or cluster uncharted: modern workplace, remote working and distance learning topics on Microsoft’s technologies, such as Microsoft 365, Microsoft Teams and SharePoint, Microsoft Azure topics relevant to the modern workplace, as well as different Business App topics (Power Apps, Logic Apps, Power Automate, Planner, Yammer), and more.
Below is a list of the Microsoft sessions – including Jeff’s keynote:
- The latest innovations in SharePoint, OneDrive, and Office for content collaboration [Microsoft keynote] | by Jeff Teper
- Microsoft 365 Live Events and remote work | by Lorena Huang Liu & Christina Torok
- Knowledge and Project Cortex – the Microsoft 365 Vision | by Naomi Moneypenny and Chris McNulty
- Share and track your information with Microsoft Lists across Microsoft 365 | by Lincoln DeMaris
- Design productivity apps with SharePoint lists and libraries, Power Apps, and Power Automate | by Chaks Chandran
- The New Yammer | by Jason Mayans
- Migration to SharePoint, OneDrive, and Microsoft Teams in Microsoft 365, free and easy | by Hani Loza & Eric Warnke
- Security and compliance in SharePoint and OneDrive | by Sesha Mani
- Jump start your projects with community projects from Patterns and Practices (PnP) | by Vesa Juvonen
Shout out to community members Spencer Harbar, Adis Jugo and the #GalacticSummit crew who are giving the conference all they got, soon transporting you into the online holodeck and beyond, navigating the far reaches and for supporting and promoting the knowledge and expertise that reaffirms this: Microsoft 365 has the best tech community in the galaxy – one that shall live long and prosper.
Beam me up Spency, Mark


