Microsoft Loop is a powerful productivity tool that enables collaborative work and flexible information organization. It provides teams with a shared workspace where they can create and collaborate on content such as notes, tasks, and files. Loop integrates seamlessly with Microsoft Power Automate, allowing users to automate repetitive tasks. By creating rules, you can trigger specific actions based on conditions, saving time and effort. For instance, you can set up a rule to send an email notification to your team whenever a new task is added to a project table in Loop. Overall, Loop enhances teamwork and streamlines communication by combining a shared workspace with automated workflows.

Building an Automation Solution with Nintex and PowerApps
Modern organisations often look for efficient ways to automate their workflows and processes. Nintex and PowerApps are two powerful tools that enable businesses to create robust automation solutions. Below, I will outline the step-by-step process for building an automation solution using these technologies.
- Define the Problem and Objectives
The first step in creating an automation solution is understanding the process you wish to streamline. Ask the following questions:
- What specific tasks or workflows need automation?
- What are the expected outcomes or benefits?
- Who will be the primary users of the solution?
Clearly defining the problem and objectives ensures alignment and provides a roadmap for the development process.
- Analyse the Workflow
Break down the process into its individual steps. Identify:
- Inputs: What data or information is required at each stage of the workflow?
- Outputs: What results or actions should the process generate?
- Pain Points: Where are the inefficiencies or bottlenecks?
Document these details to design the automation solution effectively.
- Design the Solution Architecture
Map out the architecture of your solution, incorporating both Nintex and PowerApps:
- Nintex: Use Nintex workflows for process automation and orchestration. Nintex can manage complex workflows, approvals, and document generation.
- PowerApps: Build a user-friendly interface using PowerApps to interact with the automated processes. PowerApps can act as the front end for data input and user interaction
Clearly define how the tools will integrate and interact to achieve the desired objectives.
- Develop Nintex Workflows
Nintex workflows are designed to automate repetitive tasks and manage approval processes. Follow these steps:
- Access Nintex within your SharePoint or Nintex platform environment.
- Create a new workflow and select the appropriate template.
- Configure workflow actions, such as data collection, condition checks, approvals, notifications, and integrations with external systems.
- Test the workflow to ensure it functions as intended.
Nintex provides a drag-and-drop interface, making it easy to configure workflows even for users with limited technical expertise.
- Build the PowerApps Application
PowerApps allows you to create custom apps without extensive coding knowledge. Here’s how:
- Open PowerApps and select “Create an App.”
- Choose a blank canvas or a template based on your use case.
- Design the app interface, including input fields, buttons, and navigation elements.
- Connect the app to the data sources and Nintex workflows using connectors.
- Test the app to ensure seamless interaction with the workflows.
PowerApps also supports mobile-friendly designs, enabling users to interact with your automation solution on the go.
- Integrate Nintex and PowerApps
To ensure both tools work together seamlessly:
- Use APIs or connectors to establish communication between PowerApps and Nintex workflows.
- Configure triggers in PowerApps to initiate workflows based on user actions (e.g., form submissions, button clicks).
- Ensure data flows correctly between the app and workflows, maintaining accuracy and efficiency.
- Test and Refine the Solution
Before deploying the automation solution:
- Perform thorough testing of the workflows and application.
- Collect feedback from potential users and stakeholders.
- Refine the solution based on feedback and test results.
Testing ensures that the solution is robust, user-friendly, and aligned with organisational needs.
- Deploy and Monitor
Once the solution is finalised:
- Deploy it within your organisation.
- Train users on how to interact with the app and workflows.
- Monitor the solution’s performance and gather metrics to identify areas for improvement.
Regular monitoring helps ensure the solution remains effective and continues to deliver value.
Conclusion
By combining Nintex’s powerful workflow automation capabilities with PowerApps’ user-friendly app development platform, organisations can create customised solutions to automate processes, enhance productivity, and reduce errors. Following the steps outlined above ensures a methodical approach to designing and implementing an effective automation solution.
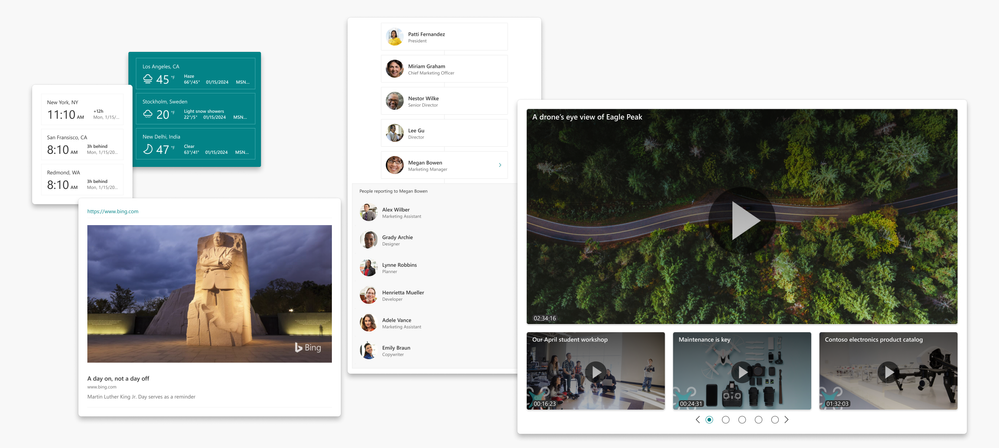
Examples of new webparts added to the SharePoint Web UI Kit in the Figma Community.
Our SharePoint Web UI kit in Figma has been updated with some great new additions! This update includes more web parts so you have more options when designing your SharePoint sites and pages. The new update (v2.2) includes:
New web parts and page elements:
- Page title
- Section header
- Divider
- Link
- Organization chart
- Stream
- Weather
- World clock
Additional updates:
- Moved shared components to single location
- Re-organized templates section
-
We are currently seeking feedback from both 1) those who have used the SharePoint Web UI Kit and 2) those who have not yet had the opportunity but have a need for this toolkit. Your input is highly valued and will help us improve the UI Kit. You can answer the anonymous survey here, which should only take 5 minutes to complete: https://forms.office.com/r/aduAA8jMN8
To get started with our updated UI kit, simply download the latest version from the Figma Microsoft Community website: SharePoint Web UI Kit – Figma.
Why use the Figma SharePoint Web UI kit?
Figma is a subscription-based application that is the industry standard tool for web design. It provides an alternative to designing sites and pages outside of SharePoint. Figma does not build the pages in SharePoint, so once you finalize a design in Figma, you will need to build it in SharePoint. You should evaluate if Figma is the right solution for mocking up sites and pages for SharePoint.
Design without organizational limitations
This UI kit provides SharePoint users with another tool in their toolbox. While building a page in SharePoint is easy, we wanted to provide the ability to mockup sites and pages. It allows you to explore different design options for your site without the limitation of admin privileges and tenant restrictions, and doesn’t expose organization data.
Figma mockups provide a quick snapshot of SharePoint updates which business stakeholders can use to plan and make decisions. They can provide appropriate requirements and use this UI kit in collaboration with their design team to iterate in the life cycle of your organization’s intranet.
Share designs with ease
This UI kit provides you with page layouts and a selection of web parts to allow you to mockup and share new ideas across organizations and companies. Figma gives you the flexibility of reviewing and sharing your designs without having to spend time and resources creating it in SharePoint. Figma also allows you to download your designs into easy-to-use formats that can be used in documentation and presentations.
Learn more at https://www.figma.com/
Community feedback
As mentioned above, please consider filling out our anonymous survey to share feedback from both 1) those who have used the SharePoint Web UI Kit and 2) those who have not yet had the opportunity but have a need for this toolkit: https://forms.office.com/r/aduAA8jMN8
We’d love to know what’s working for you and what you’d like to see next. Alternatively, you can leave a comment on the Figma SharePoint Web UI kit page or by visiting the SharePoint Community.
We hope you enjoy our latest update and look forward to seeing what you create with it!
Power Automate for desktop comes with new additions in 2024 February’s release, including the Picture-in-Picture run mode.
We’re thrilled to share that AI Builder’s latest capabilities, which include automated custom invoice processing and the extraction of dates and numerical field types from documents, are officially available. These enhancements aim to streamline the configuration of bespoke AI models for automated data extraction from invoices and to enhance the precision of processing both structured and unstructured documents.
Power Automate for desktop comes with new additions in 2023 January’s release, including AI-suggested actions, the support of blank values, single sign-on and multiple new actions including Word dedicated ones.
We are excited to announce that GPT Prompts with Prompt Builder, a new feature of AI Builder, is now generally available! GPT Prompts are powerful tools that enable you to add Generative AI capabilities to your automated workflows.
Power Automate for desktop comes with new additions in 2023 December’s release, including the support of input variables to a run URL and the introduction of Power Fx to desktop flows.