Today, we are excited to announce new capabilities in Advanced eDiscovery that directly respond to customer feedback on how they need to be able to do more with the built-in discovery tools in Microsoft 365. We have heard that organizations require expanded capabilities to complete more of common investigation and discovery workflows right within Microsoft 365.
Now we are starting to rollout a new version of Advanced eDiscovery that includes a new look and feel, additional functionality such as hold notifications and acknowledgment tracking, and a concept of a static set of content for performant searches as well as an integrated review and redact experience.
With these new updates we hope to more directly meet customer requirements for an efficient and effective way to preserve, collect and review content related to investigations or litigation.
Microsoft’s director of discovery, EJ Bastien has stated that even as “data from the average custodian has increased 20x over the last ten years, our team has reduced the cost per custodian of completing this eDiscovery work by 85%. While also maintaining high security standards of keeping data in place within the Microsoft cloud.” The capabilities integrated into Microsoft 365 have enabled Microsoft discovery to change the playing field on meeting legal and investigation requirements.
Read on below for more on the new features and check out the Mechanics video where we show and tell a bit about how the capabilities work.
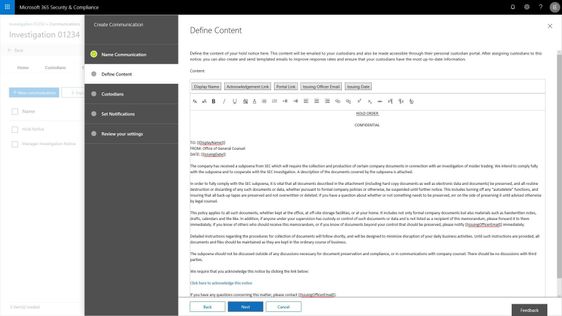
Manage custodians and notifications
Customers have told us they need to be able to manage custodians, or employees in their organization related to a particular case or investigation, from both the perspective of the content the custodian controls and manages in their email inbox and cloud storage, but also from the perspective of the shared locations that those employees interact with as part of their daily job such as team sites, groups, and channels. In addition to retention and discovery, we have also heard that organizations require a way to communicate to those custodians that are legal hold within their organization. Not only communicate with custodians, but track the fact that the custodians have been notified. Now you can manage complete that entire process right within your Advanced eDiscovery experience.
Search to add custodians and their custodial content locations, add sites and teams that they are members of from the shared locations picker, and place their content on hold for retention and discovery purposes. With the new custodial picker experience, you have a quick look up from Azure Active Directory in your organization to quickly find and identify individuals by name or organization identification alias.
Use templates to build out commonly used communications, escalate with reminders and or manager notifications. And the end user gets a clean experience showing them all of their active legal holds or other case related notifications.
Manage case content with consistency and performance using working sets
We have also heard that search and content processing needs to be higher performing, more predictable and transparent. Customers have told us that any variability in search results erodes confidence and ability to effectively complete the requirements of some eDiscovery processes. In addition, defensibility of the results is weakened, and it is just harder to get things done quickly and efficiently.
In order to help address this challenge and others, now you can isolate the set of results from a search and add it to a working set for further analysis, processing and refinement. Once this content is included in a working set you have a number of ways that you can interact with that content, all of which help you define and address the most responsive and relevant content in your case or investigation.
Customers are continuing to derive value form the advanced analytics capabilities already included in Advanced eDiscovery as the core vehicle to reduce and refine content. This reduction helps to drive down redundant, duplicative or highly related content and reduce the costs of eDiscovery.
Integrated review and redact experience
Now organizations can review and take action on the content within their case right within Microsoft 365. A new integrated review experience offers the ability to view a wide variety of file types, including jpgs, all office files, mp4s and more, and to take action on that content. Either tag and further refine content based on its responsiveness, or annotate, mark-up and redact content that might be sensitive and should not be shared with outside parties.
The new review experience includes a native, text and annotate view to provide options to support the various ways your team assess content. In addition, a customizable coding panel helps make sure that you are able to effectively tag and triage and organize the content under review. Further insights such as document history, other contributors to the document and views like difference detection in near duplicates will help speed the process to identify and curate the most responsive content.
Watch the short video and read more about this new review and redact experience here.

Data Investigations preview
Also today, we are announcing a new preview for a Data Investigations capability that helps IT and security operations search and take action on specific data in their organizations. Many organizations need to address scenarios like leaked confidential information, or investigating data breaches with this type of data remediation workflow. These scenarios are important as the risk to data security and privacy expectations continue to evolve. IT and privacy officers now have the tools to respond to any kinds of risk to personal, sensitive or business confidential information effectively and efficiently with this new solution.
The new capability, starting to roll out to preview today, includes the ability to execute targeted searches for specific content based on a variety of conditions, then investigate user activity around relevant content, and contain and ultimately remediate the leaked content at the source. Read more about the early look at this new capability here.
Ready to get started?
Make sure you have Office 365 E5, Advanced Compliance, or Microsoft 365 Information Protection and Compliance to get started today with these new features.
Read more about Advanced eDiscovery in Microsoft 365, see our broader updates and webcast on privacy and compliance in the modern era of privacy expectations and engage with us in our Tech Community .
- Iram Arras, Sr Program Manager, Advanced eDiscovery Microsoft 365
White Paper
Microsoft 365 provides innovative capabilities to empower anyone – developers, power users, and information workers – to craft business applications tailored to real-world needs.
SharePoint lists provide foundational data storage across the suite. PowerApps and Microsoft Flow bring custom forms and workflow into business applications. And Microsoft Forms and Power BI extend business apps with data gathering and analytics.
That’s a lot of power. If you’re a problem solver, you’re in the right place. Our new white paper “Transforming Business Process with Microsoft 365” helps you understand these capabilities. You’ll learn about why business apps matter. We review the core capabilities of each tool – SharePoint lists, PowerApps, Flow, Forms, and Power BI. Finally, we complete the journey by presenting three scenarios to guide your implementation:
- Event organizer
- Travel approval
- Employee onboarding
Each solution is accompanied by templates you can use immediately. Download the white paper today to start this journey.
Solutions
We also know that there’s no substitute for learning by doing. That’s why our white paper is accompanied by three downloadable scenario templates. Each includes setup scripts, PowerApps, Flow, and other tools, along with videos and step by step instructions to help you bring each of these solutions to life in your own environment.
These solutions take their place alongside the other templates already published on the TechCommunity Resource Center. Let’s take a look.
Event organizer
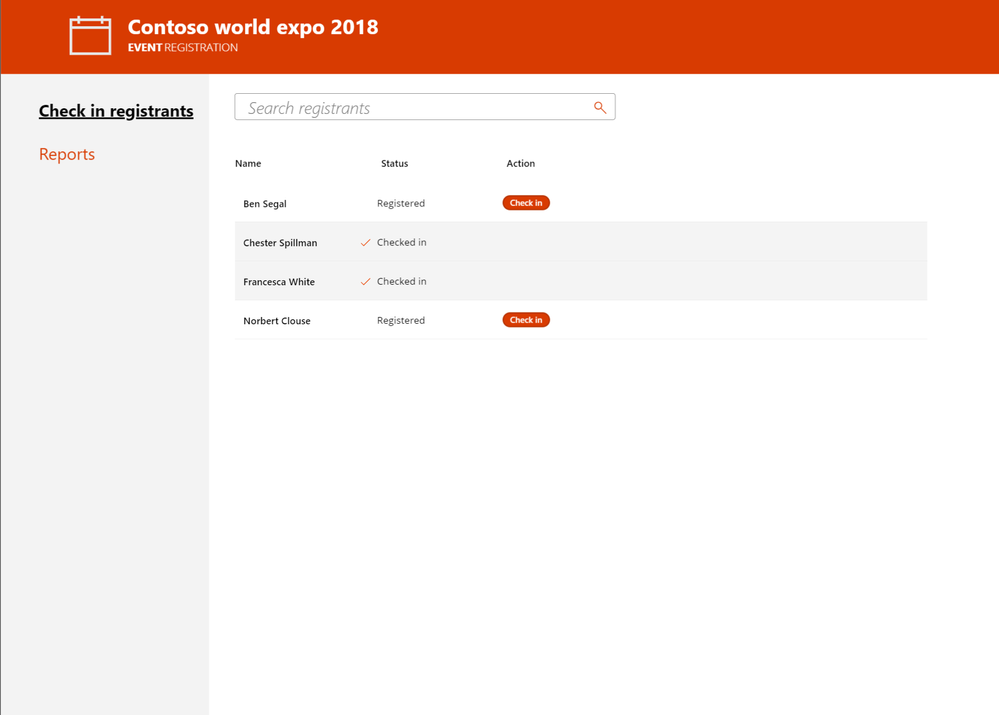
This solution allows you to invitee attendees to self-register for an event using Microsoft Forms. Registrations are tracked in a SharePoint list, which can be deployed automatically using our site scripts included in the solution. Microsoft Flow is used to provide alerts , confirmations, and reminders about the event to attendees and staff. Power BI is used for real-time reporting on attendee registrations and attendance. Finally, this solution includes mobile and tablet versions of our PowerApps solution for checking in and managing attendees on the day of the event. Download the template and get started.
Event Organizer
Travel Approval
Travel is a critical part of business operations. This solution allows employees to easily submit travel requests from desktop or mobile devices using PowerApps. Requests are automatically routed using Flow to the appropriate manager and travel department for approval. Managers can also access Power BI based status reports for all travel requests to verify current status and manage budgets. Get started with our downloadable template.
 Travel Requests
Employee onboarding
The Employee Onboarding app is designed to streamline and simplify the process of bringing a new employee onboard into the organization. In many organizations, onboarding new employees can be a complicated and laborious process. This solution integrates PowerApps, SharePoint and Flow to manage procurement, logins, email and training tasks for new staff. Download our template to get started today.
 Employee Onboarding
Conclusion
Business apps are essential to transforming processes in every organization’s journey to digital transformation. Our new white paper and templates provide a road map for learning and adopting these solutions in your organization. We look forward to learning more about your experience here on the TechCommunity.
White Paper
Microsoft 365 provides innovative capabilities to empower anyone – developers, power users, and information workers – to craft business applications tailored to real-world needs.
SharePoint lists provide foundational data storage across the suite. PowerApps and Microsoft Flow bring custom forms and workflow into business applications. And Microsoft Forms and Power BI extend business apps with data gathering and analytics.
That’s a lot of power. If you’re a problem solver, you’re in the right place. Our new white paper “Transforming Business Process with Microsoft 365” helps you understand these capabilities. You’ll learn about why business apps matter. We review the core capabilities of each tool – SharePoint lists, PowerApps, Flow, Forms, and Power BI. Finally, we complete the journey by presenting three scenarios to guide your implementation:
- Event organizer
- Travel approval
- Employee onboarding
Each solution is accompanied by templates you can use immediately. Download the white paper today to start this journey.
Solutions
We also know that there’s no substitute for learning by doing. That’s why our white paper is accompanied by three downloadable scenario templates. Each includes setup scripts, PowerApps, Flow, and other tools, along with videos and step by step instructions to help you bring each of these solutions to life in your own environment.
These solutions take their place alongside the other templates already published on the TechCommunity Resource Center. Let’s take a look.
Event organizer
This solution allows you to invitee attendees to self-register for an event using Microsoft Forms. Registrations are tracked in a SharePoint list, which can be deployed automatically using our site scripts included in the solution. Microsoft Flow is used to provide alerts , confirmations, and reminders about the event to attendees and staff. Power BI is used for real-time reporting on attendee registrations and attendance. Finally, this solution includes mobile and tablet versions of our PowerApps solution for checking in and managing attendees on the day of the event. Download the template and get started.
Event Organizer
Travel Approval
Travel is a critical part of business operations. This solution allows employees to easily submit travel requests from desktop or mobile devices using PowerApps. Requests are automatically routed using Flow to the appropriate manager and travel department for approval. Managers can also access Power BI based status reports for all travel requests to verify current status and manage budgets. Get started with our downloadable template.
Travel Requests
Employee onboarding
The Employee Onboarding app is designed to streamline and simplify the process of bringing a new employee onboard into the organization. In many organizations, onboarding new employees can be a complicated and laborious process. This solution integrates PowerApps, SharePoint and Flow to manage procurement, logins, email and training tasks for new staff. Download our template to get started today.
Employee Onboarding
Conclusion
Business apps are essential to transforming processes in every organization’s journey to digital transformation. Our new white paper and templates provide a road map for learning and adopting these solutions in your organization. We look forward to learning more about your experience here on the TechCommunity.
We are happy to announce Microsoft Graph Security connectors for Azure Logic Apps, Microsoft Flow, and PowerApps, which greatly simplify the development of automated security workflows. By building playbooks that use the Microsoft Graph Security connector, you can automate common security tasks across multiple security solutions. This reduces the time and resources required to triage, investigate, and remediate security alerts, without the cost and complexity of building and maintaining multiple integrations. For further details on integrating with the Microsoft Graph Security API, learn about the API and access the schema.
Getting Started
Use these connectors now in your existing workflows or create new workflows. The steps are similar for Azure Logic Apps, Flow, and PowerApps. We’ll use Azure Logic Apps as an example here. Refer to the documentation and connector reference for further details.
- Your Azure Active Directory (AD) tenant administrator must first grant consent for the connector; follow the steps in the connector documentation.
- Sign in to the Azure portal, and open a new or an existing Logic App in Logic App Designer.
- For a blank Logic App, first start with a trigger, such as the Recurrence trigger. For existing Logic Apps, add an action to the end of a workflow by clicking ‘+ Next Step’ or between steps by clicking the (+) sign and selecting ‘Add an action’.
- Search for “Microsoft graph security” and select an action from the list.
- Provide the necessary details for your selected action and continue building your Logic App workflow.
Supported Actions
The Microsoft Graph Security connectors enable the following actions:
- Get alerts – Use this action to get a list of alerts filtered on one or more alert properties. For example, get a list of alerts with Provider equals Azure Security Center or Palo Alto Networks.
- Get alert by ID – Use this action to get a specific alert by alert id property.
- Update alert – Update a specific alert by specifying the alert id property. Refer to the list of the editable properties of alerts to ensure required and editable properties are passed in your request. For example, you can update alert assigned to property to assign the alert to a security analyst for investigations.
- Create subscriptions – Use this action to create a Graph webhook subscription that notifies you of any changes, filtered to certain types of alerts you are interested in. For example, you can create a subscription that notifies you of high severity alerts.
- Get active subscriptions – Use this action to get a list of unexpired subscriptions to manage the list of subscriptions
- Update subscription – Update your subscription by specifying the subscription id. For example, you can update the expirationDateTime property of the subscription to extend the subscription.
- Delete subscription – Delete your subscription by specifying the subscription id.
User Scenarios
You can mash up the Microsoft Graph Security connector with the 200+ Microsoft and non-Microsoft connectors available for Azure Logic Apps, Flow and PowerApps to build end-to-end scenarios based on your requirements. We have provided a few examples of scenarios that can be enabled using the Microsoft Graph Security and other connectors.
Automating Security Monitoring and Management
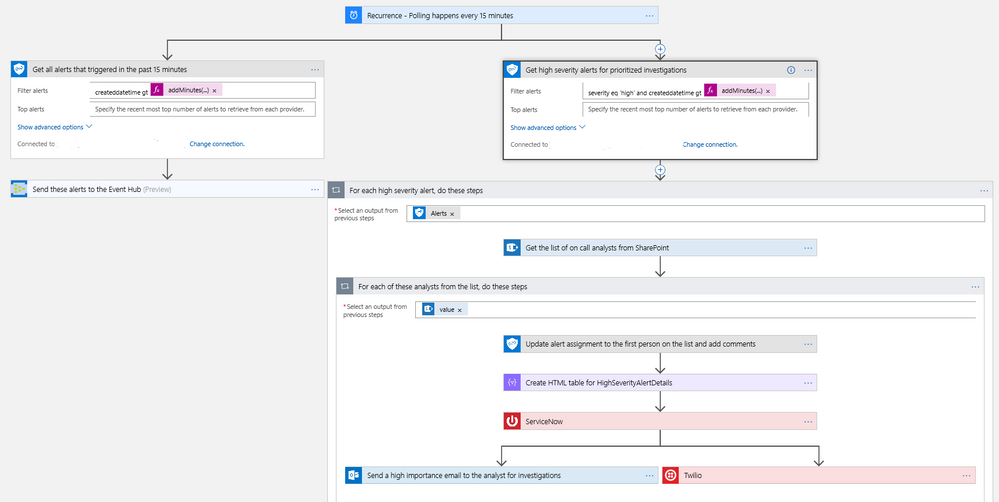
It’s always been a challenge to get notified of critical alerts that needs immediate action in an automated manner. At the same time, not all alerts are of equal priority and needs to be handled differently for optimal security management. You can now use the Microsoft Graph Security connector to get your high severity alerts across various security products like Azure Security Center, Windows Defender ATP, Palo Alto Networks, etc. and route those for immediate action. This example workflow below segregates alerts based on severity and routes high severity alerts for investigations.
- This workflow starts with a Recurrence trigger set for polling every 15 minutes. Two workflows kick off in parallel.
- Refer to the left branch.
- Refer to the right branch.
Diagram 1 – Automate Security Monitoring and Management
Automating Security Response Handling
To reduce the workload of security analysts, alerts about suspicious user actions, such as logging in from unusual locations or atypical data access, can be investigated further and in some cases automatically resolved with input from the user in question. An example workflow for this using the Microsoft Graph Security Connector is as follows.
- The workflow starts with a Recurrence trigger like the previous examples.
- For each new alert, check for a user principal name. If present, use the Outlook connector to email the user asking them to provide feedback about the alert, such as IgnoreThisAlert if the activity was legitimate or I’mUnsure if it’s not known.
- If the user responds as I’mUnsure, further investigation of the alert is needed; initiate a Teams channel with the security analysts for further investigations using the Microsoft Teams connector. This can be supplemented by SMS, etc. as well as covered in the earlier example.
- If the user responds as IgnoreThisAlert, update the alert status to closed using the Microsoft Graph Security connector and add comments to track resolution based on user input.
 Diagram 2 – Automate Security Response Handling
Automating Security Investigations
The often-manual process of correlating related alerts during an investigation can be automated using the Microsoft Graph Security connector. In this example workflow, all recent alerts for the host IP being investigated are automatically collected. This same example can be leveraged to find alerts for a specific file, user, or process user under investigation or other alert properties.
- The workflow starts with a Recurrence trigger like the previous examples.
- For each high severity alert, check for a host private IP address. If available, compare the address with that of all alerts generated in the past 2 hours using the Microsoft Graph Security connector.
- Email a list of related alerts to the security analyst team for investigation using the Outlook connector.
 Diagram 3 – Automate Security Investigations
What’s Next?
We are working on templates for the Microsoft Graph Security connector to simplify the process of building your security playbooks. Fill out the feedback form to help us design templates for the workflows you need most.
Try the Microsoft Graph Security connector and please share your feedback by filing a GitHub issue or by engaging on the Microsoft Security Graph API tech community or StackOverflow.
We are happy to announce Microsoft Graph Security connectors for Azure Logic Apps, Microsoft Flow, and PowerApps, which greatly simplify the development of automated security workflows. By building playbooks that use the Microsoft Graph Security connector, you can automate common security tasks across multiple security solutions. This reduces the time and resources required to triage, investigate, and remediate security alerts, without the cost and complexity of building and maintaining multiple integrations. For further details on integrating with the Microsoft Graph Security API, learn about the API and access the schema.
Getting Started
Use these connectors now in your existing workflows or create new workflows. The steps are similar for Azure Logic Apps, Flow, and PowerApps. We’ll use Azure Logic Apps as an example here. Refer to the documentation and connector reference for further details.
- Your Azure Active Directory (AD) tenant administrator must first grant consent for the connector; follow the steps in the connector documentation.
- Sign in to the Azure portal, and open a new or an existing Logic App in Logic App Designer.
- For a blank Logic App, first start with a trigger, such as the Recurrence trigger. For existing Logic Apps, add an action to the end of a workflow by clicking ‘+ Next Step’ or between steps by clicking the (+) sign and selecting ‘Add an action’.
- Search for “Microsoft graph security” and select an action from the list.
- Provide the necessary details for your selected action and continue building your Logic App workflow.
Supported Actions
The Microsoft Graph Security connectors enable the following actions:
- Get alerts – Use this action to get a list of alerts filtered on one or more alert properties. For example, get a list of alerts with Provider equals Azure Security Center or Palo Alto Networks.
- Get alert by ID – Use this action to get a specific alert by alert id property.
- Update alert – Update a specific alert by specifying the alert id property. Refer to the list of the editable properties of alerts to ensure required and editable properties are passed in your request. For example, you can update alert assigned to property to assign the alert to a security analyst for investigations.
- Create subscriptions – Use this action to create a Graph webhook subscription that notifies you of any changes, filtered to certain types of alerts you are interested in. For example, you can create a subscription that notifies you of high severity alerts.
- Get active subscriptions – Use this action to get a list of unexpired subscriptions to manage the list of subscriptions
- Update subscription – Update your subscription by specifying the subscription id. For example, you can update the expirationDateTime property of the subscription to extend the subscription.
- Delete subscription – Delete your subscription by specifying the subscription id.
User Scenarios
You can mash up the Microsoft Graph Security connector with the 200+ Microsoft and non-Microsoft connectors available for Azure Logic Apps, Flow and PowerApps to build end-to-end scenarios based on your requirements. We have provided a few examples of scenarios that can be enabled using the Microsoft Graph Security and other connectors.
Automating Security Monitoring and Management
It’s always been a challenge to get notified of critical alerts that needs immediate action in an automated manner. At the same time, not all alerts are of equal priority and needs to be handled differently for optimal security management. You can now use the Microsoft Graph Security connector to get your high severity alerts across various security products like Azure Security Center, Windows Defender ATP, Palo Alto Networks, etc. and route those for immediate action. This example workflow below segregates alerts based on severity and routes high severity alerts for investigations.
- This workflow starts with a Recurrence trigger set for polling every 15 minutes. Two workflows kick off in parallel.
- Refer to the left branch.
- Refer to the right branch.
Diagram 1 – Automate Security Monitoring and Management
Automating Security Response Handling
To reduce the workload of security analysts, alerts about suspicious user actions, such as logging in from unusual locations or atypical data access, can be investigated further and in some cases automatically resolved with input from the user in question. An example workflow for this using the Microsoft Graph Security Connector is as follows.
- The workflow starts with a Recurrence trigger like the previous examples.
- For each new alert, check for a user principal name. If present, use the Outlook connector to email the user asking them to provide feedback about the alert, such as IgnoreThisAlert if the activity was legitimate or I’mUnsure if it’s not known.
- If the user responds as I’mUnsure, further investigation of the alert is needed; initiate a Teams channel with the security analysts for further investigations using the Microsoft Teams connector. This can be supplemented by SMS, etc. as well as covered in the earlier example.
- If the user responds as IgnoreThisAlert, update the alert status to closed using the Microsoft Graph Security connector and add comments to track resolution based on user input.
Diagram 2 – Automate Security Response Handling
Automating Security Investigations
The often-manual process of correlating related alerts during an investigation can be automated using the Microsoft Graph Security connector. In this example workflow, all recent alerts for the host IP being investigated are automatically collected. This same example can be leveraged to find alerts for a specific file, user, or process user under investigation or other alert properties.
- The workflow starts with a Recurrence trigger like the previous examples.
- For each high severity alert, check for a host private IP address. If available, compare the address with that of all alerts generated in the past 2 hours using the Microsoft Graph Security connector.
- Email a list of related alerts to the security analyst team for investigation using the Outlook connector.
Diagram 3 – Automate Security Investigations
What’s Next?
We are working on templates for the Microsoft Graph Security connector to simplify the process of building your security playbooks. Fill out the feedback form to help us design templates for the workflows you need most.
Try the Microsoft Graph Security connector and please share your feedback by filing a GitHub issue or by engaging on the Microsoft Security Graph API tech community or StackOverflow.
It is time to further organize your modern intranet – building with SharePoint and Microsoft 365 – to enhance employee engagement and change the look of your sites so they work for you. Sites (portals) help bring together people and information that reflect your organization. It’s about getting things done – finding where you need to go—with effective navigation and common page elements.
“Megamenu and header layouts will make sites more appealing to groups that have diverse needs for pages and site navigation. It will really make my life easier in many ways as a solution architect for my company. While it’s a look and feel update, these are the features that the end users really notice and makes a big impact.” – verbatim cloud admin feedback sent to Microsoft in reply to the corresponding message center post.
Site owners can now use:
- Megamenus to better organize and showcase their site’s navigation items.
- Updated “Change the look” edit pane consolidates all modern site look & feel options.
- Site headers allow adjustment of layout options, logo and background choices.
- Site footers allow logo, text and links to be added to the bottom of pages.
- Site settings > Site designs to view any applied site designs and apply additional ones.
We will first begin rolling out these new “change the look” features in February 2019 to Office 365 customers that have opted into the Targeted Release program. And then in March 2019, we will begin roll out to Office 365 customers on Standard Release, followed by rolling out to our sovereign data centers (like Office 365 for government (known as GCC)).
Let’s dive into the details and screenshots of each new and updated “change the look” options – all important additions for site owners to configure a more-engaging SharePoint site – a more modern intranet.
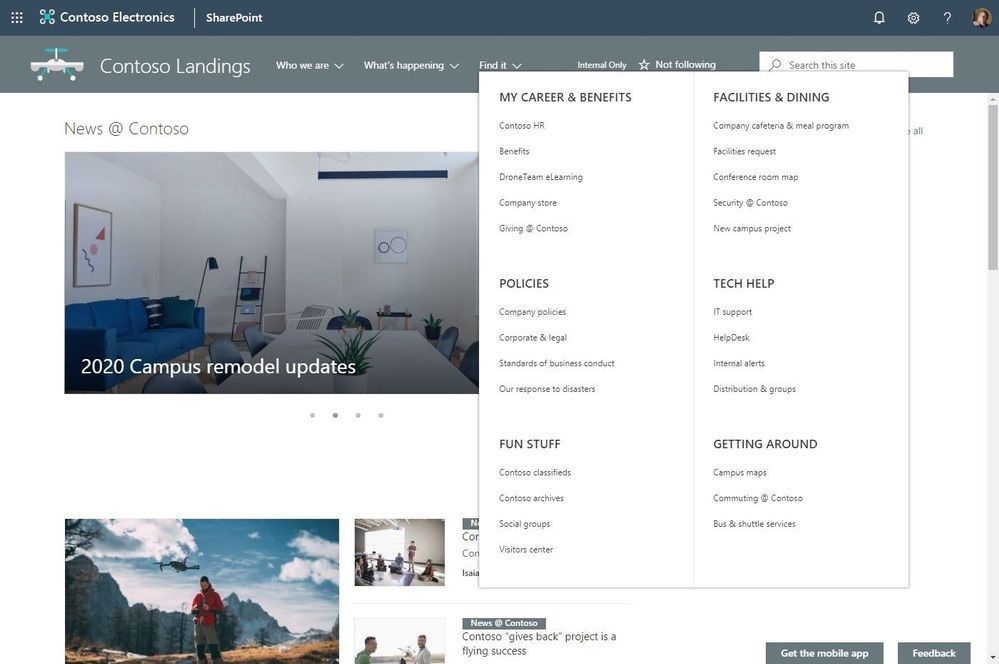
Organize your site navigation with SharePoint megamenus
The most effective SharePoint sites (and web sites in general) help visitors find what they need quickly so that they can use the information they find to make decisions, learn about what is going on, access the tools they need, or engage with colleagues to help solve a problem. Even when search is available, most visitors start their web experiences by navigating.
Now you can change the navigation style to increase the value of your site navigation. The new Megamenu options allow for multiple levels of hierarchy at once – no cascading fly-outs needed. This will enable you to better organize and showcase the content and sites. And of course, for sites that don’t need the megamenu look and feel, you can still use the Cascading option. You simply go into the Change the look edit pane, click on Navigation and choose between Megamenu and Cascading. You then add and adjust your navigation items inline as you had before – now with a new megatastic look if you choose.
The new SharePoint mega-menu helps organize your site navigation.
Navigation should always be planned from the perspective of the user of information – the visitors to your site. And why not present them with a beautiful, organized megamenu. Note: the megamenu navigation layout is only available for horizontally oriented navigations and allows for a panel display of links up to three levels.
Learn how to customize the navigation on your SharePoint site. And review the Microsoft guidance on planning navigation for the modern SharePoint intranet.
Updated Change the look edit pane gives access to control site structure
We have consolidated several look & feel site settings into an updated Change the look edit pane – including where you go to turn on the megamenu option. The Change the look edit pane provides access to site settings for theming, header, navigation and footer options.
 The updated Change the look panel gives you easier access to adjust site theme, navigation, header and footer configuration.
Adjust the header of your sites
Site owners control the header portion of a site with a few simple configuration choices. First, they choose between two layout options: standard and compact. Second, choose a site logo. And third, modern site headers support backgrounds to make it easier to see the distinct header section and adds visual variety at the top of the site; you’ll see four distinct background options.
 Site owners control the header portion of a site by choosing its header layout, logo and background.
Adjust the footer of your sites
When site owners change the look of their site, they can now add a site footer to showcase common information at the bottom of your site – like a logo, text and hyperlinks. If site owners choose not to use a logo image file, they can still add text that will appear on the bottom left. Text with links will appear on the bottom right.
 Add a logo, text and hyperlinks to the footer of your site.
Note: configuring the footer is only available in pages and news articles in SharePoint communication sites. It will not appear at the bottom of SharePoint lists or document libraries within these same communication sites, and it will not available in SharePoint team sites. You will also be able to turn off footers from the “Change the look” panel after this feature rolls out to you. When this feature rolls out, all existing communication sites will get a basic site footer. If you want to turn off the footer control before its rolled out to you, please follow these instructions to turn off footer using PowerShell.
Learn more how to adjust the look of your SharePoint site footer. Learn more how you can “change the look” of your SharePoint site in Office 365.
New site designs panel for site owners
We are providing a new site setting to view any applied Site designs and apply additional ones – from within the sites themselves. The new site setting option is for site owners to display a new site design information panel. If any site designs have been published to the tenant, they will be displayed in the picker. Only site owners and site collection administrators have access to invoke this panel – and it respects any additional scopes on the published site designs, so only those available to the viewer will be displayed. If any sites designs have been applied to the site, they will also be displayed and can be selected to view what changes were applied.
 The Site designs site settings pane allows site owners to view any applied site designs and apply additional ones.
Learn more about working with SharePoint site design and site scripts.
Try more and more of what SharePoint offers, and let us know what you think
Build your modern intranet on SharePoint in Office 365 and get the benefits of investing in business outcomes – reducing IT and development costs, increasing business speed and agility, and up-leveling the dynamic and welcoming nature of your intranet.
In all, we encourage you to build out and organize your sites, your intranet – the way you want them to be consumed in context of your content. As you progress year over year, keep creating and sharing structured, easy-to-navigate experiences to your audience.
We want to empower you and every person on your team to achieve more. Let us know what you need next. We are always open to feedback via UserVoice and continued dialog in the SharePoint community in the Microsoft Tech Community —and we always have an eye on tweets to @SharePoint. Let us know.
—Mark Kashman, senior product manager for the SharePoint team
FAQs
Q: When is this all being released in Office 365?
A: Our goal is to release all the items to Targeted Release customers in Office 365 by the end of February 2019, with release to all Office 365 productions customers by the end of March 2019.
Q: Is this the same set of features Office 365 cloud admins were notified about via the message center – two message center posts: MC165552 and MC 172503?
A: Yes. Microsoft first sent MC165552 (“Updated feature: we’re rolling out new SharePoint Online site branding and navigation features), and then we paused roll out. Recently, we sent the follow up MC172503 (“Updated Feature: New site branding and mega menu navigation features are rolling out”) to indicate that we were moving forward to release this set of features.
It is time to further organize your modern intranet – building with SharePoint and Microsoft 365 – to enhance employee engagement and change the look of your sites so they work for you. Sites (portals) help bring together people and information that reflect your organization. It’s about getting things done – finding where you need to go—with effective navigation and common page elements.
“Megamenu and header layouts will make sites more appealing to groups that have diverse needs for pages and site navigation. It will really make my life easier in many ways as a solution architect for my company. While it’s a look and feel update, these are the features that the end users really notice and makes a big impact.” – verbatim cloud admin feedback sent to Microsoft in reply to the corresponding message center post.
Site owners can now use:
- Megamenus to better organize and showcase their site’s navigation items.
- Updated “Change the look” edit pane consolidates all modern site look & feel options.
- Site headers allow adjustment of layout options, logo and background choices.
- Site footers allow logo, text and links to be added to the bottom of pages.
- Site settings > Site designs to view any applied site designs and apply additional ones.
We will first begin rolling out these new “change the look” features in February 2019 to Office 365 customers that have opted into the Targeted Release program. And then in March 2019, we will begin roll out to Office 365 customers on Standard Release, followed by rolling out to our sovereign data centers (like Office 365 for government (known as GCC)).
Let’s dive into the details and screenshots of each new and updated “change the look” options – all important additions for site owners to configure a more-engaging SharePoint site – a more modern intranet.
Organize your site navigation with SharePoint megamenus
The most effective SharePoint sites (and web sites in general) help visitors find what they need quickly so that they can use the information they find to make decisions, learn about what is going on, access the tools they need, or engage with colleagues to help solve a problem. Even when search is available, most visitors start their web experiences by navigating.
Now you can change the navigation style to increase the value of your site navigation. The new Megamenu options allow for multiple levels of hierarchy at once – no cascading fly-outs needed. This will enable you to better organize and showcase the content and sites. And of course, for sites that don’t need the megamenu look and feel, you can still use the Cascading option. You simply go into the Change the look edit pane, click on Navigation and choose between Megamenu and Cascading. You then add and adjust your navigation items inline as you had before – now with a new megatastic look if you choose.
The new SharePoint mega-menu helps organize your site navigation.
Navigation should always be planned from the perspective of the user of information – the visitors to your site. And why not present them with a beautiful, organized megamenu. Note: the megamenu navigation layout is only available for horizontally oriented navigations and allows for a panel display of links up to three levels.
Learn how to customize the navigation on your SharePoint site. And review the Microsoft guidance on planning navigation for the modern SharePoint intranet.
Updated Change the look edit pane gives access to control site structure
We have consolidated several look & feel site settings into an updated Change the look edit pane – including where you go to turn on the megamenu option. The Change the look edit pane provides access to site settings for theming, header, navigation and footer options.
The updated Change the look panel gives you easier access to adjust site theme, navigation, header and footer configuration.
Adjust the header of your sites
Site owners control the header portion of a site with a few simple configuration choices. First, they choose between two layout options: standard and compact. Second, choose a site logo. And third, modern site headers support backgrounds to make it easier to see the distinct header section and adds visual variety at the top of the site; you’ll see four distinct background options.
Site owners control the header portion of a site by choosing its header layout, logo and background.
Adjust the footer of your sites
When site owners change the look of their site, they can now add a site footer to showcase common information at the bottom of your site – like a logo, text and hyperlinks. If site owners choose not to use a logo image file, they can still add text that will appear on the bottom left. Text with links will appear on the bottom right.
Add a logo, text and hyperlinks to the footer of your site.
Note: configuring the footer is only available in pages and news articles in SharePoint communication sites. It will not appear at the bottom of SharePoint lists or document libraries within these same communication sites, and it will not available in SharePoint team sites. You will also be able to turn off footers from the “Change the look” panel after this feature rolls out to you. When this feature rolls out, all existing communication sites will get a basic site footer. If you want to turn off the footer control before its rolled out to you, please follow these instructions to turn off footer using PowerShell.
Learn more how to adjust the look of your SharePoint site footer. Learn more how you can “change the look” of your SharePoint site in Office 365.
New site designs panel for site owners
We are providing a new site setting to view any applied Site designs and apply additional ones – from within the sites themselves. The new site setting option is for site owners to display a new site design information panel. If any site designs have been published to the tenant, they will be displayed in the picker. Only site owners and site collection administrators have access to invoke this panel – and it respects any additional scopes on the published site designs, so only those available to the viewer will be displayed. If any sites designs have been applied to the site, they will also be displayed and can be selected to view what changes were applied.
The Site designs site settings pane allows site owners to view any applied site designs and apply additional ones.
Learn more about working with SharePoint site design and site scripts.
Try more and more of what SharePoint offers, and let us know what you think
Build your modern intranet on SharePoint in Office 365 and get the benefits of investing in business outcomes – reducing IT and development costs, increasing business speed and agility, and up-leveling the dynamic and welcoming nature of your intranet.
In all, we encourage you to build out and organize your sites, your intranet – the way you want them to be consumed in context of your content. As you progress year over year, keep creating and sharing structured, easy-to-navigate experiences to your audience.
We want to empower you and every person on your team to achieve more. Let us know what you need next. We are always open to feedback via UserVoice and continued dialog in the SharePoint community in the Microsoft Tech Community —and we always have an eye on tweets to @SharePoint. Let us know.
—Mark Kashman, senior product manager for the SharePoint team
FAQs
Q: When is this all being released in Office 365?
A: Our goal is to release all the items to Targeted Release customers in Office 365 by the end of February 2019, with release to all Office 365 productions customers by the end of March 2019.
Q: Is this the same set of features Office 365 cloud admins were notified about via the message center – two message center posts: MC165552 and MC 172503?
A: Yes. Microsoft first sent MC165552 (“Updated feature: we’re rolling out new SharePoint Online site branding and navigation features), and then we paused roll out. Recently, we sent the follow up MC172503 (“Updated Feature: New site branding and mega menu navigation features are rolling out”) to indicate that we were moving forward to release this set of features.
We have heard from customers the challenges with maintaining compliance in the modern workplace, and the desire to reduce the complexity and friction of core compliance processes such as records management. For many organizations, maintaining and validating critical business records is imperative to maintaining business continuity. Today we are announcing new capabilities integrated into Microsoft 365 to help you simplify and streamline core records management processes.
Working closely with several customer development partners, we have understood the importance of using the in-place archive within Office 365 core workloads such as Exchange email and SharePoint online. Organizations are already starting to realize the benefit of the in-place archival capabilities of Office 365 for a variety of content across both communications and collaboration. With these new updates, now organizations will be able to do more with the integrated archive and records management capabilities.
First we are excited to announce a new assessment of Exchange based content including email, chats, teams messages and more to meet the SEC 17a-4 compliance requirement for WORM (Write once, ready many) and non-WORM storage and immutability of records. This assessment was completed by an independent third party, Cohasset Associates, and covers SEC 17a-4, FINRA Rule 4511c and CFTC 1.31 (c-d) and provides a credible confirmation of the features built into Office 365 and their ability to help your organization meet your requirements for immutability and records retention. Learn more about this assessment and download your own copy here.
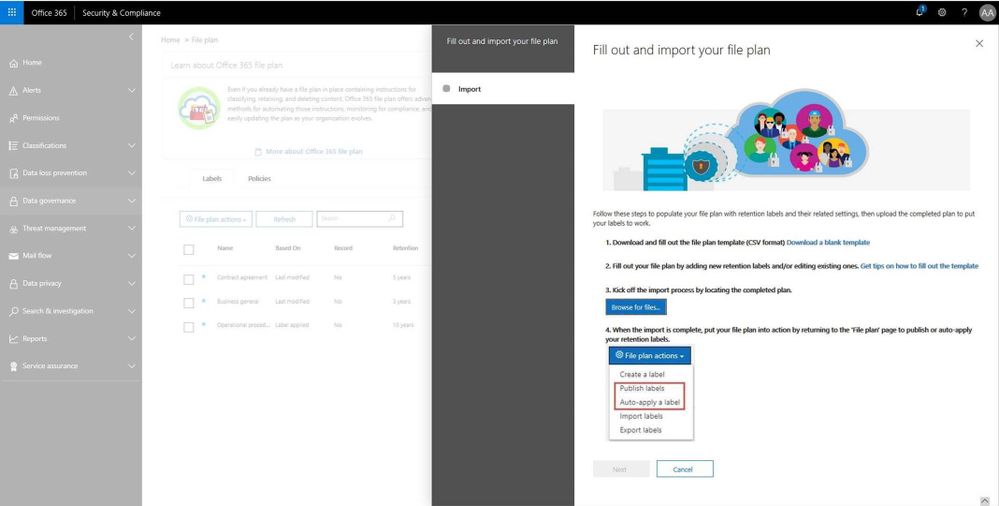
In addition, file plan manager is now generally available. This new capability allows records manager to automate retention schedules policies throughout the lifecycle using intelligent analytics and insights. Record managers can also migrate complex records retention schedules from existing on-prem or other systems into Office 365 and maintain a cohesive experience. Simplified Import and export along with file plan descriptors can be used to create a hierarchical file plan. File plan will also provide into Microsoft Information Protection analytics described below.
Read more about file plan manager here.
We are also releasing enhancements to the disposition workflow, allowing record managers to defensibility delete content and produce a certificate of destruction within the integrated workflow. Read more about this update here
The API supporting Event Based Retention based on triggers from outside systems and workflows is now generally available. Now organizations can trigger retention based on employee departure from HR systems, or accomplish other retention triggers from customer relationship management or financial systems. Read more about this and how to set this up here.

Finally, we know that visibility and ability to derive insights from classification, protection and management of records is critical and ensures confidence in the fidelity of advanced services like auto-classification. Today, along with the introduction of the Microsoft 365 Compliance Center we are announcing the preview of Microsoft Information Protection label analytics, bringing together label insights across Office 365 and Azure Information Protection to share classification and labeling of Office 365 and non-Office 365 data in your environment. This helps deliver a comprehensive view of your digital estate, sensitive data and protection and retention polices that are in place. Read more about the compliance and these updates here.
Get started with these capabilities today.
– Maithili Dandige, Group Program Manager, Microsoft 365 Compliance Solutions


