After listening to customer feedback and suggestions, Exchange Online is making some key changes to the mailbox auditing feature for Office 365 commercial users.
- Mailbox audits will be stored for all user mailboxes within the commercial service by default.
- The default audit configuration will change and include more audit events.
Why is this change happening?
These enhancements and modifications are a part of Microsoft’s commitments to improve the security tooling available to our customers and to ensure that our customers have access to critical audit data to investigate security incidents in their environment when required.
Enabling mailbox auditing by default addresses a specific pain-point with mailbox audit administration today, as Exchange administrators must configure the AuditEnabled setting on each mailbox to be audited after it is provisioned. In support of Microsoft’s commitment to providing our customers with an easy-to-use set of security features, Customers will no longer be required to configure mailbox auditing on a per-mailbox basis, and instead will be able rely on a tenant-wide configuration to enable or disable mailbox audit event collection. Mailbox events will be stored on the all user mailboxes automatically without required action.
In addition, we plan to expand the default set of audit actions to include more of the currently available Owner and Delegate events. If your mailbox configurations rely on the default settings for AuditOwner, AuditDelegate and AuditAdmin actions, your mailboxes will begin to audit according to the updated defaults. If your Exchange administrator has in the past configured mailboxes with a different set of distinct events, those mailboxes will still follow the configuration that was elected and will not be overridden. We are frequently adding to the available mailbox audit actions, and as we continue to add audit capabilities, these audit actions will be added to the default as well. A recent example was the introduction of the audit action for the creation of new Inbox Rules and Calendar delegation settings. We believe that auditing these actions can help our customers trace activity on the mailboxes within their service to a more complete degree.
When will this happen, and what do I need to do?
Over the next several months, we will enable the default-auditing configuration on all tenants with a steady ramp-up with all commercial customers to be covered by the end of the calendar year. At that time, there is nothing you need to do for the service to begin storing your user’s audit events. And if you have already enabled mailbox auditing in Exchange on your user’s mailboxes and are doing so for all new mailboxes – great! Mailboxes that are configured to audit today will continue to do so.
If the Exchange mailbox audit feature is new to you, please take some time to familiarize yourself with the options for mailbox auditing and learn how to leverage these events for your security investigation scenarios. Mailboxes generating audit records can be found in the Security & Compliance Center’s Audit Log interface, or in the mailbox audit log through the Search-MailboxAuditLog cmdlet. Additionally, explore the options available to you for audit actions including the newly-available ones. If you do not intend on relying on the default configuration, consider adding the new audit actions to your configured set.
How can I opt-out of default mailbox auditing?
As we begin rolling out the default-on configuration to tenants worldwide, a tenant administrator has the capability to pre-emptively override and disable all mailbox audits within their tenancy with the Set-OrganizationConfig cmdlet. You may choose to proactively prevent your tenancy’s mailboxes from being audited as part of this feature introduction with this setting. If the tenant-wide AuditDisabled setting is true, all settings for mailbox audit will be overridden to ignore audits. We don’t recommend you use this – but is available should your business require it.
What actions are recordable with Mailbox Auditing?
Mailbox auditing for Owner actions includes high-value scenarios to investigating a business email compromise, such as:
- MailboxLogin events – these events are recorded with client access to user mailboxes including protocol access with POP and IMAP
- Mail actions to Create, Update (edit) a message in any folder, delete actions to include moving a message to the Deleted Items folder or permanently removing messages, and the Copy or Move of a message.
- Actions commonly used in attack scenarios: creation of a mailbox’s Inbox Rule, adding Delegates, or delegating Calendar access to another user.
These Owner events will be added to the service’s default mailbox configuration for auditing. Additional events auditable for the mailbox’s Delegation capabilities include further valuable scenarios that will also be added as default:
- Mails sent on behalf of an individual, in addition to the SendAs action that is currently default
- A Delegate’s action to delete messages in a user’s mailbox or move them around folders.
How do I….?
Make Modifications to the Audit Actions
If you choose not to rely on the default settings for audit actions, you may add or drop actions from your configuration with the Set-Mailbox cmdlet for individual mailboxes. Once you elect a set of audit events this way, your mailboxes will no longer automatically follow the default service configuration and will need to be updated via PowerShell when Exchange releases new auditable actions.
Disable Mailbox Auditing for All Mailboxes
When your organization begins auditing all mailboxes by default, you may disable all mailbox auditing with this command:
Set-OrganizationConfig -AuditDisabled $true
To re-enable all mailbox audits, run:
Set-OrganizationConfig -AuditDisabled $false
In the default setting, the -AuditDisabled value will be False.
Disable Mailbox Auditing on Some Mailboxes
When your tenancy begins auditing all mailboxes by default, the per-mailbox AuditEnabled setting will be overridden. However, you may still choose to disable audits for a subset of your users if there is a business need. You can elect this option by configuring audit bypass associations on the identities you intend to ignore with the Set-MailboxAuditBypassAssociation cmdlet.
Find more information:
After listening to customer feedback and suggestions, Exchange Online is making some key changes to the mailbox auditing feature for Office 365 commercial users.
- Mailbox audits will be stored for all user mailboxes within the commercial service by default.
- The default audit configuration will change and include more audit events.
Why is this change happening?
These enhancements and modifications are a part of Microsoft’s commitments to improve the security tooling available to our customers and to ensure that our customers have access to critical audit data to investigate security incidents in their environment when required.
Enabling mailbox auditing by default addresses a specific pain-point with mailbox audit administration today, as Exchange administrators must configure the AuditEnabled setting on each mailbox to be audited after it is provisioned. In support of Microsoft’s commitment to providing our customers with an easy-to-use set of security features, Customers will no longer be required to configure mailbox auditing on a per-mailbox basis, and instead will be able rely on a tenant-wide configuration to enable or disable mailbox audit event collection. Mailbox events will be stored on the all user mailboxes automatically without required action.
In addition, we plan to expand the default set of audit actions to include more of the currently available Owner and Delegate events. If your mailbox configurations rely on the default settings for AuditOwner, AuditDelegate and AuditAdmin actions, your mailboxes will begin to audit according to the updated defaults. If your Exchange administrator has in the past configured mailboxes with a different set of distinct events, those mailboxes will still follow the configuration that was elected and will not be overridden. We are frequently adding to the available mailbox audit actions, and as we continue to add audit capabilities, these audit actions will be added to the default as well. A recent example was the introduction of the audit action for the creation of new Inbox Rules and Calendar delegation settings. We believe that auditing these actions can help our customers trace activity on the mailboxes within their service to a more complete degree.
When will this happen, and what do I need to do?
Over the next several months, we will enable the default-auditing configuration on all tenants with a steady ramp-up with all commercial customers to be covered by the end of the calendar year. At that time, there is nothing you need to do for the service to begin storing your user’s audit events. And if you have already enabled mailbox auditing in Exchange on your user’s mailboxes and are doing so for all new mailboxes – great! Mailboxes that are configured to audit today will continue to do so.
If the Exchange mailbox audit feature is new to you, please take some time to familiarize yourself with the options for mailbox auditing and learn how to leverage these events for your security investigation scenarios. Mailboxes generating audit records can be found in the Security & Compliance Center’s Audit Log interface, or in the mailbox audit log through the Search-MailboxAuditLog cmdlet. Additionally, explore the options available to you for audit actions including the newly-available ones. If you do not intend on relying on the default configuration, consider adding the new audit actions to your configured set.
How can I opt-out of default mailbox auditing?
As we begin rolling out the default-on configuration to tenants worldwide, a tenant administrator has the capability to pre-emptively override and disable all mailbox audits within their tenancy with the Set-OrganizationConfig cmdlet. You may choose to proactively prevent your tenancy’s mailboxes from being audited as part of this feature introduction with this setting. If the tenant-wide AuditDisabled setting is true, all settings for mailbox audit will be overridden to ignore audits. We don’t recommend you use this – but is available should your business require it.
What actions are recordable with Mailbox Auditing?
Mailbox auditing for Owner actions includes high-value scenarios to investigating a business email compromise, such as:
- MailboxLogin events – these events are recorded with client access to user mailboxes including protocol access with POP and IMAP
- Mail actions to Create, Update (edit) a message in any folder, delete actions to include moving a message to the Deleted Items folder or permanently removing messages, and the Copy or Move of a message.
- Actions commonly used in attack scenarios: creation of a mailbox’s Inbox Rule, adding Delegates, or delegating Calendar access to another user.
These Owner events will be added to the service’s default mailbox configuration for auditing. Additional events auditable for the mailbox’s Delegation capabilities include further valuable scenarios that will also be added as default:
- Mails sent on behalf of an individual, in addition to the SendAs action that is currently default
- A Delegate’s action to delete messages in a user’s mailbox or move them around folders.
How do I….?
Make Modifications to the Audit Actions
If you choose not to rely on the default settings for audit actions, you may add or drop actions from your configuration with the Set-Mailbox cmdlet for individual mailboxes. Once you elect a set of audit events this way, your mailboxes will no longer automatically follow the default service configuration and will need to be updated via PowerShell when Exchange releases new auditable actions.
Disable Mailbox Auditing for All Mailboxes
When your organization begins auditing all mailboxes by default, you may disable all mailbox auditing with this command:
Set-OrganizationConfig -AuditDisabled $true
To re-enable all mailbox audits, run:
Set-OrganizationConfig -AuditDisabled $false
In the default setting, the -AuditDisabled value will be False.
Disable Mailbox Auditing on Some Mailboxes
When your tenancy begins auditing all mailboxes by default, the per-mailbox AuditEnabled setting will be overridden. However, you may still choose to disable audits for a subset of your users if there is a business need. You can elect this option by configuring audit bypass associations on the identities you intend to ignore with the Set-MailboxAuditBypassAssociation cmdlet.
Find more information:
Overview
MFA enablement completely changes an organization’s security posture. Even though MFA does not necessarily provide perfect security, it does make it significantly more challenging to breach accounts and perhaps enough to encourage the attacker to seek out an easier target instead. This statement is not a presumption; during the 2017 Black Hat conference, multi-factor authentication and encryption were the 2 biggest named obstacles surveyed from hackers. Organizations recognize the benefits of MFA but we’ve received feedback about usability challenges in Exchange administration scenarios. This post identifies the popular administration workflows and will reference tools to fulfill them in accounts with MFA enforced.
To help increase the security of administrator accounts, you should enable MFA for your administrative accounts. For instructions on how to turn on MFA for Office 365 accounts, see this article. The workflow for users to set up MFA on their accounts is laid out in this document.
Exchange Online Administration Tools
Depending on the organization, Exchange Online is administrated through several different interfaces. The Office 365 customer base is incredibly diverse with larger tenants relying on automation to service their users while less complex organizations administrate the service from the portals.
Automation
Automation of Exchange administration is exposed primarily through remote PowerShell cmdlets. Many administrators use standard Windows PowerShell to connect to a remote Exchange server but if the account has MFA enabled, you need to install a separate Exchange Online PowerShell module based on the instructions in this document.
Follow the instructions here to connect to Exchange Online PowerShell with MFA. You can run scripts from this client or interact directly with Exchange. Some organizations create custom interactive scripts which provides a more admin friendly and less error prone interface for common administrative tasks on the tenant.
Portals
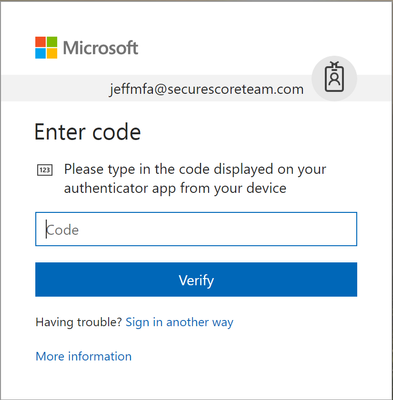
Office 365 provides portals to administrate Exchange Online, such as the Admin center, Security & Compliance Center and Exchange admin center. When MFA is enabled, you will be prompted for an authentication code.
Other Administration Workflows
Scheduled Automation
One of the main reasons organizations need to periodically run scripts on their tenant is for compliance/reporting requirements to scan the states of various assets. Some organizations have established procedures for employees to run a set of scripts as a part of their weekly/monthly responsibilities.
Some admins set up scheduled PowerShell tasks to delegate the responsibility of running this script to a machine. Of course, since the objective is to run these scripts without human intervention, MFA is not possible and will need to be turned off on these accounts. In order to authenticate into the service, administrators will still need to submit their credentials. Credentials should never be stored in plaintext. Instead, use the commands below to encode your password. You can only decode the password on the same computer with the same user account.
$AdminCred = Get-Credential
$AdminCred.Password | ConvertFrom-SecureString | Out-File C:AdminCred.txt
To submit this password in your scripts use the commands below. Replace “AdminUsername” with your account username.
$password = Get-Content C:AdminCred.txt | ConvertTo-SecureString
$Credentials = New-Object -typename System.Management.Automation.PSCredential -ArgumentList "AdminUsername",$password
Connect-EXOPSSession -Credential $AdminCred
Import-PSSession $ExoSession
Since this does still register a risk if an adversary breaches your computer, you should take the following precautions on the machine with the scheduled task:
- Tightly control access to the machine and disable Remote Desktop Protocol (RDP)
- Limit the use of the account to only administrative activities (disable mail or use an alt account)
- Set strong passwords
- Enable unified audit log and mailbox auditing
- Periodically review the audit logs for this account for signs of compromise
- Confine admin activities to within your network perimeter
- Constrain cmdlets permissions as tightly as possible to the account through role management
Exchange Role Management
You can limit the permissions of administrative accounts using role groups to ensure that even if the account does get breached, the actions that the attacker can take are limited to the administration responsibilities of the account. Details on how to manage role assignments are in this article.
Long-running Scripts
When running long scripts from the standard Windows PowerShell client, administrators have faced session timeouts. Typically, the solution is to wrap the script with a loop that checks for session timeouts and recover by submitting saved credentials to re-establish the session. Now, how would you do this without human intervention for MFA accounts which require a second method of authentication?
Fortunately, the Exchange Online PowerShell Module takes care of session timeouts by re-establishing the session automatically. NOTE: it is important to use the UserPrincipalName parameter to connect so that the client can automatically re-establish the session for you.
Connect-EXOPSSession –UserPrincipalName joe@contoso.com
See below, the original PowerShell session has expired before I ran the Get-mailbox command. The client recognizes that the session has expired and automatically creates a new session without prompting for credentials.

General Secure Administration Recommendations
Beyond using MFA for Exchange administration, Microsoft recommends that you also take a broader look at your security. Below are some great solutions and ideas to help protect administrator accounts:
We hope this post has helped create a more secure and usability friendly administration story for you. Leave us a comment below with feedback!
Overview
MFA enablement completely changes an organization’s security posture. Even though MFA does not necessarily provide perfect security, it does make it significantly more challenging to breach accounts and perhaps enough to encourage the attacker to seek out an easier target instead. This statement is not a presumption; during the 2017 Black Hat conference, multi-factor authentication and encryption were the 2 biggest named obstacles surveyed from hackers. Organizations recognize the benefits of MFA but we’ve received feedback about usability challenges in Exchange administration scenarios. This post identifies the popular administration workflows and will reference tools to fulfill them in accounts with MFA enforced.
To help increase the security of administrator accounts, you should enable MFA for your administrative accounts. For instructions on how to turn on MFA for Office 365 accounts, see this article. The workflow for users to set up MFA on their accounts is laid out in this document.
Exchange Online Administration Tools
Depending on the organization, Exchange Online is administrated through several different interfaces. The Office 365 customer base is incredibly diverse with larger tenants relying on automation to service their users while less complex organizations administrate the service from the portals.
Automation
Automation of Exchange administration is exposed primarily through remote PowerShell cmdlets. Many administrators use standard Windows PowerShell to connect to a remote Exchange server but if the account has MFA enabled, you need to install a separate Exchange Online PowerShell module based on the instructions in this document.
Follow the instructions here to connect to Exchange Online PowerShell with MFA. You can run scripts from this client or interact directly with Exchange. Some organizations create custom interactive scripts which provides a more admin friendly and less error prone interface for common administrative tasks on the tenant.
Portals
Office 365 provides portals to administrate Exchange Online, such as the Admin center, Security & Compliance Center and Exchange admin center. When MFA is enabled, you will be prompted for an authentication code.
Other Administration Workflows
Scheduled Automation
One of the main reasons organizations need to periodically run scripts on their tenant is for compliance/reporting requirements to scan the states of various assets. Some organizations have established procedures for employees to run a set of scripts as a part of their weekly/monthly responsibilities.
Some admins set up scheduled PowerShell tasks to delegate the responsibility of running this script to a machine. Of course, since the objective is to run these scripts without human intervention, MFA is not possible and will need to be turned off on these accounts. In order to authenticate into the service, administrators will still need to submit their credentials. Credentials should never be stored in plaintext. Instead, use the commands below to encode your password. You can only decode the password on the same computer with the same user account.
$AdminCred = Get-Credential
$AdminCred.Password | ConvertFrom-SecureString | Out-File C:AdminCred.txt
To submit this password in your scripts use the commands below. Replace “AdminUsername” with your account username.
$password = Get-Content C:AdminCred.txt | ConvertTo-SecureString
$Credentials = New-Object -typename System.Management.Automation.PSCredential -ArgumentList "AdminUsername",$password
Connect-EXOPSSession -Credential $AdminCred
Import-PSSession $ExoSession
Since this does still register a risk if an adversary breaches your computer, you should take the following precautions on the machine with the scheduled task:
- Tightly control access to the machine and disable Remote Desktop Protocol (RDP)
- Limit the use of the account to only administrative activities (disable mail or use an alt account)
- Set strong passwords
- Enable unified audit log and mailbox auditing
- Periodically review the audit logs for this account for signs of compromise
- Confine admin activities to within your network perimeter
- Constrain cmdlets permissions as tightly as possible to the account through role management
Exchange Role Management
You can limit the permissions of administrative accounts using role groups to ensure that even if the account does get breached, the actions that the attacker can take are limited to the administration responsibilities of the account. Details on how to manage role assignments are in this article.
Long-running Scripts
When running long scripts from the standard Windows PowerShell client, administrators have faced session timeouts. Typically, the solution is to wrap the script with a loop that checks for session timeouts and recover by submitting saved credentials to re-establish the session. Now, how would you do this without human intervention for MFA accounts which require a second method of authentication?
Fortunately, the Exchange Online PowerShell Module takes care of session timeouts by re-establishing the session automatically. NOTE: it is important to use the UserPrincipalName parameter to connect so that the client can automatically re-establish the session for you.
Connect-EXOPSSession –UserPrincipalName joe@contoso.com
See below, the original PowerShell session has expired before I ran the Get-mailbox command. The client recognizes that the session has expired and automatically creates a new session without prompting for credentials.
General Secure Administration Recommendations
Beyond using MFA for Exchange administration, Microsoft recommends that you also take a broader look at your security. Below are some great solutions and ideas to help protect administrator accounts:
We hope this post has helped create a more secure and usability friendly administration story for you. Leave us a comment below with feedback!
Overview
MFA enablement completely changes an organization’s security posture. Even though MFA does not necessarily provide perfect security, it does make it significantly more challenging to breach accounts and perhaps enough to encourage the attacker to seek out an easier target instead. This statement is not a presumption; during the 2017 Black Hat conference, multi-factor authentication and encryption were the 2 biggest named obstacles surveyed from hackers. Organizations recognize the benefits of MFA but we’ve received feedback about usability challenges in Exchange administration scenarios. This post identifies the popular administration workflows and will reference tools to fulfill them in accounts with MFA enforced.
To help increase the security of administrator accounts, you should enable MFA for your administrative accounts. For instructions on how to turn on MFA for Office 365 accounts, see this article. The workflow for users to set up MFA on their accounts is laid out in this document.
Exchange Online Administration Tools
Depending on the organization, Exchange Online is administrated through several different interfaces. The Office 365 customer base is incredibly diverse with larger tenants relying on automation to service their users while less complex organizations administrate the service from the portals.
Automation
Automation of Exchange administration is exposed primarily through remote PowerShell cmdlets. Many administrators use standard Windows PowerShell to connect to a remote Exchange server but if the account has MFA enabled, you need to install a separate Exchange Online PowerShell module based on the instructions in this document.
Follow the instructions here to connect to Exchange Online PowerShell with MFA. You can run scripts from this client or interact directly with Exchange. Some organizations create custom interactive scripts which provides a more admin friendly and less error prone interface for common administrative tasks on the tenant.
Portals
Office 365 provides portals to administrate Exchange Online, such as the Admin center, Security & Compliance Center and Exchange admin center. When MFA is enabled, you will be prompted for an authentication code.
Other Administration Workflows
Scheduled Automation
One of the main reasons organizations need to periodically run scripts on their tenant is for compliance/reporting requirements to scan the states of various assets. Some organizations have established procedures for employees to run a set of scripts as a part of their weekly/monthly responsibilities.
Some admins set up scheduled PowerShell tasks to delegate the responsibility of running this script to a machine. Of course, since the objective is to run these scripts without human intervention, MFA is not possible and will need to be turned off on these accounts. In order to authenticate into the service, administrators will still need to submit their credentials. Credentials should never be stored in plaintext. Instead, use the commands below to encode your password. You can only decode the password on the same computer with the same user account.
$AdminCred = Get-Credential
$AdminCred.Password | ConvertFrom-SecureString | Out-File C:AdminCred.txt
To submit this password in your scripts use the commands below. Replace “AdminUsername” with your account username.
$password = Get-Content C:AdminCred.txt | ConvertTo-SecureString
$Credentials = New-Object -typename System.Management.Automation.PSCredential -ArgumentList "AdminUsername",$password
Connect-EXOPSSession -Credential $AdminCred
Import-PSSession $ExoSession
Since this does still register a risk if an adversary breaches your computer, you should take the following precautions on the machine with the scheduled task:
- Tightly control access to the machine and disable Remote Desktop Protocol (RDP)
- Limit the use of the account to only administrative activities (disable mail or use an alt account)
- Set strong passwords
- Enable unified audit log and mailbox auditing
- Periodically review the audit logs for this account for signs of compromise
- Confine admin activities to within your network perimeter
- Constrain cmdlets permissions as tightly as possible to the account through role management
Exchange Role Management
You can limit the permissions of administrative accounts using role groups to ensure that even if the account does get breached, the actions that the attacker can take are limited to the administration responsibilities of the account. Details on how to manage role assignments are in this article.
Long-running Scripts
When running long scripts from the standard Windows PowerShell client, administrators have faced session timeouts. Typically, the solution is to wrap the script with a loop that checks for session timeouts and recover by submitting saved credentials to re-establish the session. Now, how would you do this without human intervention for MFA accounts which require a second method of authentication?
Fortunately, the Exchange Online PowerShell Module takes care of session timeouts by re-establishing the session automatically. NOTE: it is important to use the UserPrincipalName parameter to connect so that the client can automatically re-establish the session for you.
Connect-EXOPSSession –UserPrincipalName joe@contoso.com
See below, the original PowerShell session has expired before I ran the Get-mailbox command. The client recognizes that the session has expired and automatically creates a new session without prompting for credentials.
General Secure Administration Recommendations
Beyond using MFA for Exchange administration, Microsoft recommends that you also take a broader look at your security. Below are some great solutions and ideas to help protect administrator accounts:
We hope this post has helped create a more secure and usability friendly administration story for you. Leave us a comment below with feedback!
Overview
MFA enablement completely changes an organization’s security posture. Even though MFA does not necessarily provide perfect security, it does make it significantly more challenging to breach accounts and perhaps enough to encourage the attacker to seek out an easier target instead. This statement is not a presumption; during the 2017 Black Hat conference, multi-factor authentication and encryption were the 2 biggest named obstacles surveyed from hackers. Organizations recognize the benefits of MFA but we’ve received feedback about usability challenges in Exchange administration scenarios. This post identifies the popular administration workflows and will reference tools to fulfill them in accounts with MFA enforced.
To help increase the security of administrator accounts, you should enable MFA for your administrative accounts. For instructions on how to turn on MFA for Office 365 accounts, see this article. The workflow for users to set up MFA on their accounts is laid out in this document.
Exchange Online Administration Tools
Depending on the organization, Exchange Online is administrated through several different interfaces. The Office 365 customer base is incredibly diverse with larger tenants relying on automation to service their users while less complex organizations administrate the service from the portals.
Automation
Automation of Exchange administration is exposed primarily through remote PowerShell cmdlets. Many administrators use standard Windows PowerShell to connect to a remote Exchange server but if the account has MFA enabled, you need to install a separate Exchange Online PowerShell module based on the instructions in this document.
Follow the instructions here to connect to Exchange Online PowerShell with MFA. You can run scripts from this client or interact directly with Exchange. Some organizations create custom interactive scripts which provides a more admin friendly and less error prone interface for common administrative tasks on the tenant.
Portals
Office 365 provides portals to administrate Exchange Online, such as the Admin center, Security & Compliance Center and Exchange admin center. When MFA is enabled, you will be prompted for an authentication code.
Other Administration Workflows
Scheduled Automation
One of the main reasons organizations need to periodically run scripts on their tenant is for compliance/reporting requirements to scan the states of various assets. Some organizations have established procedures for employees to run a set of scripts as a part of their weekly/monthly responsibilities.
Some admins set up scheduled PowerShell tasks to delegate the responsibility of running this script to a machine. Of course, since the objective is to run these scripts without human intervention, MFA is not possible and will need to be turned off on these accounts. In order to authenticate into the service, administrators will still need to submit their credentials. Credentials should never be stored in plaintext. Instead, use the commands below to encode your password. You can only decode the password on the same computer with the same user account.
$AdminCred = Get-Credential
$AdminCred.Password | ConvertFrom-SecureString | Out-File C:AdminCred.txt
To submit this password in your scripts use the commands below. Replace “AdminUsername” with your account username.
$password = Get-Content C:AdminCred.txt | ConvertTo-SecureString
$Credentials = New-Object -typename System.Management.Automation.PSCredential -ArgumentList "AdminUsername",$password
Connect-EXOPSSession -Credential $AdminCred
Import-PSSession $ExoSession
Since this does still register a risk if an adversary breaches your computer, you should take the following precautions on the machine with the scheduled task:
- Tightly control access to the machine and disable Remote Desktop Protocol (RDP)
- Limit the use of the account to only administrative activities (disable mail or use an alt account)
- Set strong passwords
- Enable unified audit log and mailbox auditing
- Periodically review the audit logs for this account for signs of compromise
- Confine admin activities to within your network perimeter
- Constrain cmdlets permissions as tightly as possible to the account through role management
Exchange Role Management
You can limit the permissions of administrative accounts using role groups to ensure that even if the account does get breached, the actions that the attacker can take are limited to the administration responsibilities of the account. Details on how to manage role assignments are in this article.
Long-running Scripts
When running long scripts from the standard Windows PowerShell client, administrators have faced session timeouts. Typically, the solution is to wrap the script with a loop that checks for session timeouts and recover by submitting saved credentials to re-establish the session. Now, how would you do this without human intervention for MFA accounts which require a second method of authentication?
Fortunately, the Exchange Online PowerShell Module takes care of session timeouts by re-establishing the session automatically. NOTE: it is important to use the UserPrincipalName parameter to connect so that the client can automatically re-establish the session for you.
Connect-EXOPSSession –UserPrincipalName joe@contoso.com
See below, the original PowerShell session has expired before I ran the Get-mailbox command. The client recognizes that the session has expired and automatically creates a new session without prompting for credentials.
General Secure Administration Recommendations
Beyond using MFA for Exchange administration, Microsoft recommends that you also take a broader look at your security. Below are some great solutions and ideas to help protect administrator accounts:
We hope this post has helped create a more secure and usability friendly administration story for you. Leave us a comment below with feedback!
In February we announced several new capabilities coming soon to help organizations protect their sensitive data – across devices, apps, cloud services and on-premises. Today we’re announcing the general availability of several new sensitive information types and a new template that helps you discover, classify, protect and manage personal information that is relevant to GDPR obligations.
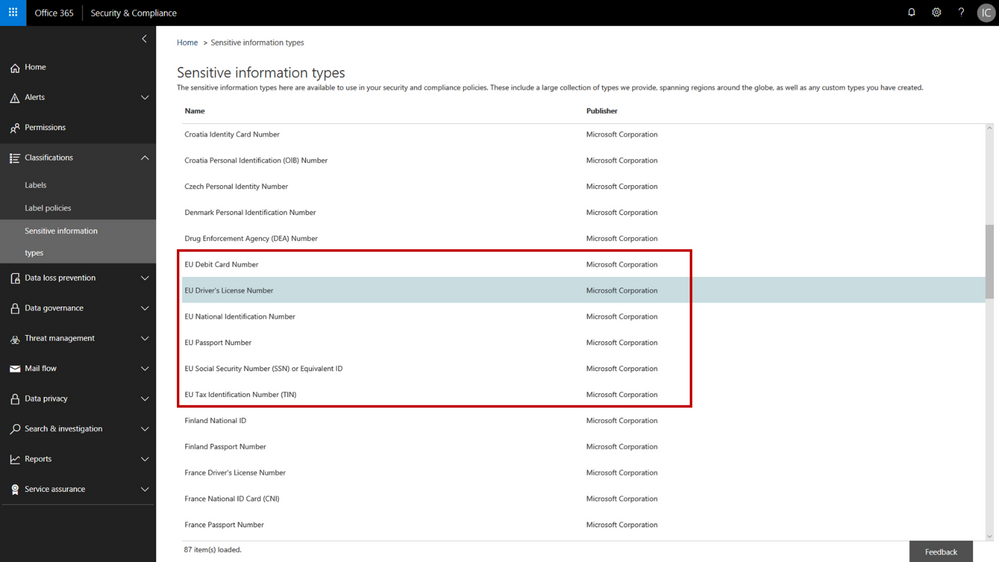
The addition of the new personal information data types adds to the existing built-in sensitive information types that are available in the Office 365 security & compliance center. You can use these sensitive information types in defining your data governance and data protection policies – there are now 87 different data types to choose from. While many of the previous sensitive information types were relevant to GDPR, the new sensitive information types help provide a more complete and consolidated set. The new personal information data types include:
- EU passport number
- EU national identification number
- EU driver’s license number
- EU tax identification number (TIN)
- EU social security number (SSN) or equivalent ID
For each of these information types, the service detects data that matches the specific patterns used by the 28 EU countries. For example, configuring your policy to include “EU driver’s license number” will detect driver’s license numbers used by any of the 28 covered EU countries.
New EU personal information data types in the Office 365 Security & Compliance Center
When configuring data governance or data loss prevention policies, you can now scan Office 365 locations (e.g. Exchange Online, SharePoint Online, OneDrive for Business) for personal information that matches the new EU data types, and then apply the desired data retention or protection actions. You can customize your policies to look for any combination of these new personal data types or use in conjunction with any of the other existing sensitive information types. For example, you can detect EU national identification numbers and EU passport numbers (both of which are new information types), in combination with US passport numbers (a previously available information type). We’ve also made it easy to detect any of the EU personal information data types by providing a GDPR template that consolidates these new information types into a single group that you can use in your policy configuration.
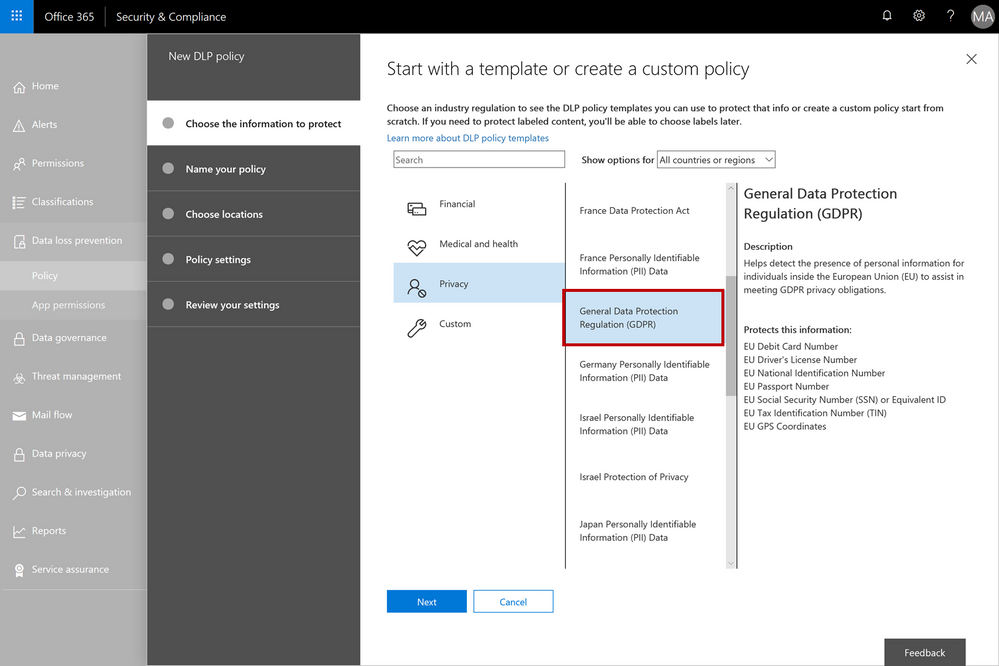 The GDPR template consolidates the new EU personal information data types into a single group – this can be used when configuring your data governance or data loss prevention policies
As with all the other sensitive information types, there is a lot of flexibility to customize and fine-tune the parameters to meet your specific needs. Learn more about the built-in sensitive information types or even create your own custom sensitive information types (such as employee ID numbers that are unique to your company).
We’re excited to release the new EU sensitive information types and GDPR template – this should help make it easier to discover, classify, protect and manage GDPR related personal information. Our support articles have also been updated with details on the specific detection methods and patterns associated with each of the data types. These new sensitive information types are available now in the Office 365 security and compliance center, and we are targeting these to also be available in Azure Information Protection in Q3 CY18. We are also investigating adding more EU personal information data types in the future and will provide more details as plans get formalized.
In February we announced several new capabilities coming soon to help organizations protect their sensitive data – across devices, apps, cloud services and on-premises. Today we’re announcing the general availability of several new sensitive information types and a new template that helps you discover, classify, protect and manage personal information that is relevant to GDPR obligations.
The addition of the new personal information data types adds to the existing built-in sensitive information types that are available in the Office 365 security & compliance center. You can use these sensitive information types in defining your data governance and data protection policies – there are now 87 different data types to choose from. While many of the previous sensitive information types were relevant to GDPR, the new sensitive information types help provide a more complete and consolidated set. The new personal information data types include:
- EU passport number
- EU national identification number
- EU driver’s license number
- EU tax identification number (TIN)
- EU social security number (SSN) or equivalent ID
For each of these information types, the service detects data that matches the specific patterns used by the 28 EU countries. For example, configuring your policy to include “EU driver’s license number” will detect driver’s license numbers used by any of the 28 covered EU countries.
New EU personal information data types in the Office 365 Security & Compliance Center
When configuring data governance or data loss prevention policies, you can now scan Office 365 locations (e.g. Exchange Online, SharePoint Online, OneDrive for Business) for personal information that matches the new EU data types, and then apply the desired data retention or protection actions. You can customize your policies to look for any combination of these new personal data types or use in conjunction with any of the other existing sensitive information types. For example, you can detect EU national identification numbers and EU passport numbers (both of which are new information types), in combination with US passport numbers (a previously available information type). We’ve also made it easy to detect any of the EU personal information data types by providing a GDPR template that consolidates these new information types into a single group that you can use in your policy configuration.
The GDPR template consolidates the new EU personal information data types into a single group – this can be used when configuring your data governance or data loss prevention policies
As with all the other sensitive information types, there is a lot of flexibility to customize and fine-tune the parameters to meet your specific needs. Learn more about the built-in sensitive information types or even create your own custom sensitive information types (such as employee ID numbers that are unique to your company).
We’re excited to release the new EU sensitive information types and GDPR template – this should help make it easier to discover, classify, protect and manage GDPR related personal information. Our support articles have also been updated with details on the specific detection methods and patterns associated with each of the data types. These new sensitive information types are available now in the Office 365 security and compliance center, and we are targeting these to also be available in Azure Information Protection in Q3 CY18. We are also investigating adding more EU personal information data types in the future and will provide more details as plans get formalized.
In February we announced several new capabilities coming soon to help organizations protect their sensitive data – across devices, apps, cloud services and on-premises. Today we’re announcing the general availability of several new sensitive information types and a new template that helps you discover, classify, protect and manage personal information that is relevant to GDPR obligations.
The addition of the new personal information data types adds to the existing built-in sensitive information types that are available in the Office 365 security & compliance center. You can use these sensitive information types in defining your data governance and data protection policies – there are now 87 different data types to choose from. While many of the previous sensitive information types were relevant to GDPR, the new sensitive information types help provide a more complete and consolidated set. The new personal information data types include:
- EU passport number
- EU national identification number
- EU driver’s license number
- EU tax identification number (TIN)
- EU social security number (SSN) or equivalent ID
For each of these information types, the service detects data that matches the specific patterns used by the 28 EU countries. For example, configuring your policy to include “EU driver’s license number” will detect driver’s license numbers used by any of the 28 covered EU countries.
New EU personal information data types in the Office 365 Security & Compliance Center
When configuring data governance or data loss prevention policies, you can now scan Office 365 locations (e.g. Exchange Online, SharePoint Online, OneDrive for Business) for personal information that matches the new EU data types, and then apply the desired data retention or protection actions. You can customize your policies to look for any combination of these new personal data types or use in conjunction with any of the other existing sensitive information types. For example, you can detect EU national identification numbers and EU passport numbers (both of which are new information types), in combination with US passport numbers (a previously available information type). We’ve also made it easy to detect any of the EU personal information data types by providing a GDPR template that consolidates these new information types into a single group that you can use in your policy configuration.
The GDPR template consolidates the new EU personal information data types into a single group – this can be used when configuring your data governance or data loss prevention policies
As with all the other sensitive information types, there is a lot of flexibility to customize and fine-tune the parameters to meet your specific needs. Learn more about the built-in sensitive information types or even create your own custom sensitive information types (such as employee ID numbers that are unique to your company).
We’re excited to release the new EU sensitive information types and GDPR template – this should help make it easier to discover, classify, protect and manage GDPR related personal information. Our support articles have also been updated with details on the specific detection methods and patterns associated with each of the data types. These new sensitive information types are available now in the Office 365 security and compliance center, and we are targeting these to also be available in Azure Information Protection in Q3 CY18. We are also investigating adding more EU personal information data types in the future and will provide more details as plans get formalized.
In February we announced several new capabilities coming soon to help organizations protect their sensitive data – across devices, apps, cloud services and on-premises. Today we’re announcing the general availability of several new sensitive information types and a new template that helps you discover, classify, protect and manage personal information that is relevant to GDPR obligations.
The addition of the new personal information data types adds to the existing built-in sensitive information types that are available in the Office 365 security & compliance center. You can use these sensitive information types in defining your data governance and data protection policies – there are now 87 different data types to choose from. While many of the previous sensitive information types were relevant to GDPR, the new sensitive information types help provide a more complete and consolidated set. The new personal information data types include:
- EU passport number
- EU national identification number
- EU driver’s license number
- EU tax identification number (TIN)
- EU social security number (SSN) or equivalent ID
For each of these information types, the service detects data that matches the specific patterns used by the 28 EU countries. For example, configuring your policy to include “EU driver’s license number” will detect driver’s license numbers used by any of the 28 covered EU countries.
New EU personal information data types in the Office 365 Security & Compliance Center
When configuring data governance or data loss prevention policies, you can now scan Office 365 locations (e.g. Exchange Online, SharePoint Online, OneDrive for Business) for personal information that matches the new EU data types, and then apply the desired data retention or protection actions. You can customize your policies to look for any combination of these new personal data types or use in conjunction with any of the other existing sensitive information types. For example, you can detect EU national identification numbers and EU passport numbers (both of which are new information types), in combination with US passport numbers (a previously available information type). We’ve also made it easy to detect any of the EU personal information data types by providing a GDPR template that consolidates these new information types into a single group that you can use in your policy configuration.
The GDPR template consolidates the new EU personal information data types into a single group – this can be used when configuring your data governance or data loss prevention policies
As with all the other sensitive information types, there is a lot of flexibility to customize and fine-tune the parameters to meet your specific needs. Learn more about the built-in sensitive information types or even create your own custom sensitive information types (such as employee ID numbers that are unique to your company).
We’re excited to release the new EU sensitive information types and GDPR template – this should help make it easier to discover, classify, protect and manage GDPR related personal information. Our support articles have also been updated with details on the specific detection methods and patterns associated with each of the data types. These new sensitive information types are available now in the Office 365 security and compliance center, and we are targeting these to also be available in Azure Information Protection in Q3 CY18. We are also investigating adding more EU personal information data types in the future and will provide more details as plans get formalized.