Change agents, from virus outbreaks like COVID-19 to unexpected weather emergencies, highlight the importance of establishing and keeping open the lines of communication. The goal: to ensure everyone stays briefed on the situation and any business impacts.
To address crises, meetings move online, daily guidance email updates get sent, and dedicated sites emerge to consolidate news, related resources and topical Q&A.
This ‘how to’ post addresses the latter, to guide you through simple steps and configuration to establish a crisis management site based on a SharePoint communication site. You, too, will also find additional links to helpful guides and videos at the end.
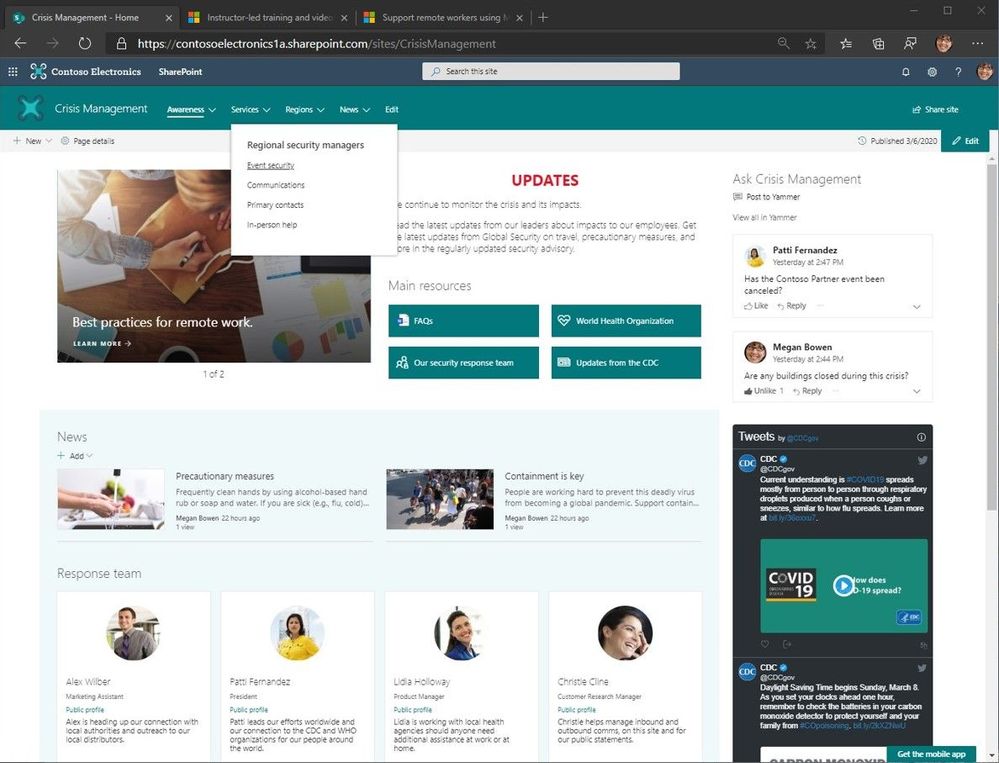
“Crisis Management” SharePoint communication site with top navigation and seven web parts laid out to provide access to people and information from inside and outside the organization.
Note: tenant admins can provision a pre-configured crisis management site using this new look book design: “Crisis Communications – announcements, news, resources, communities and calls-to-action.” Kudos and thanks to & .
How to create a crisis management site
Beyond reading this blog, getting from concept to live site should take no more than two hours. And before you commit to a single pixel, we suggest you take a few minutes to draft a wireframe of the site to identify desired content and information placement; this is what you see as #1 in the below four-image graphic; this, too, will start to describe what SharePoint web parts you will need.
Back of the napkin, check. Let’s get to it.
Create the site
- Go to your SharePoint start page
- Note: Use this common URL pattern to go right to it, or click the SharePoint tile within the Office 365 app launcher (aka, the waffle in the upper left of Office 365 user interface): https://[yourcompany].sharepoint.com/_layouts/15/sharepoint.aspx
- Click + Create site
- Choose Communication site [Support article: “Create a communication site in SharePoint Online“]
- Note: This is what you see as #2 in the below four-image graphic.
- Choose the Topic design, enter site name, and click Finish.
- Note: You’ll then see your new communication site with placeholder content. This is what you see as #3 in the below four-image graphic.
 Create the SharePoint communication site in four steps: 1) draw wire frame content layout plan, 2) create the site from SharePoint start page, 3) edit and rearrange text, words, links, sections, layouts off of template, and 4) finalize design, content and permissions.
Note: if you are unable to create sites within your Office 365 tenant, send a request to your SharePoint admin to create the site and assign you as a site owner. Once created and assigned, you can move to the next steps described in this post.
Adjust section layouts and add useful web parts
From here, it’s all about actualizing your wire frame; if it has a coffee stain on it by now – that just adds character. It’s now time to add sections, select useful web parts and content layout.
On the new crisis management site, click the highlighted Edit button. Hover your mouse below the title area and you’ll see a “+” appear: this applies to both section layouts (the “+” sign appears when hovering near the left side of the page) and when adding web parts (the “+” sign appears more in the middle of the page, and then under each added web part).
 Hover near the left side of the page makes the “+” sign appear to add section layouts.
 Hover more in the center of the page to make the “+” sign appear to add web parts.
Click + to add content like text, documents, video and more; learn more about how to find and use web parts & add sections and columns.
Now, make the site useful and actionable.
Add your content, and update it any time
In the above example crisis management site (first larger graphic in this post and #4 in the above four-image graphic), it uses top navigation (mega menu), a two-column section above a single column section – all to the left of a vertically laid out section, and a total of seven web parts.
Going left-to-right, top-down, the crisis management site uses the following web parts:
- Hero – use this to highlight the most important, or newest, content on the site. The one in the example uses the carousel layout.
- Text – use the rich-text editor to add and update the main intent of the site, or an important message. You can use and adjust color, font size, hyperlink and tables.
- Quick links – call out primary resources. These can be internal sites, pages, documents, videos, FAQs, and can be external links, too.
- Yammer Conversations – create an associated “Crisis Management” community and take questions and manage feedback directly from the site.
- News – publish daily and weekly news posts. They will appear here on the site and flow into everyone SharePoint start page where News from sites appear.
- Twitter – pull in feeds from public Twitter handles; the above example (per COVID-19) highlights @CDCgov and I also suggest: @CDCemergency & @WHO.
- People – indicate the right people dedicated to the specific crisis. This is tied to Azure Active Directory and on-hover, visitors of the site will be able to see all their contact information.
There, too, are web parts to showcase videos, BI dashboards, lists and more; see all web parts in production (scroll down to the “Available web parts” section of this help article).
You can adjust content at any time. You can rearrange where content is placed – aka, drag’n’drop web parts as you need. And know that everything will look great across web and mobile, resizing to the screen your people are using to get to the information.
Categorize top navigation with important pages, sites and more
Mega menus enable site navigation to be displayed at-a-glance. This increases the ease of use and exposure of more key content. You can put up to three levels of hierarchy, both enabling visual buckets of information and increases the likelihood of resources being discovered.
 SharePoint mega menus enable site navigation to be displayed at-a-glance.
Click Edit to the right of the default navigation elements to begin to add, adjust, delete and rearrange nav items. To Add a new header or sub-link, hover above header labels and select the + icon that will appear. To Edit, Move, Promote, and Remove select the ellipses next to the menu topic. Move and Promote headers and sub-links until they are in the desired position and select Save. Once you’ve arranged the hierarchy that works, click the upper right gear icon (site settings) and select Change the look. Select Mega menu and then select Save.
Make the top nav work for you. Make it your own. Learn more how to create and adjust a mega menu in SharePoint communication sites.
Last step: Share your site, aka, give the right permissions
You set permissions to grant people access to the site. And you can broadly communicate to raise awareness about the new crisis management site.
Above the site, in the upper right, you’ll see a gear icon. Click it, select Site permissions, and then click Share site. Now you can type in broader security groups, Office 365 Groups or individuals (possibly others to help you manage the site; give them Edit permissions). For a site like this, it’s common to use the “Everyone” or “Everyone except external users” and ensure they are given Read permissions so that the most users in your organization can access the site in the right way once it’s ready; this then denotes them as Site visitors. Note: I typically uncheck the “Send email” option and rather use Outlook or Yammer to broadly communicate or Teams chat to raise awareness to my teams. Once you’ve decided on the right
 Share the site to give permissions to all or select users and groups you wish to have access to the new site.
Learn more how to manage site permissions.
OK, on to additional materials out there to help best assess, learn and move forward.
‘How to’ webinar [now on-demand; embedded below]
Title: SharePoint: how to build a crisis management site
Description: This ‘how to’ webinar walks you through how to establish a *crisis management* site using a SharePoint communication site in Office 365, both manually and with a pre-configured site design from the Microsoft Look Book.
Date of recording: March 27, 2020
Webinar PowerPoint presentation: PDF
Two of the FAQs from the webinar that were not yet covered in this blog post:
Q: Is it possible to create multiple crisis managements sites within the same tenant?
A: Yes. You can create multiple crisis management type sites so long as you use different names for each site; aka, unique URLs.
Q: I want to create a portal for external people. Is that possible?
A: Yes. Make sure to work with your SharePoint administrator to help enable external sharing for the new site, inline with your external user governance plan before inviting guests.
Helpful, related reads and resources
Stay safe out there, wash your hands (Thanks, ellentube), and be kind to your neighbor at work and at home. Create your site. Share what you know and ask about what you don’t.
We’re here to help,
Mark Kashman, senior product manager – Microsoft

Summary
I recently worked on a case where News from associated sites are not displayed in the hub News Webpart.
This took several months to resolve due to the complexity of hub news webpart and how it integrates with the Search Engine to retrieve and display news from the associated sites.
Before getting into the problem, just providing a quick example of the News webpart configuration with a Hub Site.
Hub Site Example: The following image shows a Hub site named “hubsite” and 2 associated sites (“hubsitechild1” and hubsitechild2”)

Posting News items from the Hub:

This is what the News Webpart looks like from the root Hub Site:

Now let’s look at a child site:
By default, the News Webpart will only show news from the current site:

Site Admins will need to change this Webpart to view news from the Hub or any associated Hub site. In this example I will choose the “Hubsite”.

With this configuration “Hubsitechild1” will display News posts from the Hub site

Note: Since the retrieval of the new posts are based on search, you will not see new posts show up in the news webpart for about 5-15 minutes.
How does it work?

- The News Webpart triggers a request to the SP Home Microservice with “DepartmentID”
Example:
https://sphome_base_url/api/v1/news/hub/filtered?departmentId=47060b5d-eb3a-4f7b-a1c0-421fc86cd0f6&start=0&count=13
Note: The DepartmentID will be the Site ID of the root hub site.
- The SP Home Micrososervice then calls the Search service with “ContentTypeId”, “PromotedState”, “DepartmentId” to retrieve the News items.
Example:
GET: https://tenant.sharepoint.com/search/_api/search/query?querytext='(*)'&QueryTemplate='PromotedState:2 AND ContentTypeId:0x0101009D1CB255DA76424F860D91F20E6C4118* AND (DepartmentId:47060b5d-eb3a-4f7b-a1c0-421fc86cd0f6 OR DepartmentId:{47060b5d-eb3a-4f7b-a1c0-421fc86cd0f6})'&Properties='ClientFunction:HubNewsArticles ,EnableDynamicGroups:True'&ClientType='SPHomePagesWeb'&SelectProperties='DocID,Path,DocID,SiteID,NormSiteId,WebID,NormWebId,GroupID,Title,Description,PictureThumbnailURL,AuthorOWSUSER,SiteTitle,SPSiteUrl,SiteLogo,PromotedState,FirstPublishedDate,UniqueId,ViewCountLifetime,SiteTemplate,IsExternalContent,SPWebUrl,ContentTypeId,Language,Color,ListItemID,DepartmentId'&SourceId='8413cd39-2156-4e00-b54d-11efd9abdb89'&Sortlist='FirstPublishedDate:1'&BypassResultTypes=true&TrimDuplicates=true&EnableQueryRules=false&EnableSorting=true&StartRow=0&RowLimit=13
- The Search results are sent back to the News Webpart and displayed as configured.
However, in the case that I was working, the Webpart was not displaying any news, even though the Search request was correct.
Cause
We found that the default Search Schema had been modified either manually or by a 3rd party product. In this case the managed property “ AuthorOWSUSER” is used to locate News items. If the value of this property is unexpected or NULL, Hub News items will not be displayed within the Webpart.
Here is the default setting for the “AuthorOWSUSER “managed property.


As you can see there are 2 crawled properties by default.
- ows_q_USER__AuthorByline
- ows_q_USER_Author
If either one of these crawled properties are missing, Hub News will not be displayed.
Also, we found that in some cases there is a new managed property that uses “AuthorOWSUSER” as an alias.

Resolution
To resolve this issue, simply fix the modified search schema, which can be modified at the tenant level or the site collection level .
The AuthorOWSUSER property exists at both tenant level and site level.
How do we reach tenant level settings?
- Copy this URL and open in the new tab where tenant admin is already signed in https://admin.microsoft.com/sharepoint?page=classicfeatures&modern=true.
- Under Search, select Open.
- Select Manage Search Schema on the search administration page.
How do we reach site level settings?
- On one of your affected hub sites, select Settings, and then select Site Settings. If you don’t see Site settings, select Site information, and then select View all site settings.

- Under Site Collection Administration, select Search Schema.
- At this point your URL should look like this https://TENANT-NAME.sharepoint.com/sites/Hub-SITE-NAME/_layouts/15/listmanagedproperties.aspx?level=sitecol
After opening the managed properties list at the tenant/hub site level:
1. Search for “AuthorOWSUSER”

2. You see all matches, including any custom managed properties that set AuthorOWSUSER as an alias.

3. Locate the problematic Managed property and correct the issue by deleting the property or changing the alias. In this example, I will change the alias of “Thiswillbreaknews”.

4. Make sure AuthorOWSUSER is mapped to “ows_q_USER__AuthorByline” and “ows_q_USER_Author”, if the mapping is incorrect, fix it.
Please Note: Since these some of these properties are used in real-time, the problem should be resolved almost immediately. In a worst-case scenario, you will have to re-index the site , wait for Search to complete (about 15 minutes), then re-create the News Webpart.
Steps to Re-index the site:
- On the hub site site, select Settings
and then select Site settings. If you don’t see Site settings, select Site information, and then select View all site settings.
- Under Search, click Search and offline availability.
- In the Reindex site section, click Reindex site.
More Information
For additional reading on the topics discussed in this blog see the following articles.
What is a SharePoint hub site?
Create a hub site in SharePoint
Use the News web part on a SharePoint page
Manage the search schema in SharePoint Online
Manually request crawling and re-indexing of a site, a library or a list
In this session of PnP Weekly, hosts – Vesa Juvonen (Microsoft), Waldek Mastykarz (Rencore), and typically a special guest from the PnP Community, discuss the latest news and topics around Microsoft 365 development. This week, Vesa and Waldek are joined by Brett Lonsdale – Office Apps and Services MVP, owner of UK based Lightning Tools developing “gap filler” products like BDC Meta Man and Lightning Conductor for the Microsoft 365 Suite.
Topics of discussion included:
- Decreasing time between release and adoption
- Improved product use experience as a result of adopting SPFx
- Building personal apps (including Social-Squared – discussion forum tool) for Microsoft Teams
- Using Microsoft Graph to connect with apps and data across the M365 suite.
This episode was recorded on Monday, March 23, 2020
Got feedback, ideas, other input – please do let us know!
With the announcement earlier this month that we plan to deprecate the AIP (classic) client and label management from the Azure Portal, customers are actively working to migrate their label management from the Azure Portal to the M365 Compliance portal.
This is the aim whether your plan for Windows clients is to use the Azure Information Protection (AIP) unified labeling client , or use the Microsoft Information Protection (MIP) features built-in to Office Pro Plus. This isn’t a concern For non-Windows platforms as they leverage the features built-in to our Office products.
As a recap, we discuss the strategic options for which client to use on Windows in our recent migrating to Unified Labeling webinar and the client comparison matrix in our Microsoft documentation.
After activating unified labeling one of the challenges your organization might have is the need to configure the localizations you had in AIP for MIP clients. The AIP CXE team has recently published a great blog post that can help you tackle this challenge. You can read the post here.
Thanks!
@Adam Bell on behalf of the MIP and Compliance CXE team
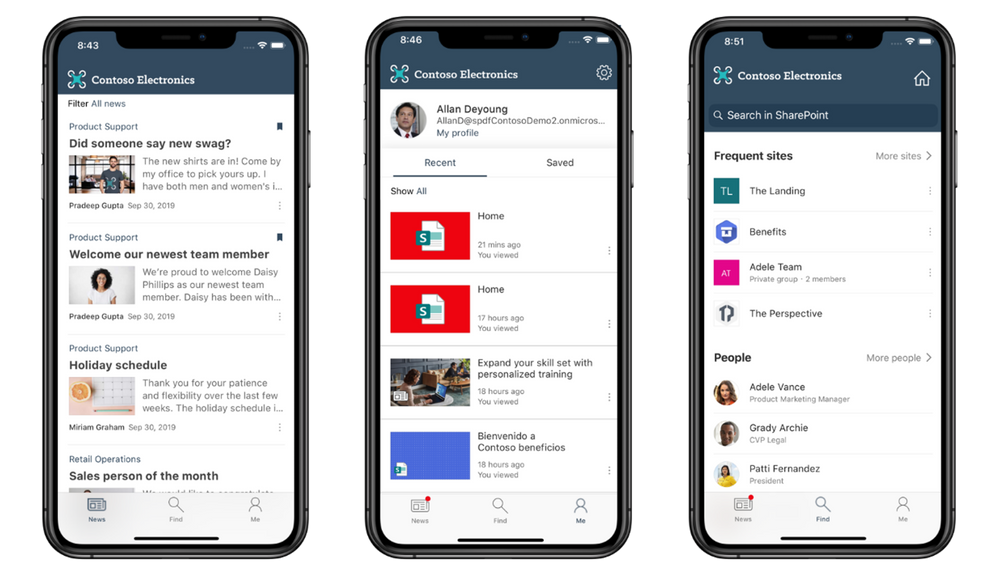
More of your employees are working remotely and depending on their mobile device for important company information. The current world climate and the concerns surrounding the COVID-19 virus have only amplified this need.
For many organizations their intranet is the hub for knowledge and information, and the SharePoint mobile app is the best way for employees to access this from any mobile device. A request we have heard from you is to allow the SharePoint mobile app to be more customizable and enable you brand it with your company’s guidelines easily. We are happy to announce that the SharePoint mobile app will now allow admins to customize their tenant theme in the Microsoft 365 admin center. The SharePoint mobile app will allow users to view their tenant theme on the app if admins have configured in on the Microsoft 365 admin center. This ability is available today for both iOS and Android devices.
Company branding with the SharePoint mobile app
For more information on how to customize your tenant them see Customize the Office 365 theme for your organization.
Administrators can configure the following for the SharePoint mobile app:
- Logo Image: Logo of SVG format (Images uploaded in any other format will not display in the app)
- Nav Bar Color: This is background color that appears in the background of the nav bar for all 3 tabs. (Please note sites will not be impacted by this nav bar color input).
- Text and Icon Color: This section input affects text and icons color on the navigation bar
- Accent Color: This input will affect buttons, links and other elements defined on the app for branding.
If you have already configured this information employee will automatically start seeing the branded app after they update the mobile app to latest version.
 Customize for your organization
Download or update the SharePoint mobile app from iOS and Android app store today to experience company branding.
![Trainable classifier auto-labeling with sensitivity labels webinar]()
This classification method is particularly well suited to content that isn’t easily identified by either the manual or automated pattern matching methods. This method of classification is more about training a classifier to identify an item based on what the item is, not by elements that are in the item (pattern matching). A classifier learns how to identify a type of content by looking at hundreds of examples of the content you’re interested in classifying

References:
This webinar was presented on Tue Mar 17th 2020, and the recording can be found here.
Attached to this post are:
- The FAQ document that summarizes the questions and answers that came up over the course of both Webinars; and
- A PDF copy of the presentation.
Thanks to those of you who participated during the two sessions and if you haven’t already, don’t forget to check out our resources available on the Tech Community.
Thanks!
@Adam Bell on behalf of the MIP and Compliance CXE team
![Trainable classifier auto-labeling with sensitivity labels webinar]()
Insider risk management is a solution in Microsoft 365 that helps minimize internal risks by enabling you to detect, investigate, and take action on risky activities in your organization.
Communication compliance is part of the new insider risk solution set in Microsoft 365 that helps minimize communication risks by helping you detect, capture, and take remediation actions for inappropriate messages in your organization.

References:
This webinar was presented on Tue Mar 10th 2020, and the recording can be found here.
Attached to this post are:
- The FAQ document that summarizes the questions and answers that came up over the course of both Webinars; and
- A PDF copy of the presentation.
Thanks to those of you who participated during the two sessions and if you haven’t already, don’t forget to check out our resources available on the Tech Community.
Thanks!
@Adam Bell on behalf of the MIP and Compliance CXE team
This week, Vesa and Waldek are joined by Tracy van der Schyff – Microsoft Office 365 Service and Services MVP, learner, keynote speaker, story teller and blogger focused on explaining technology in simple terms, change management and adoption, residing in South Africa.
Did we mention: Tracy is a prolific blogger? Tracy’s idea of March Madness is 31 days of blogging about Power Platform. Then there is her Office 365 learning journey – 365 posts in 365 days. A full index of Tracy’s posts can be found here.
Tracy’s Quotes:
- “If you have to wait until you are an expert to share your learning journey, you would never have anything to say.”
- “People can learn from how you learn.”
- “Force yourself to learn everyday.”
- “Easier to teach a business person a tech skill than to teach a teckie a business process.”
- “Do things right even when doing small things. Because small projects can become large projects.”
- “Products don’t fix problems, people fix problems with products.”
- “Many people need to learn what we have already forgotten.”
- “Try and document”
This episode was recorded on Monday, March 16, 2020
Got feedback, ideas, other input – please do let us know!
![Trainable classifier auto-labeling with sensitivity labels webinar]()
As part of this preview, the Microsoft 365 Compliance Center will allow you to create sensitivity labels and corresponding automatic or recommended labeling policies in Office apps using built-in classifiers.
The six built-in classifiers that are available as part of this preview are:
- Resume: detects written accounts of an applicant’s personal, educational, and professional qualifications and experience
- Source code: detects a set of instructions and statements written in the top 25 computer programming languages of GitHub
- Offensive language: detects text items that contain profanities, slurs, taunts, and disguised expressions (expressions that have the same meaning as more offensive terms)
- Threat: detects a specific category of offensive language related to threat to commit violence or do physical harm/damage to a person/property.
- Harassment: detects a specific category of offensive language related to offensive conduct targeting one or multiple individuals regarding race, color, religion, national origin, gender, sexual orientation, age, disability and genetic information.
- Profanity: detects a specific category of offensive language that contains swear words or vulgar language.

References:
Thanks to those of you who participated in our previews so far. If you haven’t already, don’t forget to check out our preview programs page and our resources available on the Tech Community.
Thanks!
Written by @Nir Hendler , posted by @Adam Bell on behalf of the MIP and Compliance CXE team
![Trainable classifier auto-labeling with sensitivity labels webinar]()
Auto classification for Sensitivity labels in OneDrive for business, SharePoint, and Exchange Online helps you automatically label or tag content as sensitive to ensure the configured protections are applied.
Similar to manual labeling, an administrator can create sensitivity labels and policies to label content based on defined policies or rules. Auto classification varies from manual labeling in that the label occurs within the service, for example SharePoint Online, instead of the user labeling the content.
Additionally, before you publish an auto classification policy – wouldn’t it be great if you knew exactly what files and how many would be affected by your new configuration? This is where the new policy simulation feature will help. Before you enable a policy in your tenant, simulation mode allows you to validate your policy, and tune it further if the results are not quite as expected. The simulation can then be run again to check your update. You can rinse and repeat this process until you’re happy with the results. The ability to safely validate your approach without negatively impacting your environment and end users is critical and should help ease adoption.

References:
Thanks to those of you who participated in our previews so far. If you haven’t already, don’t forget to check out our preview programs page and our resources available on the Tech Community.
Thanks!
Written by @Nir Hendler , posted by @Adam Bell on behalf of the MIP and Compliance CXE team


