![Trainable classifier auto-labeling with sensitivity labels preview]()
As part of this preview, the Microsoft 365 Compliance Center will allow you to create sensitivity labels and corresponding automatic or recommended labeling policies in Office apps using built-in classifiers.
The six built-in classifiers that are available as part of this preview are:
- Resume: detects written accounts of an applicant’s personal, educational, and professional qualifications and experience
- Source code: detects a set of instructions and statements written in the top 25 computer programming languages of GitHub
- Offensive language: detects text items that contain profanities, slurs, taunts, and disguised expressions (expressions that have the same meaning as more offensive terms)
- Threat: detects a specific category of offensive language related to threat to commit violence or do physical harm/damage to a person/property.
- Harassment: detects a specific category of offensive language related to offensive conduct targeting one or multiple individuals regarding race, color, religion, national origin, gender, sexual orientation, age, disability and genetic information.
- Profanity: detects a specific category of offensive language that contains swear words or vulgar language.

References:
Thanks to those of you who participated in our previews so far. If you haven’t already, don’t forget to check out our preview programs page and our resources available on the Tech Community.
Thanks!
Written by @Nir Hendler , posted by @Adam Bell on behalf of the MIP and Compliance CXE team
![Trainable classifier auto-labeling with sensitivity labels preview]()
Auto classification for Sensitivity labels in OneDrive for business, SharePoint, and Exchange Online helps you automatically label or tag content as sensitive to ensure the configured protections are applied.
Similar to manual labeling, an administrator can create sensitivity labels and policies to label content based on defined policies or rules. Auto classification varies from manual labeling in that the label occurs within the service, for example SharePoint Online, instead of the user labeling the content.
Additionally, before you publish an auto classification policy – wouldn’t it be great if you knew exactly what files and how many would be affected by your new configuration? This is where the new policy simulation feature will help. Before you enable a policy in your tenant, simulation mode allows you to validate your policy, and tune it further if the results are not quite as expected. The simulation can then be run again to check your update. You can rinse and repeat this process until you’re happy with the results. The ability to safely validate your approach without negatively impacting your environment and end users is critical and should help ease adoption.

References:
Thanks to those of you who participated in our previews so far. If you haven’t already, don’t forget to check out our preview programs page and our resources available on the Tech Community.
Thanks!
Written by @Nir Hendler , posted by @Adam Bell on behalf of the MIP and Compliance CXE team

This week, Vesa and Waldek are joined by Fabian Williams – Microsoft MVP – Visual Studios Development Technologies and Director for the Intelligent Process automation (IPA) practice at Withum located in Washington D.C.
In addition to Microsoft and Community activities and articles, the group focused on this question: Why should a Teams or SharePoint developer care about Azure Functions?
This episode was recorded on Tuesday, March 9, 2020
Got feedback, ideas, other input – please do let us know!
This post is a contribution from Jing Wang, an engineer with the SharePoint Developer Support team.
There are multiple ways to access SharePoint data with custom code, for example, CSOM, JSOM, SharePoint Rest API and Sharepoint Web Service call.
Troubleshooting problems with these accesses likely need correlation IDs of the failed requests. With the correlation IDs we can locate relevant errors in SharePoint ULS logs efficiently.
However, not all failed requests expose the correlation ID to UI, code or through network traces. In those scenarios, being able to set distinctive correlation IDs when send the requests to SharePoint become very useful.
- For CSOM (client object model code), it is straight forward to set it:
ClientContext context = new ClientContext(“https://{site_url}”);
Web web = context.Web;
context.TraceCorrelationId = “88888888111111112222222233333333”;
context.Load(web);
context.ExecuteQuery();
- For JSOM (JavaScript library code):
<script type=”text/javascript”>
var clientContext;
var website;
SP.SOD.registerSod(‘sp.js’, ‘/_layouts/16/sp.js’);
SP.SOD.executeFunc(‘sp.js’, ‘SP.ClientContext’, sharePointReady);
function sharePointReady() {
clientContext = SP.ClientContext.get_current();
website = clientContext.get_web();
clientContext.set_traceCorrelationId(88888888111111112222222233333333′);
clientContext.load(website);
clientContext.executeQueryAsync(onRequestSucceeded, onRequestFailed);
}
function onRequestSucceeded() {alert(website.get_url()); }
function onRequestFailed(sender, args){alert(‘Error: ‘ + args.get_message());}
</script>
- For SharePoint Rest API call:
<input id=”Button” type=”button” value=”Empty Site Recycle Bin” onclick=”runCode()” />
<script type=”text/javascript”>
function runCode(){
SP.SOD.registerSod(‘sp.js’, ‘/_layouts/16/sp.js’);
SP.SOD.executeFunc(‘sp.js’, ‘SP.ClientContext’, emptySiteRecycleBin);
function emptySiteRecycleBin(){
var restUrl = _spPageContextInfo.webAbsoluteUrl+”/_api/site/RecycleBin/deleteAll()”;
$.ajax({
url: restUrl,
type: “POST”,
//withCredentials: true,
headers: {
“X-RequestDigest”: $(“#__REQUESTDIGEST”).val(),
‘SPResponseGuid’: ‘88888888111111112222222233333333‘
},
success: function(response) {alert(“Emptied Site RecycleBin!”);},
error: function(response){ alert(“Error empting RecycleBin…” );}
});
}
}
</script>
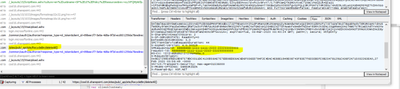
Fiddler Trace shows the correlation ID was set successfully:
- For the calls to SharePoint Web Services, for example, listdata.svc or lists.asmx, we can hardcode the correlation IDs as well.
To make a web service call from C# code, you need to create web service reference to the service .svc file first, Visual Studio will generate the reference class for the web service automatically, for example, reference.cs:
The below is the code change needed to add into that class file:
namespace callwebservice.sp2016ws {
using System;
using System.Web.Services;
using System.Diagnostics;
using System.Web.Services.Protocols;
using System.Xml.Serialization;
using System.ComponentModel;
[System.CodeDom.Compiler.GeneratedCodeAttribute(“System.Web.Services”, “4.7.2053.0”)]
[System.Diagnostics.DebuggerStepThroughAttribute()]
[System.ComponentModel.DesignerCategoryAttribute(“code”)]
[System.Web.Services.WebServiceBindingAttribute(Name=”ListsSoap”, Namespace=”http://schemas.microsoft.com/sharepoint/soap/“)]
public partial class Lists : System.Web.Services.Protocols.SoapHttpClientProtocol {
private System.Threading.SendOrPostCallback GetListOperationCompleted;
…
protected override System.Net.WebRequest GetWebRequest(Uri uri)
{
var request = base.GetWebRequest(uri);
request.Headers.Add(“SPResponseGuid”,”88888888111111112222222233333333“);
return request;
}
In this episode, Vesa and Waldek are joined by Franck Cornu – Office 365 developer, architect and owner of aequos out of Montreal, Canada. Franck’s strength is bringing and bridging 3 perspectives – Developer, Architect and Functional Consultant, in every customer conversation. His collaborative approach is – define the backlog together, translate to functional requirements, consider functionality available from community and then define requirements for code, test and final delivery. Lately, Franck has been very actively contributing to the PnP Modern SharePoint Search solution web part.
This episode was recorded on Tuesday, March 3, 2020
Got feedback, ideas, other input – please do let us know!
In this episode, Vesa and Waldek are joined by Karoliina Kettukari – MVP and Microsoft Teams and Office 365 user adoption and change management consultant with Sulava in Helsinki, Finland. Their conversation focuses on the human side of technology deployments, not addressed by the mere roll-out/announcement of a new technology. It is clear, change is constant and change impacts people throughout the entire organization – directly and more often indirectly.
This episode was recorded on Monday, February 24, 2020

-
Below are the steps for a 1 Node WFM farm using WFM/SB certificate generation key – resetting expired certificate process:
First, some quick notes:
- NOTE: Ensure you have credentials for WFM Run-As service account and WFM passphrase for generated certificate.
- NOTE: If you have a 3 node WFM farm, then you will need to have WFM2 and WFM3 leave the WFM farm once you have changed the system date and time for all 3 nodes and then run Workflow Manager Configuration Wizard to leave farm.
- NOTE: If the WFM passphrase is not known, step 6 will allow you to change WFM passphrase as long as you are part of the WFM farm
- NOTE: If you are running CA-Cert, you’ll follow the same process to change system date and time, and then follow below article to change to new certificate thumbprints – note new certificate requires to be created prior to expiration date: https://blogs.msdn.microsoft.com/whereismysolution/2017/02/08/changing-my-workflow-manager-farm-certificates/
-
- In order to reset generation key for WFM and SB the following steps needs to be done on the WFM node(s): System date and clock of WFM node must be set back before certificate expiration date (step needs to be done if multiple WFM nodes in farm)
- Stop Windows Time Service
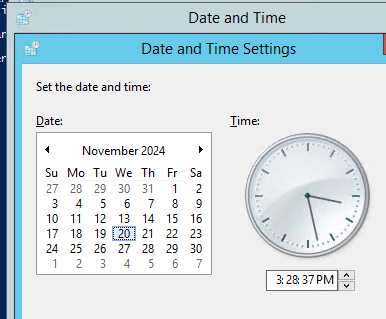
- Change System date and clock to Day before certificate expired (in this example, the cert expired on November 21st, 2024)
- Steps to follow once System date and time has been set prior to expiration date:
- Output workflow manager PowerShell commands to clipboard and paste to notepad:
TIP: Use “|clip” parameter to output results to clipboard and then paste to notepad
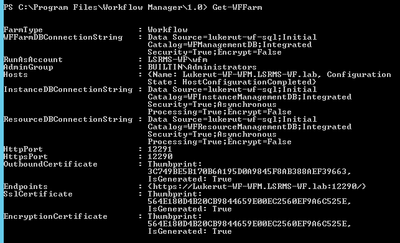
- Get-WFFarm | clip
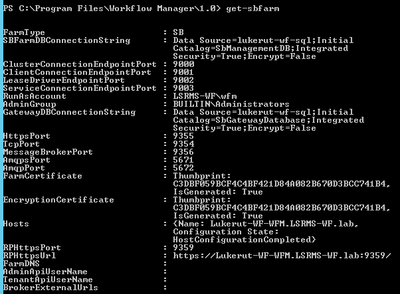
- Get-SBFarm | clip
- Get-SBNamespace |clip
- NOTE: The “Get-SBNamespace” command will list ManageUser accounts – one of those accounts should be the logon credentials used. Account should have the required SQL permissions to reset expired certificates.

- Run below commands (after reverting the date and time, all services should display as “Running” before proceeding to next steps:
- Get-WFFarmStatus

- Get-SBFarmStatus – There are scenarios where Service Bus Message Broker service will get stuck at “Starting”, regardless continue to next step

- From Administrative SharePoint Management Shell, run below command to get current WorkflowHostURI used to register WFM to SharePoint:
- $wfProxy = Get-SPWorkflowServiceApplicationProxy
$wfProxy.GetWorkflowServiceAddress((Get-SPSite -Limit 1 -WarningAction SilentlyContinue))

- Run below WFM PowerShell command to change passphrase and thumbprints:
- Run these commands to set the Certificate keys:
- $CertKey=convertto-securestring ‘PASSPHRASE’ -asplaintext -force;
Set-WFCertificateAutoGenerationKey –Key $CertKey
Set-SBCertificateAutogenerationKey –Key $CertKey

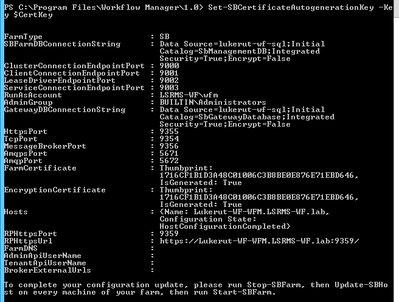
- Then run the below commands:
- Stop-SBFarm
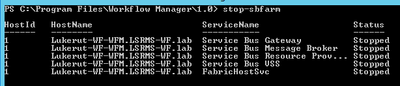
- Update-SBHost

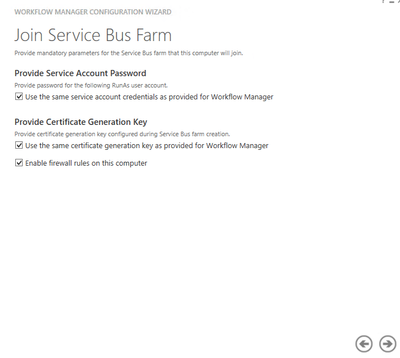
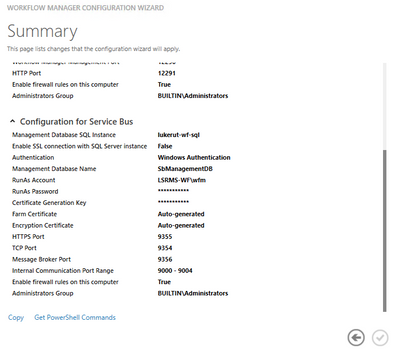
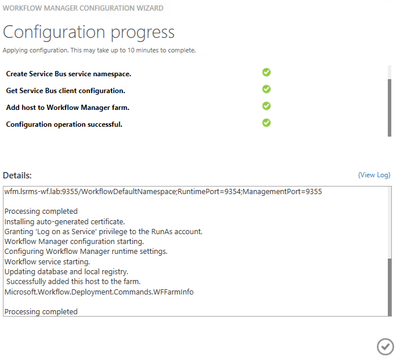
- Run Workflow Manager Configuration Wizard – we’ll leave WFM farm first and then rejoin WFM farm. This step is necessary, as when we rejoin the WFM farm later, it will create the new WFOutboundCertificate for us.
- Enable Windows Time Service – this will automatically change server back to current date and time

- Follow the steps from this article: SharePoint 2016: Step by Step guide to add Workflow Manager Certificate into SharePoint trust (Also install to Trusted Root store)
- Export WFM Client certificate using below command from Workflow Manager Powershell: Get-WFAutoGeneratedCA
- Above command creates “AutoGeneratedCA.cer” file in path where command was executed – default C:Program FilesWorkFlow Manager1.0

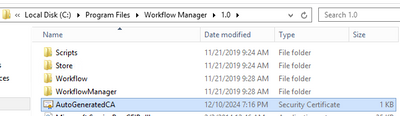
- Copy “AutoGeneratedCA.cer” file to all SP nodes and Web Frontends – install certificate to Trusted Root Certification Authorities certificate store
- Copy the file to the SharePoint server(s)
- Right-click, and select Install Certificate
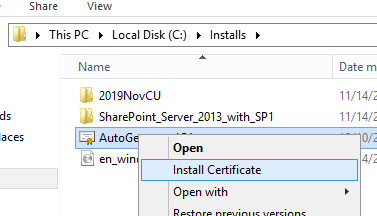
- Select “Local Machine” and click Next

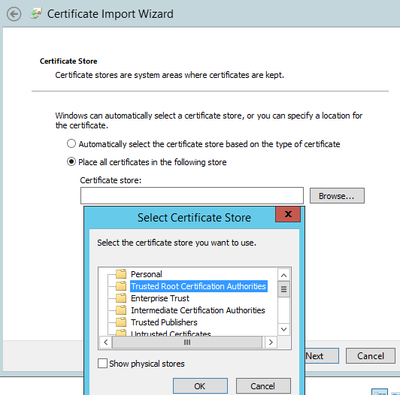
- Select “Place all certificates in the following store”, and then choose “Trusted Root Certification Authorities”, and then choose OK, and NEXT, then FINISH
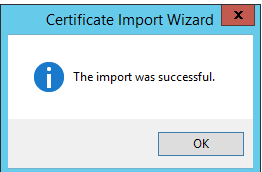
- Choose OK to complete
- Repeat on each SP server
- Repeat same process on each SP server for the certificate that was trusted into SharePoint Manage Trusts earlier during Step 7.
- Reset IIS on all SP WFEs
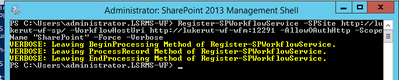
- Register WFM to SharePoint
- Sample command:
- From SharePoint Central Admin, run daily timer “Refresh Trusted Security Token Services Metadata feed [Farm job – Daily]”
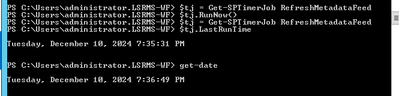
- $tj = Get-SPTimerJob RefreshMetadataFeed
$tj.RunNow()
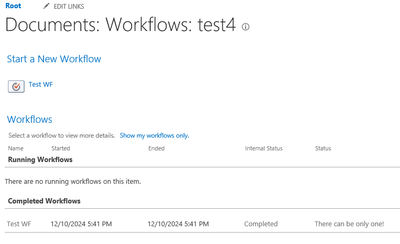
- Test one of your 2013 workflows now, and it should complete successfully
Contents
- What is SSL Offloading
- Configuring SSL Offloading with SharePoint
- Web Applications
- Host Names Site Collections
- SharePoint Apps (App Domain
- Common Issues
- URLs returned to users are incorrect
- List or library Dropdown menu not loading
- After configuring SSL offloading for a web application users receive a 404 or 503
- Additional Information
- Creating IIS bindings for SharePoint Web Applications through PowerShell
What is SSL Offloading?
The idea behind SSL offloading is to reduce the load on web servers as well as the administrative overhead of managing SSL certificates across multiple servers. This is accomplished by using a dedicated network device (often times a network load balancer or a proxy server) to terminate SSL as it routes the requests. This removes the burden of decrypting and encrypting https traffic from the web server as well as providing a single location to host the SSL certificate reducing administrative efforts of maintaining and replacing certificates.
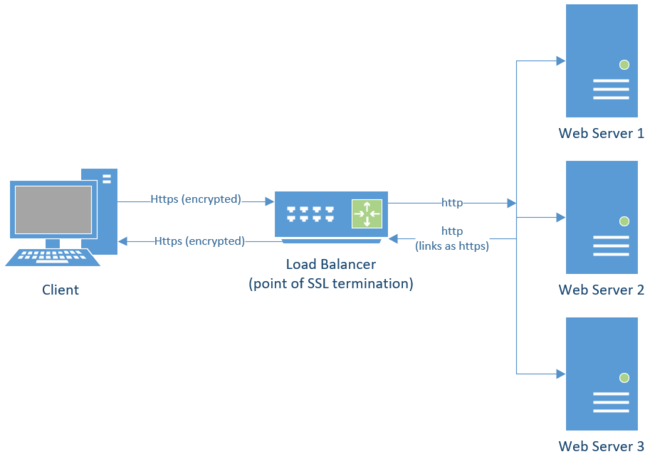
What it looks like:
SharePoint SSL Offloading Request
- The user makes an https request for a webpage that is routed to the load balancer
- The load balancer terminates SSL and sends the unencrypted http request to the web server
- The Web server handles the request and returns an unencrypted http response to the load balancer
- The load balancer encrypts the request and forwards it to the client that made the original request as https
Configuring SSL Offloading with SharePoint
Web Applications
To configure a SharePoint web application to take advantage of SSL offloading the Alternate Access Mappings must be configured in a specific way that allows the request to be accepted as http but have links rendered as https. By using internal URLs we can tell SharePoint to recognize an incoming request to http://sharepoint and handle it as though it were https:/sharepoint. Below illustrates how Alternate Access Mappings should be configured to allow for SSL offloading to occur. Note that the internal URL should match the traffic between the load balancer and SharePoint while the public url should reflect what URL users think they are using.
If you are creating a new web application to be used with SSL offloading use the below settings as a guide to create it.
If you are configuring an existing HTTPS Web Application for SSL offloading add an internal URL using the same hostname over http to the zone they wish to use SSL offloading with. The end result should look like the example below. To add these you will want to go to Central Administration > Application Management > Configure Alternate Access Mappings > Add Internal URLs.
|
Zone
|
Internal Url
|
Public Url
|
|
Default
|
https://sharepoint
|
https://sharepoint
|
|
http://sharepoint
|
https://sharepoint
|
Host Names Site Collections
In path based sites we can utilize a combination of internal and public URLs in the web app’s AAMs to achieve the redirection that we need. While we do have multiple zones for HNSCs we do not have the same functionality that internal and public URLs provide. As such the configuration for HNSCs is different as described below.
Web Application Configuration
- The web application should be configured the same way as seen above except the host header should remain empty
- HNSC should be created using an https URL
Example:
New-SPSite 'https://portal.fabrikam.com' -HostHeaderWebApplication 'https://sharepoint.contoso.com' -Name 'Portal' -OwnerAlias 'contosoadministrator' -Language 1033 -Template 'STS#0'
- Bindings for the backing IIS site should include an http binding with a blank host-header if not already present
Proxy or Load Balancer Configuration
Since we cannot use internal URLs like we would for a path based site collections we must configure the proxy server or load balancer that is serving as the point of SSL/TLS termination to add an additional header to the web requests. The header Front-End-Https tells SharePoint whether the links that it renders for this web request should be rendered as http or https.
|
Front-End-Https
|
|
Value
|
Description
|
|
On
|
The request made by the end user was made over https
Example: Front-End-Https: On
|
|
Off
|
The request made by the end user was made over http
|
Public Content: Use host-named site collections with off-box SSL termination
SharePoint Apps (App Domain)
When attempting to configure SSL offloading for app domains you may see the below error:
03/05/2015 09:13:34.20 w3wp.exe (0x0XXX) 0x0XXX SharePoint Foundation General aiz2a High Request for app scheme does not match the webapp’s scheme for this zone. Request Uri: http://app-XXXXXXXXX.apps.contoso.com…. Zone Response Uri: https://sharepoint.contoso.com Site collection path: /
To allow requests between web applications and app domains to be handled under different protocol schemes (http and https) as you would see when configuring SSL offloading for both web apps and app domains run the below PowerShell to enable support for multiple app domains.
$contentService = [Microsoft.SharePoint.Administration.SPWebService]::ContentService
$contentService.SupportMultipleAppDomains = $true
$contentService.Update()
Public Content: Configure an environment for apps for SharePoint (SharePoint 2013)
Common Issues
URLs returned to users are incorrect
When an environment with SSL offloading is not configured correctly it is not uncommon to see the URL in link rendered by SharePoint such as navigation to be incorrect. I.e. all links are rendered in http instead of https or in some scenarios even a different host name. This is most commonly caused by the configuration of alternate access mappings.
Document the following:
- The address and protocol that the users utilize to access the site.
- The address and protocol that the load balancer (or point of SSL termination) forwards the request as. It is possible that the hostname could differ as well as the protocol.
With the answers to the above ensure that the alternate access mappings for the web application are configured as seen below where the numbers coordinate to the responses from the above:
- Public url matches url that users utilize.
- Internal url matches url of incoming requests from the load balancer, if it is not present click Add Internal URLs on the Configure Alternate Access Mappings page in Central Administration.
List or library Dropdown menu not loading
This can be a problem when the site is accessed via Azure Application Proxy. See https://internal.support.services.microsoft.com/en-us/help/4459184
After configuring SSL offloading for a web application users receive a 404 or 503
This most often is due to the bindings in IIS. Locate the IIS site behind this zone of the web application.
To modify the bindings of an IIS website:
- Open Internet Information Services (IIS) Manager from Start > Administrative Tools
- Expand the server name in the Connections pane
- Expand Sites
- Right click on the site that should be serving the requests for the SharePoint Web Application in question
- Ensure that there is both an https as well as an http binding for the hostname that will be accessed as seen in the image below
Additional Information
Creating IIS bindings for SharePoint Web Applications through PowerShell
While you can add bindings to the SPWebApplication.IisSettings.ServerBindings array through PowerShell do note that this does not propagate to the existing IIS sites. This will however create the bindings when the SharePoint Foundation Web Application service is started on a server. As such any new server added to the farm, or any server where the web application service is started/restarted the bindings added through the below method will be reflected.
Add-PSSnapin Microsoft.SharePoint.PowerShell
$wa = Get-SPWebApplication ‘http://sharepoint.contoso.com’
$binding = New-Object Microsoft.SharePoint.Administration.SPServerBinding
$binding.Port = 80
$binding.HostHeader = “”
#Note the “Default” below references the zone of the web application, if you wish to add a binding to a different zone replace that with the appropriate zone (Default/Intranet/Internet/Extranet/Custom).
$iis = $wa.IisSettings[“Default”]
$iis.ServerBindings.Add($binding)
$wa.Update()
#Call the provision method to push this out to all servers, note that this will overwrite any manual modifications to the web.config or other manual changes within IIS for this web app.
$wa.ProvisionGlobally()
Special thanks to the original author: Ian Ragusa (Microsoft PFE)

In this episode, Vesa and Waldek are joined by Luise Freese – MVP – Microsoft 365 business consultant/Maker. Their inspiring conversation touches on impostering, inclusion, mind mapping, functional drawing, practice, facilitation, less code & more power, and planned chaos. If you’re feeling like an under-qualified topic expert – 1) you are human, 2) you will enjoy this discussion along with the articles.
This episode was recorded on Monday, February 17, 2020

In this episode, Vesa and Waldek are joined by Sébastien “Seb” Levert, Product Lead and MVP managing product strategy at Valo Intranet in Montreal, Canada. The conversation focused on the convergence of portals and collaboration platforms. Teams is becoming the primary work environment through which LOB apps, communications, BOTs, SharePoint, etc., are being accessed. Valo follows a Teams First development approach. The challenge is creating the tailored/personalized landing page in Teams without the same controls that are available in SharePoint. Other trends discussed – clickable BOT actions, Teams left nav, building personal apps using SPFx, enterprise provisioning and “proper snow.”
This episode was recorded on Monday, February 11, 2020