Power Automate continues to evolve, bringing new security features to help organizations protect their data and automate intelligent processes more securely by design. Here are some of the latest enhancements:
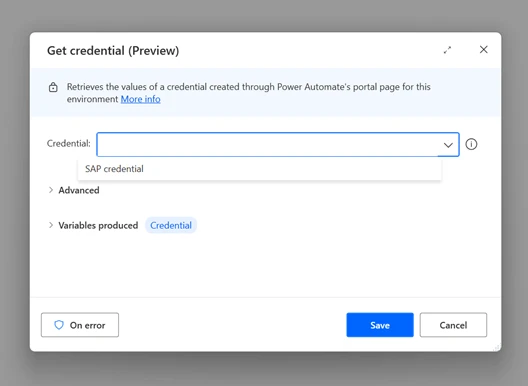
Protect Identities and Secrets with credential management
Desktop flow connection credentials with Azure key vault and CyberArk secrets: Power Automate now supports storing connection credentials securely in Azure Key Vault (AKV) or CyberArk. This ensures that passwords are encrypted and managed securely, reducing the risk of unauthorized access. This feature includes support for automatic connection updates at runtime (like when a password rotation occurs).
Certificate-Based Authentication with MFA (Public preview): To further enhance security, Power Automate now supports certificate-based authentication in desktop flow connections. This passwordless solution adds an extra layer of security, meeting multi-factor authentication (MFA) requirements for attended as well as unattended scenarios. This feature is available from Power Automate for Desktop Build 2410.
Credentials for Desktop flow actions (Public preview): For desktop flows, Power Automate allows the use of credentials directly within flow actions. This ensures sensitive information is handled securely, not stored in scripts or logs, and accessible only to authorized users. This feature is available from Power Automate for Desktop Build 2411.
Network isolated, private environments with customized network security measures, such as Network Security Groups and firewalls, to control and monitor traffic.
Integration with on-premises networks through VPN or ExpressRoute where access to on-premises resources is necessary for RPA workloads.
Network Level Authentication (NLA) is a security measure that mandates user authentication prior to the establishment of a remote desktop connection. This feature assists organizations in mitigating the risk of unauthorized access by ensuring that only authenticated users can initiate a remote session, thereby protecting against vulnerabilities associated with the authentication process.
This feature is now supported when running unattended workload using a MS Entra ID account on a Microsoft Entra joined or hybrid device.
These new security features make Power Automate an even more robust tool for automating intelligent processes while maintaining a high level of security. By protecting identities and secrets, safeguarding networks, and monitoring for threats, organizations can confidently leverage Power Automate to drive efficiency with hypermation.
In today’s business environment, streamlined workflows and reduced manual tasks are essential. Microsoft AI Builder brings the power of advanced automation to routine processes like email handling, document processing, and image management, helping businesses run smarter and more efficiently. With new capabilities, including multi-modal content processing, structured JSON outputs, flexible model selection, Dataverse grounding, and an extensive prompt library, AI Builder elevates agents, apps and automation to the next level of business impact.
Next generation document and image processing with GPT
One of the most game-changing updates in AI Builder is the new multi-modal content processing capability, which allows businesses to handle various data types —including text, document, and images—within a single natural language instruction. This integration greatly simplifies the process of crafting AI actions for intelligent document processing. Unlike traditional machine learning models that require extensive training and expertise, AI Builder’s multi-modal processing can be set up using natural language, and without training data.
Structured JSON outputs now generally available
With AI Builder’s new structured JSON output feature, businesses gain a more deterministic and reliable way to handle generated content. Unlike traditional outputs that might vary in format and structure, JSON outputs are now generated with a consistent predefined schema that you define at design time, ensuring that every result aligns precisely with expected data formats. This determinism in content generation means your automated workflows will produce predictable, structured data every time, and those results will be readily integrated as variables in your Power Automate workflow for downstream processing. This feature is especially beneficial when integrating AI Builder outputs into other systems, as it reduces the need for additional data cleaning or transformation. Whether feeding data into a CRM, database, or custom application, you can ensure that data is generated in a structured and predictable way.
Dataverse grounding is now generally available
The new Dataverse grounding capability empowers Generative AI models with up-to-date, contextually relevant information from your organization’s own data. By employing Retrieval-Augmented Generation (RAG), AI Builder integrates directly with Dataverse to pull in real-time, business-specific knowledge, giving models a deeper understanding of your unique context.
This RAG-enhanced approach allows AI models to dynamically retrieve and incorporate relevant data from Dataverse during processing, enabling Q&A scenarios with accurate responses that are also highly contextualized to your organization. For instance, models can instantly access customer histories, product information, and up-to-the-minute operational data, enriching outputs with knowledge directly grounded in your business reality.
As part of this feature becoming generally available, the capability has been enhanced to support multiple tables, including tables with large amounts of data records.
Model selection: GPT-4o and GPT-4o Mini
AI Builder offers flexibility in model selection, allowing users to choose between the powerful GPT-4o and the cost-effective GPT-4o Mini. This adaptability enables customization based on specific project requirements and resource considerations.
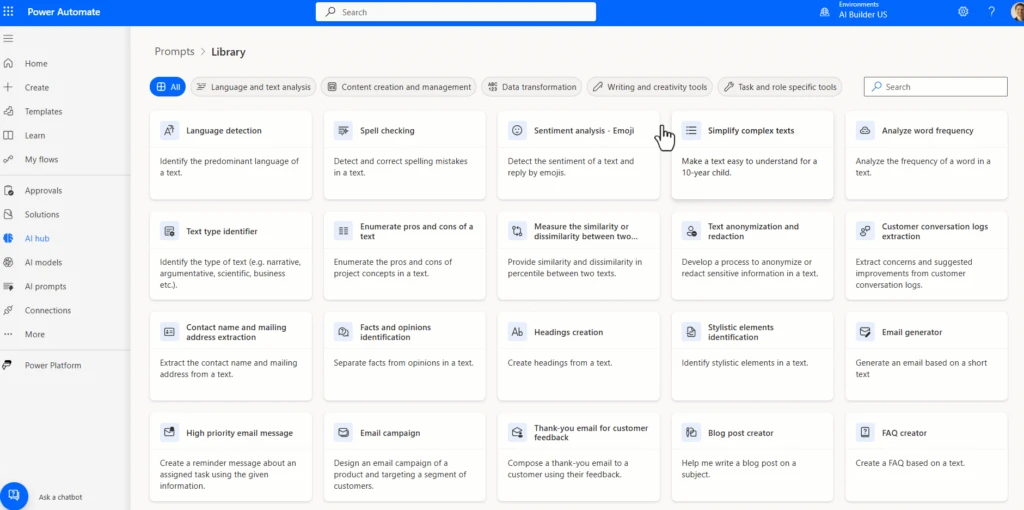
Prompt library
The prompt library feature provides a collection of pre-designed prompts, serving as templates to expedite the creation of AI models. This resource accelerates development and ensures best practices are followed in prompt engineering. Users can modify templates to suit specific needs, adjusting language, tone, and detail to match organizational standards and requirements. The templates cover key areas like document extraction, data transformation, and content generation, making it easy for users to find the right starting point for their intelligent automation goals.
Use cases to get started
With AI Builder, you don’t need to be a coding expert to leverage the power of AI in your daily operations. By creating prompts that can extract information from documents, classify emails, and even analyze images, you can empower your team to work smarter, not harder. AI Builder works hand-in-hand with other Power Platform tools like Power Automate, Copilot Studio and Power Apps, enabling users to create intelligent workflows and applications that are customized to meet the needs of any business.
For example, let’s say your team frequently processes customer inquiries. Using AI Builder and Power Automate, you can design a workflow that analyzes the content of incoming emails, categorizes them by urgency or topic, and even suggests responses. This not only saves time but also keeps communication consistent and efficient. By setting up this automated flow, businesses can stay on top of customer interactions and ensure timely responses.
Are you ready to bring AI to your organization?
The AI Builder Documentation provides a comprehensive guide on setting up AI Builder, configuring models, and integrating it with tools like Power Automate and Power Apps. For step-by-step tutorials, the Microsoft Learn AI Builder Learning Path is an excellent place to start. It covers everything from foundational concepts to advanced use cases, helping users of all levels become proficient in leveraging AI Builder to automate and optimize workflows.
The latest AI experiences in Power Automate are redefining the boundaries of what is possible in enterprise automation—transforming how we optimize and manage business processes to achieve more. Developers can now create advanced automation faster, business analysts can quickly extract, analyze, and optimize critical processes, and IT administrators can seamlessly manage and govern automation at scale. Copilot in Power Automate makes it faster to build solutions that save valuable time and reduce costs, thereby achieving business outcomes. Step into the future with the Power Automate advanced, enterprise-grade intelligent automation solutions.
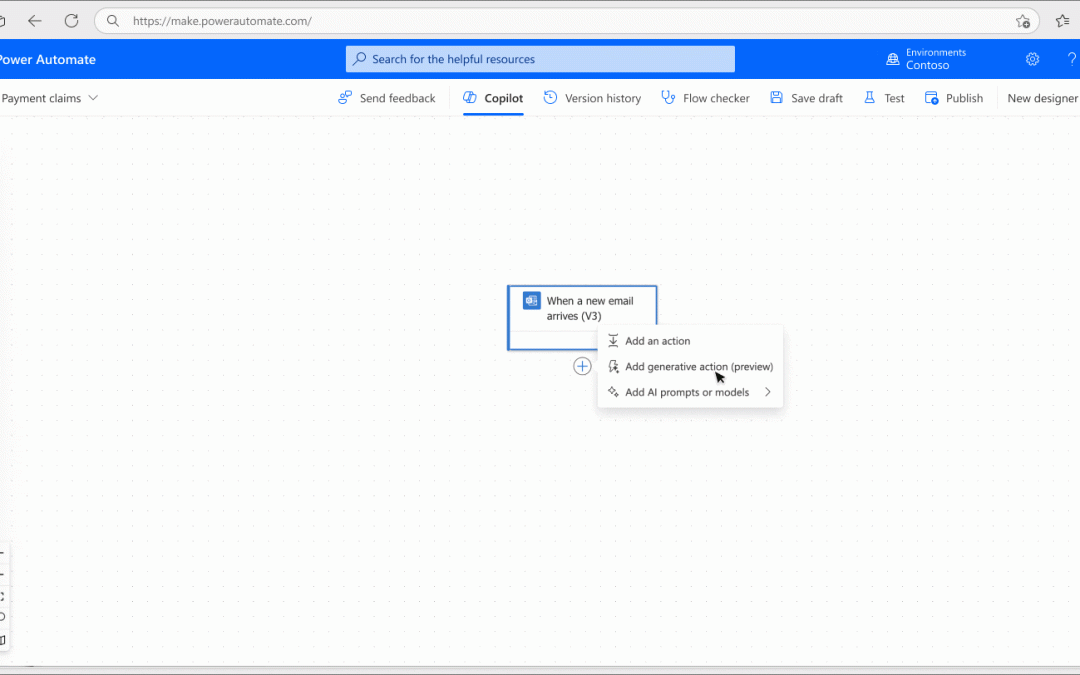
Build advanced, reliable automations faster with AI
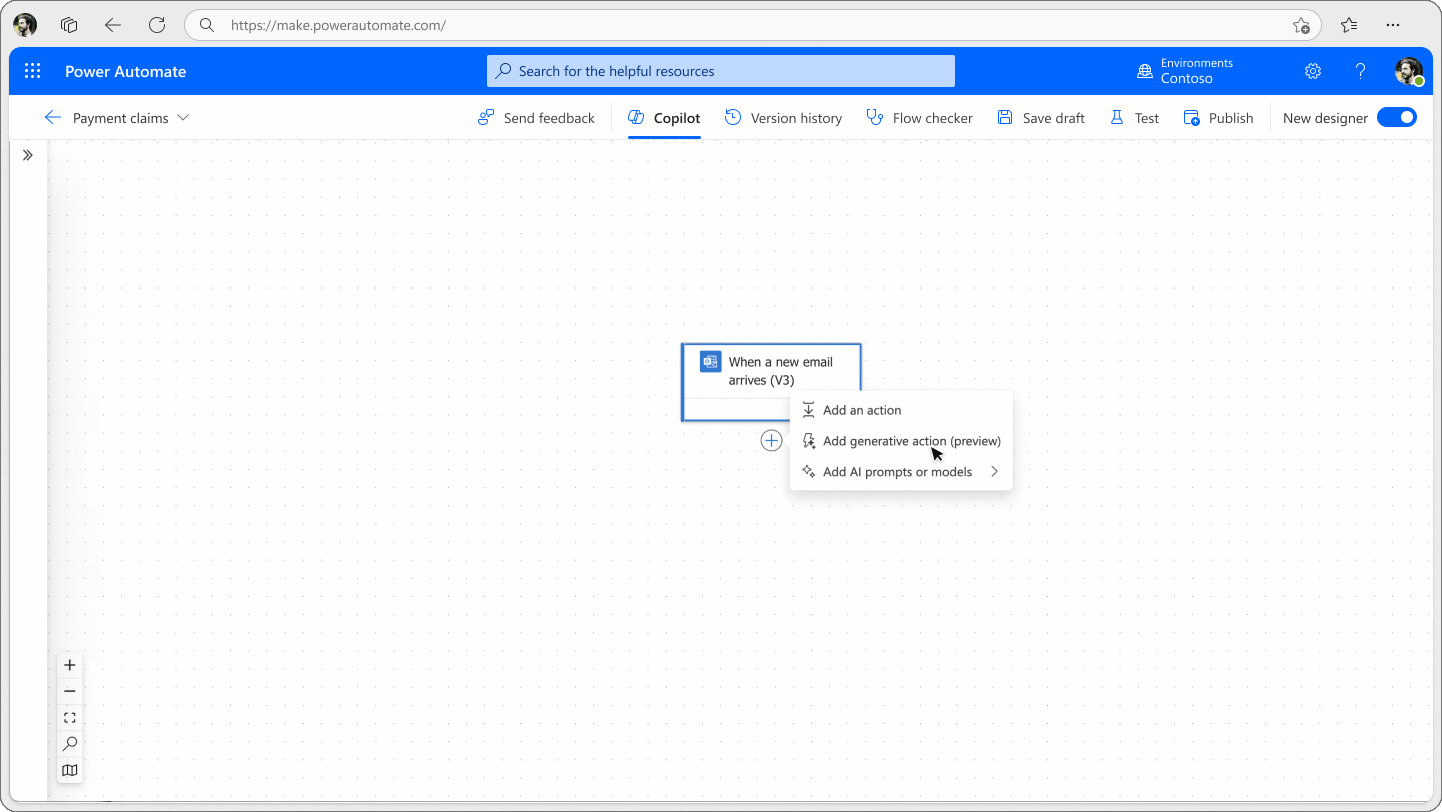
Developers are key to business process innovation. In Power Automate, it is now possible to build automations that utilize AI within cloud flows using generative actions, easily use natural language to create expressions for flows with Copilot for expressions, and incorporate document processing into workflows with next-generation document processing. These features enhance developers’ ability to deliver solutions efficiently and effectively.
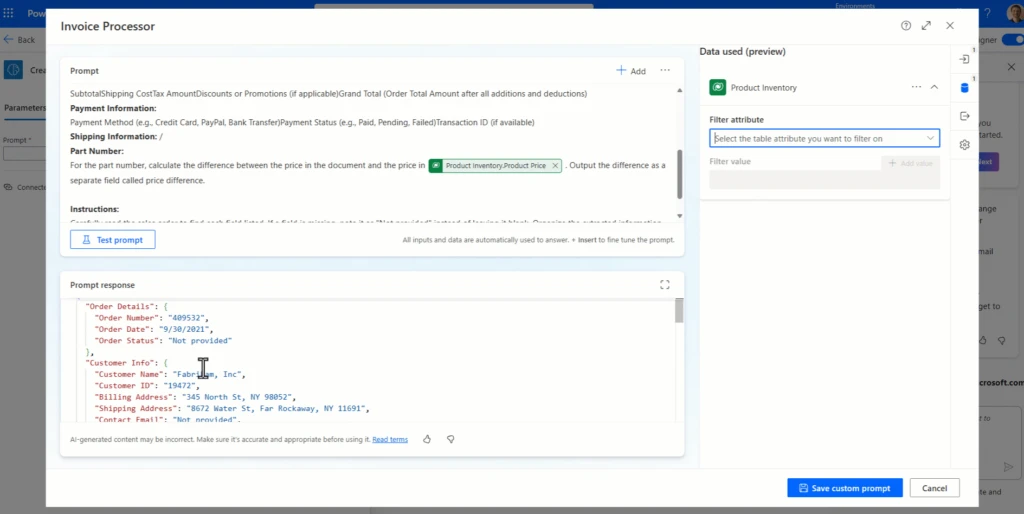
Introducing next-generation document processing with GPT
Efficient document management is vital for smooth operations and timely decisions, but traditional AI models require lengthy training and frequent updates. With GPT-4-powered document processing, now available in public preview, you can use natural language to extract and process unstructured data from documents like invoices, medical results, or emails. This next-gen tool handles multi-modal content, automating email, document, and image processing for improved productivity. For makers who want to blend in pro-code or gain greater control, we’ve added the ability to structure outputs using JavaScript Object Notation (JSON) directly inline. Makers can combine multi-modal content with enterprise knowledge from Microsoft Dataverse in their prompts. This feature enables makers to quickly deploy document and image processing directly into existing workflows using natural language instructions.
Transform your automation processes with generative actions
Generative actions allow you to add AI-powered steps to your cloud flows, letting AI reason over enterprise guardrails provided in unstructured content format such as documents and PDFs, and decide the best course of action for complex tasks. For example, with generative actions you can automate conditional approvals based on the content of incoming emails and company policies. This feature, currently in the Early Access Program, is coming soon to public preview, when you will be able to create, edit, test, and run generative actions all from within the cloud flow designer.
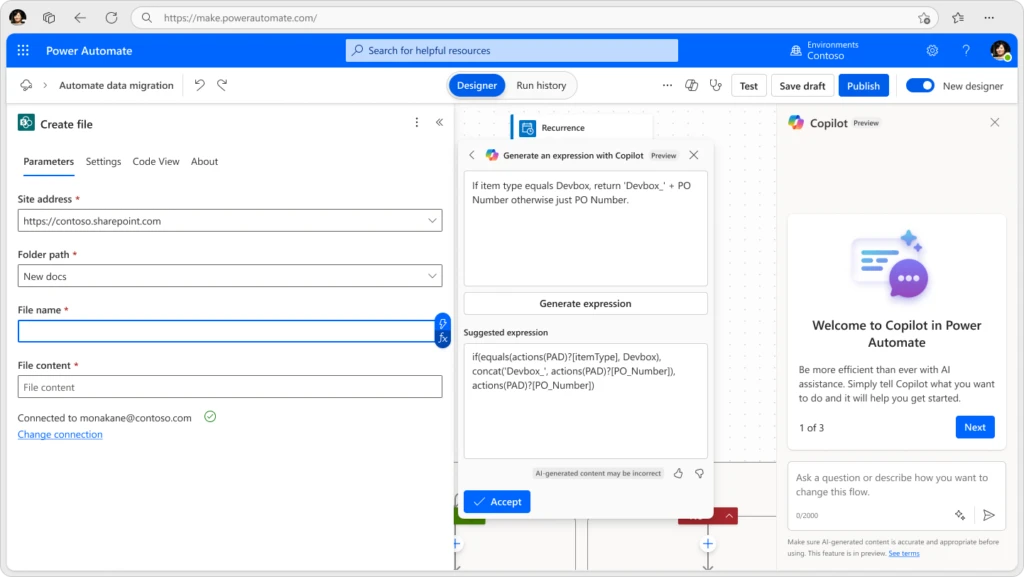
Create and edit expressions faster with Copilot
Copilot for expressions, now in public preview, is designed to assist developers and makers in creating or editing complex expressions using natural language. By simply describing what you want to build and referencing the dynamic data in the flow, Copilot translates your prompts into specific expressions in your Power Automate flow, speeding up development and reducing manual coding time.
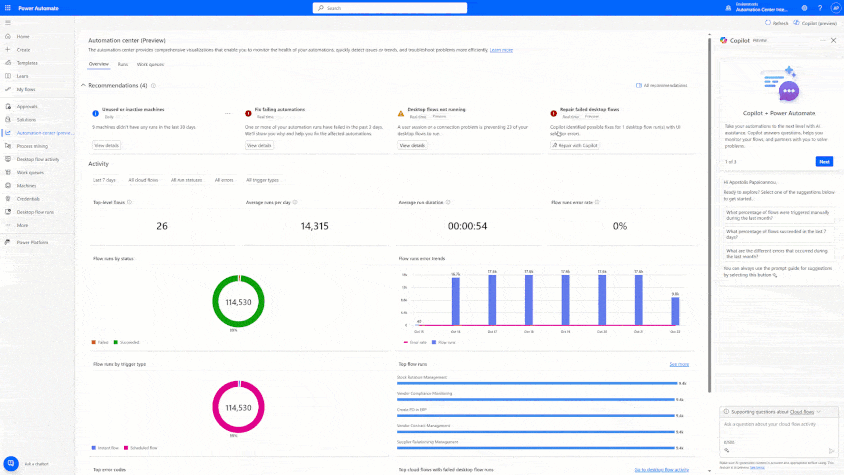
Monitor and manage at scale with new automation center
Automation center, now generally available, is a central hub for efficient monitoring and troubleshooting experiences for automation processes across Power Automate at scale. The automation center provides comprehensive visualizations that enable you to monitor the health of your automations, quickly detect issues or trends, and troubleshoot problems more efficiently.
Whether you’re a developer, operator, Center of Excellence team member, or business analyst, the automation center provides a centralized view of all automation activities. Now generally available, it features a user-friendly interface with dashboards that show recommendations, the health status of work queues, and desktop flow activity. Additionally, new views for execution logs, performance metrics, and integrated agents are now available in public preview.
To learn more and to get started, read our Automation center documentation.
Improve robotic process automation (RPA) reliability using repair with Copilot
Repair with Copilot, now in public preview, simplifies resolving user interface (UI) control issues in both attended and unattended RPA with Power Automate for desktop. By proactively providing solutions to common automation issues, such as notifying the right person in the automation center, repair with Copilot reduces downtime for RPA scenarios.
Example of using repair with Copilot for unattended RPA:
Example of using repair with Copilot for attended RPA:
Start your journey into a new era of automation and AI
Are you ready to bring your organization into the future with the latest AI capabilities in Power Automate? Get started with a free trial or compare plans, join our sessions below at Microsoft Ignite 2024, and read about other exciting announcements for Microsoft Power Platform.
Power Automate
Find the right low-code automation plan for your business.
The “Create and share Copilot agents in SharePoint in a few clicks” is our latest ‘Meet the Makers’ webinar is just around the corner. This is a great opportunity to learn more from our primary product maker lead, CJ Tan. Karuana Gatimu interviews CJ to uncover more about what agents are within SharePoint, how they work, how you can use them within your SharePoint sites, how you can govern them (hint: “they’re a file in SharePoint”), and beyond (hint: Teams).
NOW ON DEMAND | Originally aired: Wednesday, October 16th, 2024, 8am PDT.
In fact, you can watch it right here (embedded below), directly in YouTube (set an alert), or from its dedicated event page within the Tech Community (you can login, RSVP, and add it to your calendar). Plus, check out the new *Microsoft 365 Copilot agents in SharePoint* adoption hub: https://aka.ms/SharePoint/agents.
The “Create and share Copilot agents in SharePoint in a few clicks” is our latest ‘Meet the Makers’ webinar is just around the corner. This is a great opportunity to learn more from our primary product maker lead, CJ Tan. Karuana Gatimu interviews CJ to uncover more about what agents are within SharePoint, how they work, how you can use them within your SharePoint sites, how you can govern them (hint: “they’re a file in SharePoint”), and beyond (hint: Teams).
Tune in | Wednesday, October 16th, 2024, 8:00 AM – 8:30 AM PDT.
In fact, you can watch it right here (embedded below), directly in YouTube (set an alert), or from its dedicated event page within the Tech Community (you can login, RSVP, and add it to your calendar).
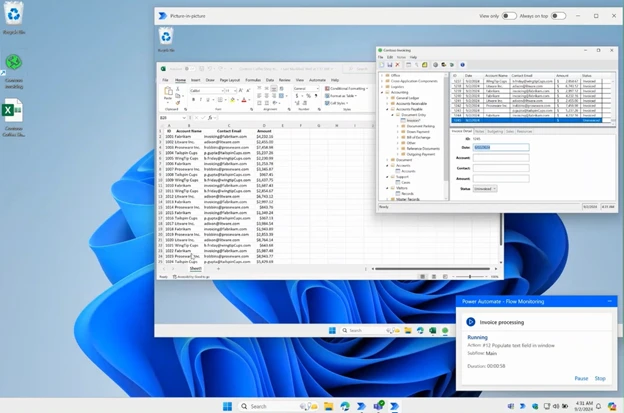
Traditionally, attended automation takes over users’ mouse, keyboard, and screen, halting their current activity. Picture-in-Picture in Power Automate for desktop lets you run attended desktop flows within a virtual window that mirrors your desktop. It allows multitasking, improves user experience, and increases productivity.
You no longer need to wait for the flow to finish before continuing your work!
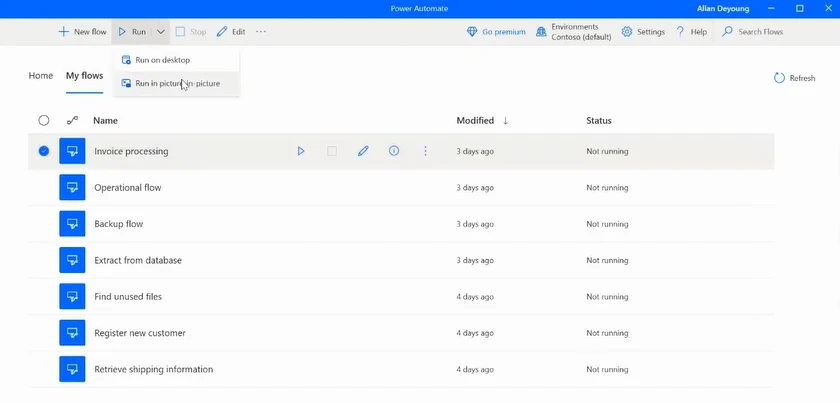
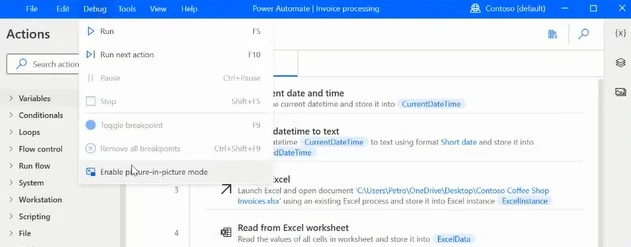
To execute in picture-in-picture mode from the Power Automate console, select your flow, open the command bar, and click on Run in picture-in-picture.
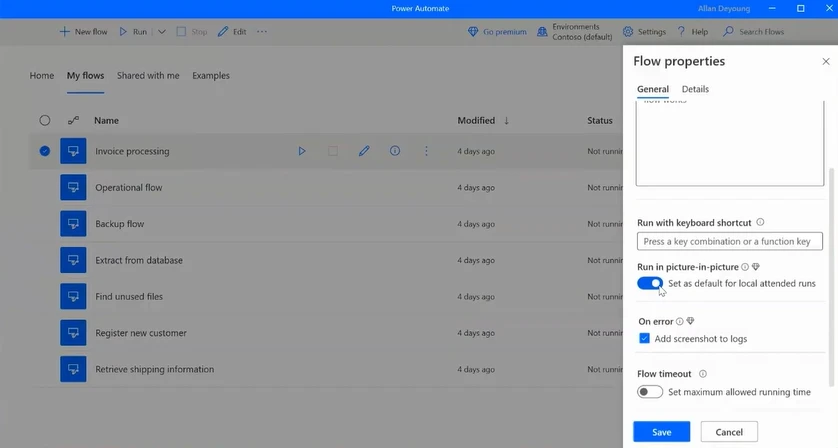
Alternatively, enable the Run in picture-in-picture flow property to ensure your flow always operates in this mode when initiated locally via the console or its Run URL.
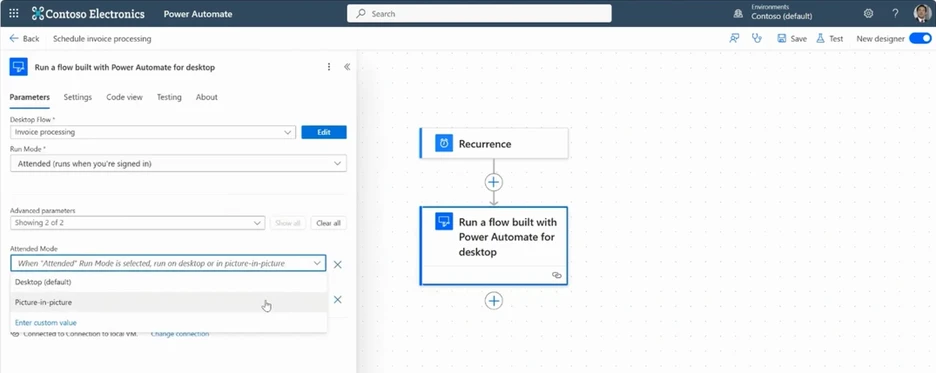
Initiate a desktop flow from a cloud flow using picture-in-picture mode. Use the Run a flow built with Power Automate for desktop cloud action, set Run Mode to Attended, and in the Advanced parameters, choose Attended Mode as Picture-in-picture.
To troubleshoot a desktop flow with picture-in-picture, enable this option in the designer and run your tests. This helps confirm the flow will work seamlessly in production.
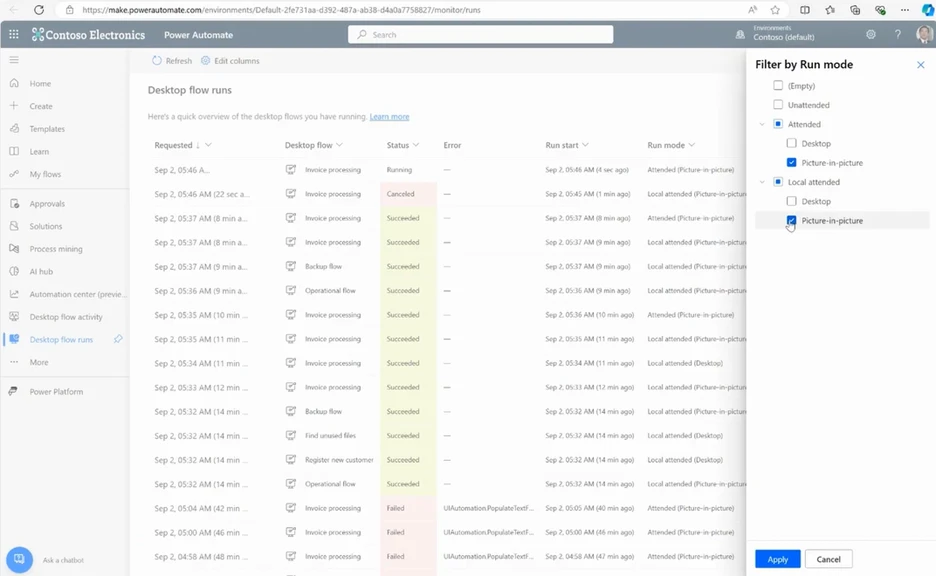
To supervise the flow executions in picture-in-picture mode, navigate to desktop flow runs in the portal and apply a filter by run mode.
The SharePoint brand center introduces a central location for your organization to manage and create brand assets for Microsoft 365. The new Brand center brings together the power of your organization asset libraries and your organization’s brand assets to create and manage product application of your brand into Microsoft 365 products.
SharePoint brand center
Our new SharePoint brand center provides an easy-to-use location for your brand managers (individuals responsible for your organizations brand) to create and manage from a single location. While today’s brand center is primarily focused on SharePoint and Viva Connections, we are excited to be working with multiple teams across Microsoft 365 to integrate their services for organization brand with the brand center and will share a bit more on this topic in this document.
Features and capabilities mentioned in this blog post, are demonstrated in the following video with Cathy Dew(Microsoft) and Vesa Juvonen (Microsoft).
Manage your organization’s brand assets
The Brand center is setup to allow easy management of your organization assets that will be available across Microsoft 365 in one location while also providing a location to create product specific brand application scenarios. The first of these organization assets to be supported in the brand center are brand fonts and brand colors.
Brand fonts
Manage your organization’s brand fonts using the brand fonts library in the SharePoint brand center. As a brand manager uploads your font files into the brand fonts library you will be able to manage which fonts are available in picker experiences. Fonts can be used to define and showcase your brand’s expression.
Manage your organization’s brand colors using the brand color list in the SharePoint brand center. As a brand manager, you can create a list of your brand colors that will be available for picker experiences. Brand colors can be utilized to customize and add personality to your content and experiences.
Add your brand colors in the SharePoint brand center
Images and logos can provide the context, definition, and identity of your content to align with your brand. By utilizing Organization Assets Libraries brand managers can provide the images to help anyone in their organization create content that will reflect the values and beliefs of their brand.
Once you have uploaded your organizations brand fonts into the SharePoint brand center, you will be able to create a font package that can later be applied to your SharePoint sites and Viva Connections desktop experiences. A font package contains the configuration of how you want your fonts to be utilized within your content.
Font packages in the SharePoint brand center
Microsoft has provided a set of 8 font packages that can be used without uploading custom fonts into the Brand center to transform your sites and experiences.
You can include 2 font families into your font package and then select 4 font styles to assign to the font package slots. Headline, title, content, and interactive will determine which fonts and styles are used in your content.
SharePoint includes custom font support for the following areas (September 2024):
Site header – site title
Quick links web part
Hero web part
All web part titles (From Microsoft)
Link web part
Hub header – hub title
Button web part
Sites web part
Countdown timer web part
Organization chart web part
Navigation (hub and site) – links and labels
Dashboard for Viva Connections
People web part
Events web part
Site activity web part
News web part
Image web part
Call to action web part
Highlighted content web part
Weather web part
Page title region
Section heading
Text web part (RTE)
Image gallery web part
World clock web part
Viva Connections includes custom font support for the following areas:
Using color can transform the look of your sites and experiences and we are excited to introduce a new way to create and manage themes within the SharePoint brand center. You can use this new tool to create your organization’s themes without needing PowerShell. Any existing themes created in your tenant via PowerShell will remain available and manageable with PowerShell.
Theme creation in the SharePoint brand center
Creating themes in the SharePoint brand center will make these themes available for your organization to use in the Change the look experience.
Copilot in PowerPoint using your organization’s brand library
When working with Copilot and PowerPoint you have two options to utilize your organization’s brand content in your presentations.
By using Copilot with your organization’s branded templates, you can create presentations that look tailored for your information. Copilot will try it’s best to create beautiful presentations with your content, but by following the best practices outlined in the linked documentation you will have the best chance to be successful.
Once you have a presentation or if you are creating a presentation on your own and would like to use your organization’s images you can also make use of Copilot to select images. With a few simple steps, you can ask Copilot to find images from your organization with a simple conversation.
When creating video content Clipchamp makes it easy to provide all of your organization’s brand assets in one simple package called a Brand kit. It is now possible to create brand kits for your organization and distribute them to your enterprise users. Organization brand kits are available in Clipchamp
SharePoint site templates come in all shapes and sizes, save time and address numerous scenarios, and provide an opportunity to programmatically adhere to your organization’s preferred custom site creation policies.
Using a template when creating SharePoint sites improves efficiency and helps standardize site creation. While templates provide a starting point, they are customizable to adapt them to specific needs of a project or team. As your organization grows, templates make it easier to deploy new sites quickly and efficiently, with governance to ensure features and settings comply with organizational policies or industry regulations.
Select “+ Create site” on the SharePoint start page and choose between a Team site or a Communication site (pictured). Then, select the template that you want to use to create your new site – out-of-the-box or custom.
At their core, SharePoint site templates contain pre-populated pages, page templates, news post templates, themes, and web parts. When you create a site, you choose from either a Communication site or a Team site, and then select the site template that matches your desired outcome. You will find numerous site templates available directly within the service, ready to use. You can create and deploy your own custom site templates – for reuse within your tenant. And take advantage of custom PnP site templates from GitHub – implemented via PowerShell.
This article aims to highlight what’s possible, share what’s new, and clarify where and how you get, deploy, and use SharePoint site templates in Microsoft 365.
Use and adopt SharePoint site templates directly from SharePoint service within Microsoft 365.
Much of what we’ve learned about SharePoint site templates, and developed for use in production, now resides within the Microsoft 365 commercial service – meaning many of the deployable site templates are now available to choose from during the standard, out-of-the-box + Create site process – in SharePoint. These templates make it easy to create a SharePoint site. They demonstrate the art of what’s possible with design-focused layouts and content to save you time (and heartache ).
To get a broad overview of what’s available, review the SharePoint Look Book page – now hosted on adoption.microsoft.com (recently updated; more on the original look book website below). This page highlights the value of each site and breaks down what gets created for you when applying the various templates. And we published an important related Help article to learn how to apply and customize SharePoint site templates, including several guided walkthroughs to familiarize yourself with how to create sites for your organization. Below are two site template examples:
IT help desk (Team site template)
The ‘IT help desk’ template helps manage technical requests, track devices, and share training materials.
Learning central (Communication site template)
The ‘Learning central’ template provides a landing experience for your organization’s learning opportunities.
As with all our other Microsoft-provided site templates, these are automatically available in SharePoint tenants and can be applied by users with site owner permissions or higher. When you create a new site, you will be asked if you’d like to use a template. Select Browse templates to see Microsoft templates and templates from your organization. Additionally, we’ve released the site template history panel. Site owners will be able to access the Site information panel from within Settings, and then select View template history. A history of all site templates previously applied to the site will then be displayed. Selecting an entry will display all site script actions and if they ran successfully or encountered errors. Whether you’re creating a new site or applying a template to an existing site, navigate to Settings and then select Apply a site template.
Custom templates made by your organization using site scripts will display in the site template gallery based on the type of site a user chose to start with – either a communication site or team site. Therefore, it is likely that all the custom site templates will not appear in the site template gallery at once. Soon, users will have the ability to choose to view all custom site templates in the From your organization tab regardless of the type of site chosen.
Site templates provided by your organization will appear in the From your organization tab when selecting a template type. Customization instructions will vary depending on the site template design. Review customization resources below to learn more about site personalization options.
You can create site templates to provide reusable lists, themes, layouts, pages, or custom actions so that your users can quickly build new SharePoint sites with the features they need. Learn more about how to create custom site templates for your organization.
Deploying scenario-based solutions with custom PnP site templates from the GitHub repository.
Explore additional scenario-based solutions with custom PnP* site templates found in the GitHub repository. Several custom site templates exist for you to utilize and are standardized for how to implement into your own environment using PowerShell.
The following video by Microsoft MVP, Paolo Pialorsi, shows you how to provision custom PnP site templates from the GitHub repository, in this instance using the example of the ‘Learning Pathways’ site template. Watch now:
The move away from the original lookbook.microsoft.com website.
Previously, Microsoft maintained a website at lookbook.microsoft.com – where tenant admins could select scenario-based templates and deploy them – from this website directly into their own tenant. The website’s DNS registration has expired and no longer resolves. We understand this is not ideal. Going forward, Microsoft is investing in the SharePoint Look Book page on adoption.microsoft.com; we created a new aka.ms link: aka.ms/SharePointLookBook to take you directly to this page.
The SharePoint Look Book page on adoption.microsoft.com is our primary destination to display SharePoint site templates, including ones you can find in GitHub and provision using PowerShell.
I would like to thank two Microsoft MVPs and community members, Tracy van der Schyff and Marc Anderson – for sharing their thoughts and insights with everyone during this change. We aim to highlight the value of SharePoint site templates and improve Microsoft change management communications. Here are what Tracy and Marc published in support of adding clarity during this update:
In summary, templates serve as a blueprint for creating new SharePoint sites, ensuring that they are set up quickly, consistently, and with best practices in mind. They offer a balance between uniformity and customization, making it easier to manage and scale SharePoint environments within an organization.
We hope the above helps you get informed in all the ways SharePoint site templates help you save time and ground what SharePoint can do for you and your organization – be it through use site templates from within the service, custom site templates you create and deploy, or if you benefit from custom site templates from the GitHub repository.
Discover what’s possible, save time, and remember: Make it your own. SharePoint site templates are a map; you are the trailblazing guide!
Thanks, Mark Kashman, Senior Product Manager – Microsoft
We are excited to introduce thenewSharePoint start experience to make it easy for authors to create personal pages or publish ones to target SharePoint sites.
This feature is in a preview phase to collect initial feedback and enhance the final product.
The new SharePoint start experience is designed to motivate content creators to utilize the platform. By prioritizing a streamlined and user-friendly interface that reduces the number of clicks, it has become simpler to create SharePoint sites and pages. Creators can revisit the start experience hub to polish drafts, review previous work, and track engagement metrics.
Creating SharePoint pages is now significantly simpler:
The updated SharePoint start experience simplifies creating pages. Authors can begin with a blank page or use OOTB templates without selecting a target SharePoint site initially. These pages are saved in the SharePoint pages library in OneDrive for Business. Once drafts are ready, authors can choose to publish them as personal pages or to the intended SharePoint site(s).
Gone are the days when authors couldn’t locate their drafts:
The updated SharePoint start experience serves as a one-stop service for authors to find and manage their drafts or already published pages. From this view, authors can monitor view counts and view a list of individuals who have recently made changes.
Features and capabilities mentioned in this blog post, are demonstrated in the following video with Belle Podeanu (Microsoft) and Vesa Juvonen (Microsoft).
Frequently asked questions
When will this happen?
The feature started rolling out to customers in late July 2024 and will be available gradually worldwide by end of September 2024.
Creators can now reach the new SharePoint start experience via the top banner on the current SharePoint home.
What do you need to prepare?
You do not need to do anything to prepare for this update, but you may want to let your users know about this improvement.
What is next?
A left-hand navigation bar to help authors locate recently accessed SharePoint sites where they have created, edited, or published pages.
More email-ready web parts for personal pages.
Create SharePoint pages from custom templates right from the SharePoint start experience.
and more…
Thanks for reading. Please enjoy making beautiful pages with new SharePoint start experience and let us know any feedback or questions in the comments.
We are thrilled to announce that authors will now have the option to remove the title area, which is no longer mandatory at the top of a page. This title area is being rebranded as a Banner web part with new layouts, allowing you to add one or more banners to any column of a page, including a full-width section.
Now, with this flexibility, you can choose to have no banners, one banner, or multiple banners on a SharePoint page. If you decide to remove the title area, you can choose a Banner to restore the title.
New Banner Layouts:
We’ve added two new layouts for Banner: Author and Fade. It works in each type of section, including Full-width section, One column, Two columns, Three columns, and One-third.
New layouts:
Banner in Full-width Section and Three column section:
Title on the command bar
The first banner at the top of the page (in a full-width section) is considered as the title (H1), which automatically synchronizes to the page Title on the command bar at the top of the screen. Additional banners will function as headings in the page. The page Title on the command bar is visible in edit mode only.
Note: You must enter a page title in the first banner or on the command bar before you can Save and close or Publish the page.
Features and capabilities mentioned in this blog post, are demonstrated in the following video with Tina Chen (Microsoft) and Vesa Juvonen (Microsoft).
WCAG 2.1 Compliance:
How do you meet WCAG 2.1 criteria without a visible H1 title? If you opt not to have a title on the page, a hidden H1 element in HTML will ensure accessibility, with the H1 content derived from the page title on the command bar.
The title area in existing SharePoint page templates has been updated, meaning when you create a new page from a SharePoint page template, you will see a Banner at the top. In some situations, the old title area will not rename automatically, but you can still select new layout options from the toolbox:
When you edit an existing page with a title created before this rollout, you can remove or keep the Title Area.
When you make a copy of an existing page with a title created before this rollout, you can remove or keep the Title Area in the copied page.
When you create a new page using a custom template with a Title Area, you can remove or keep the Title Area in the new page.
General Availability (Worldwide, GCC, GCC High and DoD): We began rolling out in early July 2024 and rollout was completed by the end of August 2024. This message is associated with Microsoft 365 Roadmap ID 386904.
How will this affect your organization?
With this update, SharePoint Page and News authors can set section background color or image, making it an appealing experience.
What do you need to prepare?
This rollout will happen automatically by the specified dates with no admin action required before the rollout. You may want to notify your users about this change and update any relevant documentation as appropriate.
How does it look in emails?
The pre-rollout title areas and Banners will be supported in email. When users send a Page or News as email, the layout will change slightly: the banner image will appear above the banner text.
What is next?
The new Banner is available in Design Ideas Private Preview.
Enhanced page templates experiences with new capabilities like Banner new layouts, Section Background and more.
Thanks for reading. Please enjoy making beautiful pages and let us know any feedback or questions in the comments.