The enterprise journey toward operational excellence is ongoing, and the adoption of hyperautomation has become a pivotal milestone. Microsoft Power Platform stands at the forefront of this movement, offering a suite of tools that transform the way businesses approach digital transformation at scale – and Microsoft Power Automate is a key accelerator.
Introducing a new data governance feature for desktop flows that allows administrators to control when desktop flow run action logs are captured or disable them completely
We are excited to announce that we are currently rolling out the new forms experience in Microsoft Lists for Microsoft 365 work and school. Our goal is to make it easier to collect and gather information directly into your lists – saving you time and effort. Thus, we are excited to launch a new forms experience built right inside Microsoft Lists – rolling out now. Note: This relates to Microsoft 365 roadmap ID: 124865.
Let’s start with a short ‘how it works’ video tour of the new forms experience in Microsoft Lists:
With a modern design experience, Lists forms can be created quickly and shared via a link to anyone within your organization. The recipient focuses on filling out the details without seeing your full list. All submitted responses appear immediately as new list items. From there, it’s just like any other item in a list – and get the benefits of formatting, automations, and commenting.
Lists forms work well to track recruitment, manage orders, intake customer issues, file expenses, and more. For example, an event organizer can create and manage multiple forms for the same list tracking attendees, feedback, logistics and more – each form collecting elements of the full list.
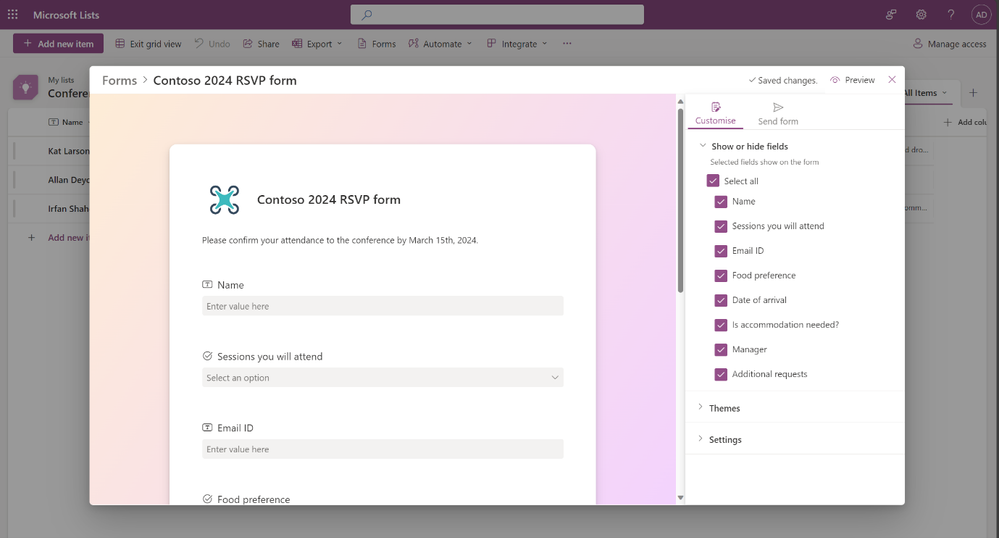
The new Forms experience in Microsoft Lists – showing how you add and edit columns as segments to collect various pieces of information.
Take advantage of the built-in design capabilities to make your forms more relevant, professional, and beautiful. You , choose from several themes, add descriptions and user-friendly questions instead of the default column names – without affecting the list itself.
Form designers can hide fields that are not required and add new fields directly. You can build the whole schema of a list right inside the form designer if you do desire.
 The new Forms experience in Microsoft Lists – showing how you can select pre-made themes or create your own style.
As a form creator, you can create a form by clicking Forms on the command bar at the top of a list. This section lets you make new forms or access existing forms created by other list collaborators. When you create a new form, the form builder opens and uses the fields from the list schema. You can add or show/hide fields on the form. You can choose to change the theme and share the form with a link. You can also stop accepting responses on a form at any time. NOTE: The Forms section is hidden from people who do not have permission to edit the list.
 The new Forms experience in Microsoft Lists – showing what a recipient sees when they click on the Form share link – they simply, and only, see the form as you designed it.
Anyone in your organization can access the form through a link – click Share link and include it in an email, chat, or as a link on a SharePoint page. When they submit their responses (as shown above), the information goes directly to your list as a new list item (as shown below). From there, it’s just like any other item in a list – to take advantage of formatting, rules, and maybe you’ll even feel compelled to add a Ratings column and rate those submissions as they come in.
 Once a new item is submitted from the form, you will see it appear on your list as a new list item.
And, not to worry about where your recipients receive the form link. They can view the form, put in their details, and submit it on a desktop or mobile browser. The form submitter must be logged into Microsoft 365. And the good news, they cannot see the entirety of the list or gain any extra permissions by filling out and submitting the form.
We are working to bring more value to this forms experience and would deeply appreciate feedback and suggestions from you. Don’t be shy; use the Feedback button at the top of the page when looking at a List to let us know what you think. Submit your feature ideas at any time to the Microsoft Lists – Feedback Portal. And coming soon, a new Help article to help you through all the steps on how to create a form in Microsoft Lists.
I’ll be demo’ing the new Microsoft Lists Forms experience on the upcoming Microsoft 365 & Power Platform community call: Tuesday, April 16th, 2024, at 8:00 AM PDT; it’s free to join and it’s a great community to learn from. See you there.
To learn more about Microsoft Lists, please visit our dedicated Lists resource center. And come say hi to the team and ask questions at the Microsoft 365 Community Conference (Orlando, FL | April 30 – May 2, 2024).
Thank you, Sahil Baid, Senior product manager – Microsoft Lists
Power Automate for desktop comes with new additions in 2024 March’s release, including new functionalities for Power Fx enabled desktop flows, a new Excel action, and more.
General availability of auto-claim for Power Automate licenses, a feature that simplifies license management for admins and enhances the user experience.
Power Automate for desktop’s March release includes major updates for Power Fx enabled desktop flows (preview). IntelliSense capabilities, a revamped variable picker and a dedicated function picker assist makers in creating complex functions with minimal effort.
In this article:
SharePoint Server Subscription Edition Version 24H1 feature update
Today we’re delighted to share the latest steps in our evergreen journey for SharePoint Server with the release of the Version 24H1 feature update for SharePoint Server Subscription Edition. This feature update brings greater customization capabilities to our modern UX, simplifies Open ID Connect configuration, and opens up a new channel for on-premises customers to share their feedback directly with the SharePoint Server product team.
Search vertical customization in modern search results
Long-time SharePoint Server customers are aware of the breadth of functionality available in the classic SharePoint UX. This power can also be its Achilles’ heel, overwhelming users with options as they carry out their day-to-day work. Microsoft introduced the modern UX to address these concerns, simplifying the SharePoint experience and making it easier for users to perform their most common tasks.
While the modern UX has been a welcome redesign of the SharePoint experience, Microsoft recognizes that there are opportunities to further enhance the modern UX without negating its advantages in ease of use. Search verticals are a good example of this.
Search verticals provide a way for users to quickly filter the types of search results returned for a query, such as by only returning documents, news posts, and so on. Customers have the flexibility to customize which search verticals are present in the classic search results page. However, search verticals couldn’t be customized in the modern search results page. Customers were locked into using the default search verticals that were built-in to SharePoint Server Subscription Edition.
This limitation is removed starting with the SharePoint Server Subscription Edition Version 24H1 feature update. Customers now have the ability to add custom search verticals to their modern search results page at both the site and organization level. This will help users to quickly find what they’re looking for while staying in the simplified modern UX.
OpenID Connect (OIDC) integration with SharePoint certificate management
The initial RTM release of SharePoint Server Subscription Edition introduced several new features that were designed to improve the security and manageability of SharePoint Server.
One of those new features was OpenID Connect (OIDC) authentication support. OpenID Connect is a modern authentication protocol that makes it easy to integrate applications and devices with an organization’s identity and authentication management solutions to better meet their evolving security and compliance needs. For example, organizations can enforce authentication policies such as multifactor authentication (MFA), conditional access policies based on device compliance, and more.
Another new feature was SSL/TLS certificate management. This feature allows farm administrators to directly manage the deployment and lifecycle of SSL/TLS certificates in their SharePoint farms. This includes importing and exporting certificates into SharePoint, deploying those certificates to each server in their SharePoint farm, assigning certificates to web applications or other SharePoint resources, and automatic notifications when certificates are approaching their expiration date.
SharePoint Server Subscription Edition’s OIDC implementation includes a nonce cookie certificate, which is part of the infrastructure that ensures OIDC authentication tokens are secure. However, this nonce cookie certificate wasn’t managed by the SharePoint certificate management feature. As a result, customers had to manually deploy, configure, and monitor the expiration of this certificate on each server in their SharePoint farm.
Starting with the SharePoint Server Subscription Edition Version 24H1 feature update, the OpenID Connect (OIDC) nonce cookie certificate is now integrated into the SharePoint certificate management experience. SharePoint farm administrators can use the SharePoint certificate management feature to manage the full lifecycle of the OIDC nonce cookie certificate, including deployment of the certificate to all servers in the farm and automatic configuration of the necessary permissions. A new SharePoint Health Analyzer health rule has also been added to notify administrators if the nonce cookie certificate isn’t being managed through SharePoint certificate management.
Customer feedback experience in SharePoint Central Administration
Microsoft aspires to bring the best possible experiences for users around the world through its innovative product offerings. Customer feedback is critical to ensure we’re meeting the needs of our customers. That’s why we’re happy to announce a new way for customers to share their feedback with Microsoft from directly in the product.
Starting with the SharePoint Server Subscription Edition Version 24H1 feature update, an optional survey will appear to SharePoint farm administrators from time to time when they visit the SharePoint Central Administration site. The feedback shared through this survey will go directly to the SharePoint Server product team to help us improve the product to meet your needs. Customers can disable this customer feedback experience on a per-user or farm-wide basis if they so choose.
For more information about these new feature experiences, see New and improved features in SharePoint Server Subscription Edition Version 24H1.
End of support reminder for SharePoint 2016 and SharePoint 2019
It may be hard to believe, but SharePoint Server 2019 reached the end of Mainstream Support on January 9th of this year and is now in Extended Support. This means that it’s no longer eligible to receive non-security quality updates. Going forward, it’s only eligible to receive security updates.
In fact, the end of support for SharePoint Server 2016 and SharePoint Server 2019 is just over 2 years away. On July 14, 2026, both of these products will reach end of support. After that date, these products will no longer be eligible to receive support of any kind, including security updates.
If you’re currently using either of these products, now is the perfect time to start thinking about your future. There are two paths forward to remain supported:
- Migrate to SharePoint in Microsoft 365, which is our recommended approach. SharePoint in Microsoft 365 is our premier SharePoint experience and gives customers access to all of the latest productivity, security, and usability investments that Microsoft is making now and in the future.
- Upgrade to SharePoint Server Subscription Edition, which is the latest version of SharePoint Server. SharePoint Server Subscription Edition is based on our modern engineering and support lifecycle, which means we’ll continue to introduce new feature experiences and capabilities for it on a regular basis through feature updates, focusing on security and key customer scenarios. Note that while we’ll continue to make investments in SharePoint Server Subscription Edition, the scope of those investments will be much smaller compared to SharePoint in Microsoft 365, so the feature gap between them will only increase over time. For this reason, we encourage customers to migrate what they can to SharePoint in Microsoft 365 and only keep what they must in SharePoint Server Subscription Edition.
Summary
We hope SharePoint Server Subscription Edition customers take this opportunity to explore the new feature experiences we’ve introduced in the Version 24H1 feature update. We look forward to sharing even more new feature experiences with you in our next feature update, coming in the second half of this year.
And for SharePoint 2016 and SharePoint 2019 customers, don’t wait to begin planning your path forward to remain supported once these products reach end of support. Planning now will give you plenty of time to evaluate your options to either migrate to the cloud or remain on-premises, and begin executing on your decision. Whichever option you choose, Microsoft stands behind you with products and services designed to meet your needs today and in the future.
Microsoft Loop is a powerful productivity tool that enables collaborative work and flexible information organization. It provides teams with a shared workspace where they can create and collaborate on content such as notes, tasks, and files. Loop integrates seamlessly with Microsoft Power Automate, allowing users to automate repetitive tasks. By creating rules, you can trigger specific actions based on conditions, saving time and effort. For instance, you can set up a rule to send an email notification to your team whenever a new task is added to a project table in Loop. Overall, Loop enhances teamwork and streamlines communication by combining a shared workspace with automated workflows.

Building an Automation Solution with Nintex and PowerApps
Modern organisations often look for efficient ways to automate their workflows and processes. Nintex and PowerApps are two powerful tools that enable businesses to create robust automation solutions. Below, I will outline the step-by-step process for building an automation solution using these technologies.
- Define the Problem and Objectives
The first step in creating an automation solution is understanding the process you wish to streamline. Ask the following questions:
- What specific tasks or workflows need automation?
- What are the expected outcomes or benefits?
- Who will be the primary users of the solution?
Clearly defining the problem and objectives ensures alignment and provides a roadmap for the development process.
- Analyse the Workflow
Break down the process into its individual steps. Identify:
- Inputs: What data or information is required at each stage of the workflow?
- Outputs: What results or actions should the process generate?
- Pain Points: Where are the inefficiencies or bottlenecks?
Document these details to design the automation solution effectively.
- Design the Solution Architecture
Map out the architecture of your solution, incorporating both Nintex and PowerApps:
- Nintex: Use Nintex workflows for process automation and orchestration. Nintex can manage complex workflows, approvals, and document generation.
- PowerApps: Build a user-friendly interface using PowerApps to interact with the automated processes. PowerApps can act as the front end for data input and user interaction
Clearly define how the tools will integrate and interact to achieve the desired objectives.
- Develop Nintex Workflows
Nintex workflows are designed to automate repetitive tasks and manage approval processes. Follow these steps:
- Access Nintex within your SharePoint or Nintex platform environment.
- Create a new workflow and select the appropriate template.
- Configure workflow actions, such as data collection, condition checks, approvals, notifications, and integrations with external systems.
- Test the workflow to ensure it functions as intended.
Nintex provides a drag-and-drop interface, making it easy to configure workflows even for users with limited technical expertise.
- Build the PowerApps Application
PowerApps allows you to create custom apps without extensive coding knowledge. Here’s how:
- Open PowerApps and select “Create an App.”
- Choose a blank canvas or a template based on your use case.
- Design the app interface, including input fields, buttons, and navigation elements.
- Connect the app to the data sources and Nintex workflows using connectors.
- Test the app to ensure seamless interaction with the workflows.
PowerApps also supports mobile-friendly designs, enabling users to interact with your automation solution on the go.
- Integrate Nintex and PowerApps
To ensure both tools work together seamlessly:
- Use APIs or connectors to establish communication between PowerApps and Nintex workflows.
- Configure triggers in PowerApps to initiate workflows based on user actions (e.g., form submissions, button clicks).
- Ensure data flows correctly between the app and workflows, maintaining accuracy and efficiency.
- Test and Refine the Solution
Before deploying the automation solution:
- Perform thorough testing of the workflows and application.
- Collect feedback from potential users and stakeholders.
- Refine the solution based on feedback and test results.
Testing ensures that the solution is robust, user-friendly, and aligned with organisational needs.
- Deploy and Monitor
Once the solution is finalised:
- Deploy it within your organisation.
- Train users on how to interact with the app and workflows.
- Monitor the solution’s performance and gather metrics to identify areas for improvement.
Regular monitoring helps ensure the solution remains effective and continues to deliver value.
Conclusion
By combining Nintex’s powerful workflow automation capabilities with PowerApps’ user-friendly app development platform, organisations can create customised solutions to automate processes, enhance productivity, and reduce errors. Following the steps outlined above ensures a methodical approach to designing and implementing an effective automation solution.
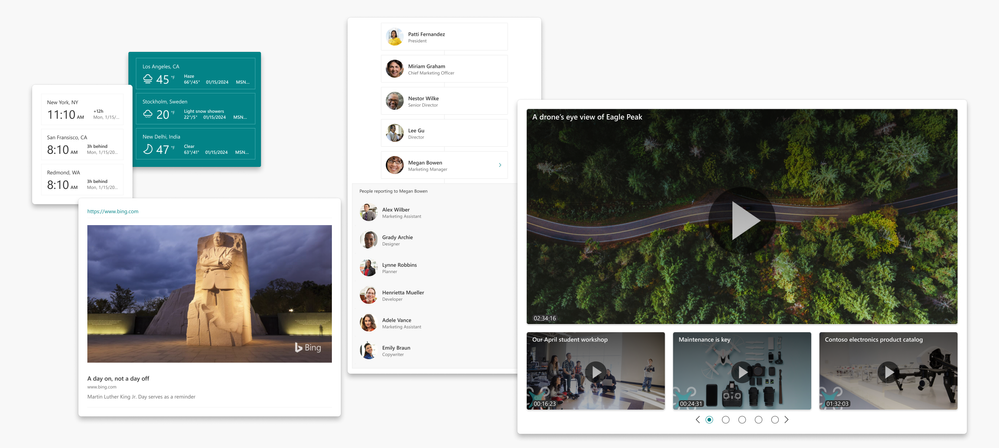
Examples of new webparts added to the SharePoint Web UI Kit in the Figma Community.
Our SharePoint Web UI kit in Figma has been updated with some great new additions! This update includes more web parts so you have more options when designing your SharePoint sites and pages. The new update (v2.2) includes:
New web parts and page elements:
- Page title
- Section header
- Divider
- Link
- Organization chart
- Stream
- Weather
- World clock
Additional updates:
- Moved shared components to single location
- Re-organized templates section
-
We are currently seeking feedback from both 1) those who have used the SharePoint Web UI Kit and 2) those who have not yet had the opportunity but have a need for this toolkit. Your input is highly valued and will help us improve the UI Kit. You can answer the anonymous survey here, which should only take 5 minutes to complete: https://forms.office.com/r/aduAA8jMN8
To get started with our updated UI kit, simply download the latest version from the Figma Microsoft Community website: SharePoint Web UI Kit – Figma.
Why use the Figma SharePoint Web UI kit?
Figma is a subscription-based application that is the industry standard tool for web design. It provides an alternative to designing sites and pages outside of SharePoint. Figma does not build the pages in SharePoint, so once you finalize a design in Figma, you will need to build it in SharePoint. You should evaluate if Figma is the right solution for mocking up sites and pages for SharePoint.
Design without organizational limitations
This UI kit provides SharePoint users with another tool in their toolbox. While building a page in SharePoint is easy, we wanted to provide the ability to mockup sites and pages. It allows you to explore different design options for your site without the limitation of admin privileges and tenant restrictions, and doesn’t expose organization data.
Figma mockups provide a quick snapshot of SharePoint updates which business stakeholders can use to plan and make decisions. They can provide appropriate requirements and use this UI kit in collaboration with their design team to iterate in the life cycle of your organization’s intranet.
Share designs with ease
This UI kit provides you with page layouts and a selection of web parts to allow you to mockup and share new ideas across organizations and companies. Figma gives you the flexibility of reviewing and sharing your designs without having to spend time and resources creating it in SharePoint. Figma also allows you to download your designs into easy-to-use formats that can be used in documentation and presentations.
Learn more at https://www.figma.com/
Community feedback
As mentioned above, please consider filling out our anonymous survey to share feedback from both 1) those who have used the SharePoint Web UI Kit and 2) those who have not yet had the opportunity but have a need for this toolkit: https://forms.office.com/r/aduAA8jMN8
We’d love to know what’s working for you and what you’d like to see next. Alternatively, you can leave a comment on the Figma SharePoint Web UI kit page or by visiting the SharePoint Community.
We hope you enjoy our latest update and look forward to seeing what you create with it!


